The Profile Management module allows users to securely change their account password.

Getting Started
Welcome to DineSpace – Complete Restaurant Management Solution
DineSpace is a comprehensive, multi-tenant restaurant management system built with Laravel 11, designed to help restaurants manage their operations efficiently. The system includes features for menu management, order processing, table reservations, staff management, billing, comprehensive reporting, and customer-facing ordering system.
Thank you for choosing DineSpace Restaurant Management System. This documentation will help you understand the system features, install the application, and configure it according to your needs.
Follow the sections below to get started with your restaurant management system.
Technologies Used
Technologies Used
- Version: Laravel 11.31
- Language: PHP ^8.2
- Architecture: MVC (Model-View-Controller) Pattern
- Database Layer: Eloquent ORM
- Caching: Laravel Cache with Filesystem Adapter
- PDF Generation: barryvdh/laravel-dompdf ^3.1
- QR Code Generation: simplesoftwareio/simple-qrcode ^4.2
Blade Templates + Tailwind CSS (Frontend)
- Blade Templates: Laravel Blade templating engine
- Tailwind CSS ^3.4.13 – Utility-first CSS framework
- Vite ^6.0 – Lightning-fast development tooling
- Laravel Vite Plugin ^1.0 – Laravel and Vite integration
- Autoprefixer ^10.4.20 – Automatic vendor prefixing for CSS
- jQuery 3.7.1 – DOM manipulation and AJAX requests
- Flowbite – Date picker and UI components
- ApexCharts – Interactive charts and dashboard analytics
- DataTables – Sorting, filtering, and pagination for tables
- SheetJS (xlsx) – Excel file export functionality
- Font Awesome 6.7.2 – Icon library
- Utilities: Toastr (Notifications), Swiper (Carousels), jQuery Validation (Form validation)
Project Structure
Backend (Laravel)
DineSpace follows a standard Laravel MVC architecture with a multi-tenant, multi-panel structure, which promotes clean separation between admin, restaurant, and customer functionalities. The application is organized into three main panels, each with its own controllers, models, views, and business logic.
Each panel encapsulates its own models, controllers, services, views, middleware, and route definitions, ensuring clear separation of concerns and maintainability.
Core Modules
- Admin: Super admin panel for managing restaurants, packages, pricing plans, payment history, site settings, and system configuration
- Restaurant: Complete restaurant operations including dashboard, menu management, orders, POS, KOT, tables, reservations, staff, customers, payments, reports, and settings
- Customer: Customer-facing interface for browsing menus, placing orders, making reservations, order tracking, cart management, and account management
- Auth: Authentication and authorization for all three panels (Admin, Restaurant, Customer) with separate login/register flows
- Billing: Package subscription management, payment processing, invoice generation, and offline payment requests
- Branch: Multi-branch management with branch-specific settings, data filtering, and branch switching functionality
- Menu: Menu builder with categories, items, items add-ons, add-ons sets, pricing, availability, and item types (Veg/Non-Veg)
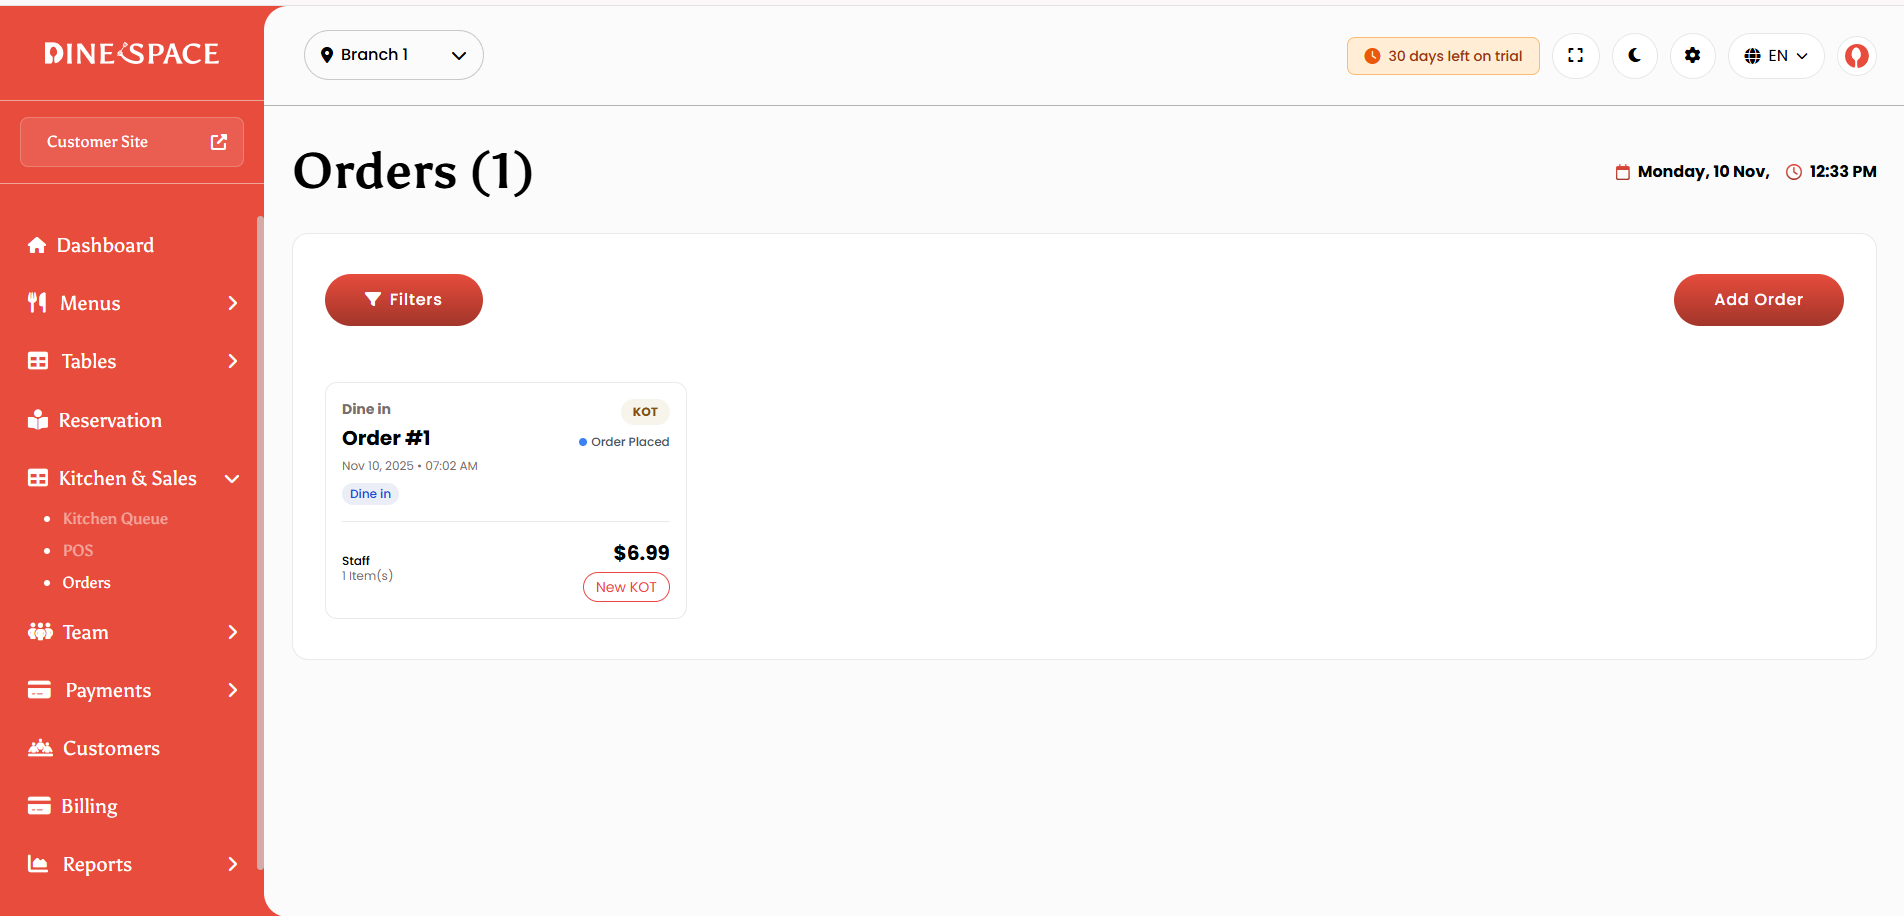
- Order: Order lifecycle management for dine-in, takeaway, delivery, and online orders with status tracking
- POS: Point-of-Sale system for counter operations with quick order creation, payment processing, and receipt printing
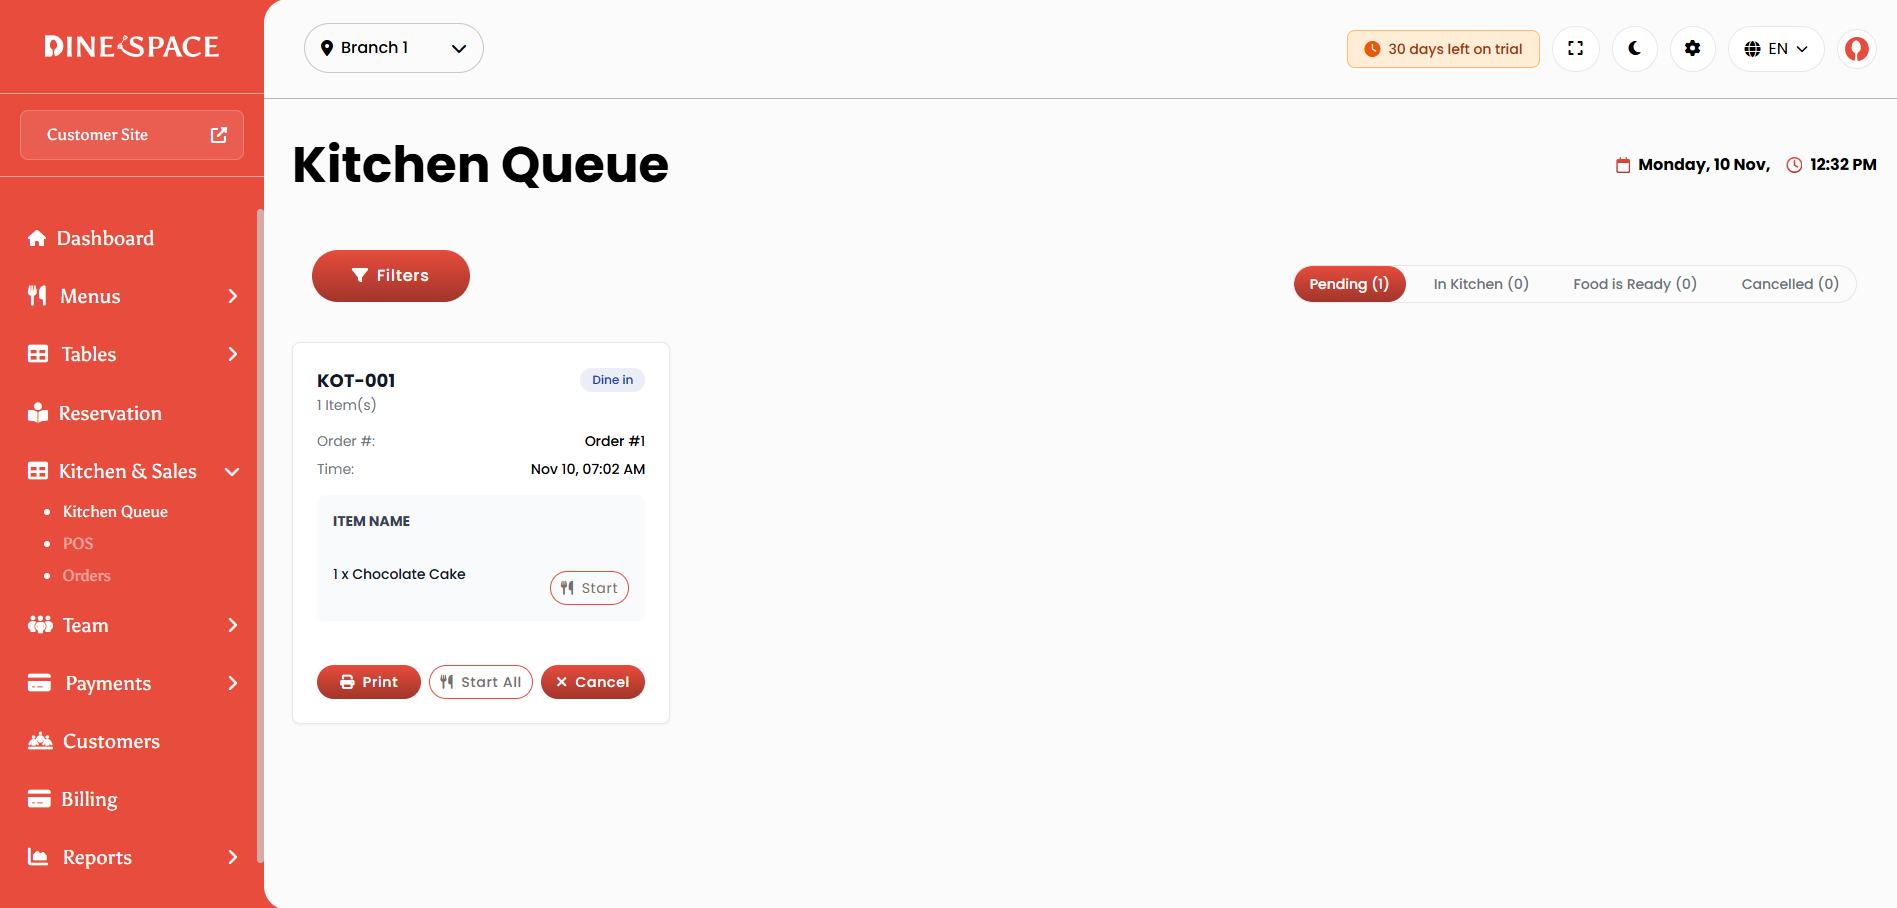
- KOT: Kitchen Order Ticket system with real-time queue management, status updates, and item-wise tracking
- Table: Dining area and table management with QR code generation, table status tracking, and capacity management
- Reservation: Table reservation system with time slot management, table assignment, and reservation status tracking
- Payment: Payment processing with multiple gateways (Stripe, PayPal, Cash, QR Code, Offline), payment history, and due payments
- Staff: Staff management with role-based permissions, custom roles, and access control
- Customer Management: Customer database management with order history, reservation history, and customer statistics
- Coupon: Coupon management with discount types, validity periods, usage limits, and minimum order amounts
- Settings: Comprehensive settings management for restaurant information, app preferences, payment gateways, reservations, taxes, currencies, and themes
- Profile: User profile management for admin, restaurant, and customer panels
- Installation: Step-by-step installation wizard for restaurant onboarding
Frontend (Blade Templates + Tailwind CSS)
The frontend is built with Laravel Blade templating engine and Tailwind CSS as the UI framework. It leverages modern JavaScript libraries and tooling for enhanced interactivity and user experience.
Key Highlights:
- Blade Templates: Server-side rendering with reusable components and template inheritance for consistent layout management.
- Tailwind CSS: Utility-first CSS framework for responsive, mobile-first UI design and rapid styling.
- jQuery: Handles DOM manipulation, event handling, and AJAX-based dynamic interactions.
- Multi-panel Views: Separate view directories for Admin, Restaurant, Customer, and Front panels for better code organization.
- Dark Mode Support: Built-in theme switcher for toggling between dark and light modes.
- Responsive Design: Fully mobile-first layout using Tailwind’s responsive utilities.
- Form Validation: Client-side validation powered by the jQuery Validation plugin.
- Icon System: Font Awesome 6.7.2 integration for a comprehensive icon library.
View Organization:
- admin/ – Super Admin panel views for managing dashboards, restaurants, packages, and system settings.
- restaurant/ – Restaurant panel views covering menus, orders, POS, KOT, tables, reservations, staff, customers, and reports.
- customer/ – Customer-facing views for browsing menus, managing carts, checkout, orders, and profile.
- front/ – Public-facing website views such as landing page, features, pricing, and FAQs.
Package Included
DineSpace comes with a complete set of features organized into three main panels:
- Super Admin Panel (Master Dashboard)
- Complete system administration
- Restaurant managementPackage and pricing management
- Payment gateway configuration
- Site settings
- Language and currency management
- Restaurant Panel
- Complete restaurant operations management
- Multi-branch support
- POS system
- Order and KOT management
- Menu and inventory management
- Staff and customer management
- Reports and analytics
- Billing and subscription management
- Customer Panel
- Customer-facing ordering interface
- Table-based ordering via QR codes
- Online ordering and delivery
- Reservation system
- Order tracking
- Account management
Installation
System Requirements
- Server Requirements:
- PHP 8.2 or higher
- MySQL 5.7 or higher
- Recommended PHP Limits:
- max_execution_time: 300
- memory_limit: 256M
- post_max_size: 50M
- upload_max_filesize: 20M
Manual Installation
DineSpace manual installation is easy with the following steps:
- Create a folder and upload
files- Create a folder inside your local server (htdocs for XAMPP or www for
WAMP). - Unzip the package. Copy all files and folders inside the upload folder
and paste to the created folder.
- Create a folder inside your local server (htdocs for XAMPP or www for
- Create a MySQL database and import
- Create a database and import dinespace.sql
from the unzipped package. - Steps to import:
- Under Databases, enter the database name and click Create.
- Select the database.
- Click Import in the top menu.
-
Click Browse and select dinespace.sql.
- Click Go to import the file.
- A success message will appear when the import is complete.
- Create a database and import dinespace.sql
- Set Base URL and Database in .env file
- Open the .env file in the root folder with a text editor.
- Set your APP_URL here:
APP_URL=http://localhost/ - Set your database credentials here:
- DB_CONNECTION=mysql
- DB_HOST=127.0.0.1
- DB_PORT=3306
- DB_DATABASE=your_database_name
- DB_USERNAME=your_db_username
- DB_PASSWORD=your_db_password
- Set your APP_URL here:
- Open the .env file in the root folder with a text editor.
Installation via FTP Client
DineSpace server installation via FTP is easy with the following steps:
- Upload files via FTP
- Unzip the package on your computer.
- Connect to your FTP server.
- Upload all files and folders from the package upload folder to the server root directory (e.g., public_html).
- Create database and import
- Create a database (Click here for how to create) and import dinespace.sql following the same steps as in manual installation.
- Set Base URL and Database on server
- Open .env file in the root of server files with a text editor.
- Set APP_URL and database credentials as above.
- Save the file and upload it to the server.
Login
Super Admin Login
After successful installation, you can access the Super Admin Panel and Website using the links provided below:
- Website : http://localhost/xyz (where xyz – your project folder name)
http://xyz.com (where xyz.com – your domain name)
- Super Admin panel : http://localhost/xyz/master-dashboard(where xyz – your project folder name)
http://xyz.com (where xyz.com – your domain name)
-
- Username: admin
- Password: Password
Restaurant Panel Register & Login
Before accessing the Restaurant Panel, each restaurant must first register either through the Super Admin or by visiting the registration page using the following URL:
- http://localhost/xyz/restaurant/register (where xyz – your project folder name)
- http://xyz.com (where xyz.com – your domain name)
Login URL:
- http://localhost/xyz/restaurant(where xyz – your project folder name)
Super Admin Panel
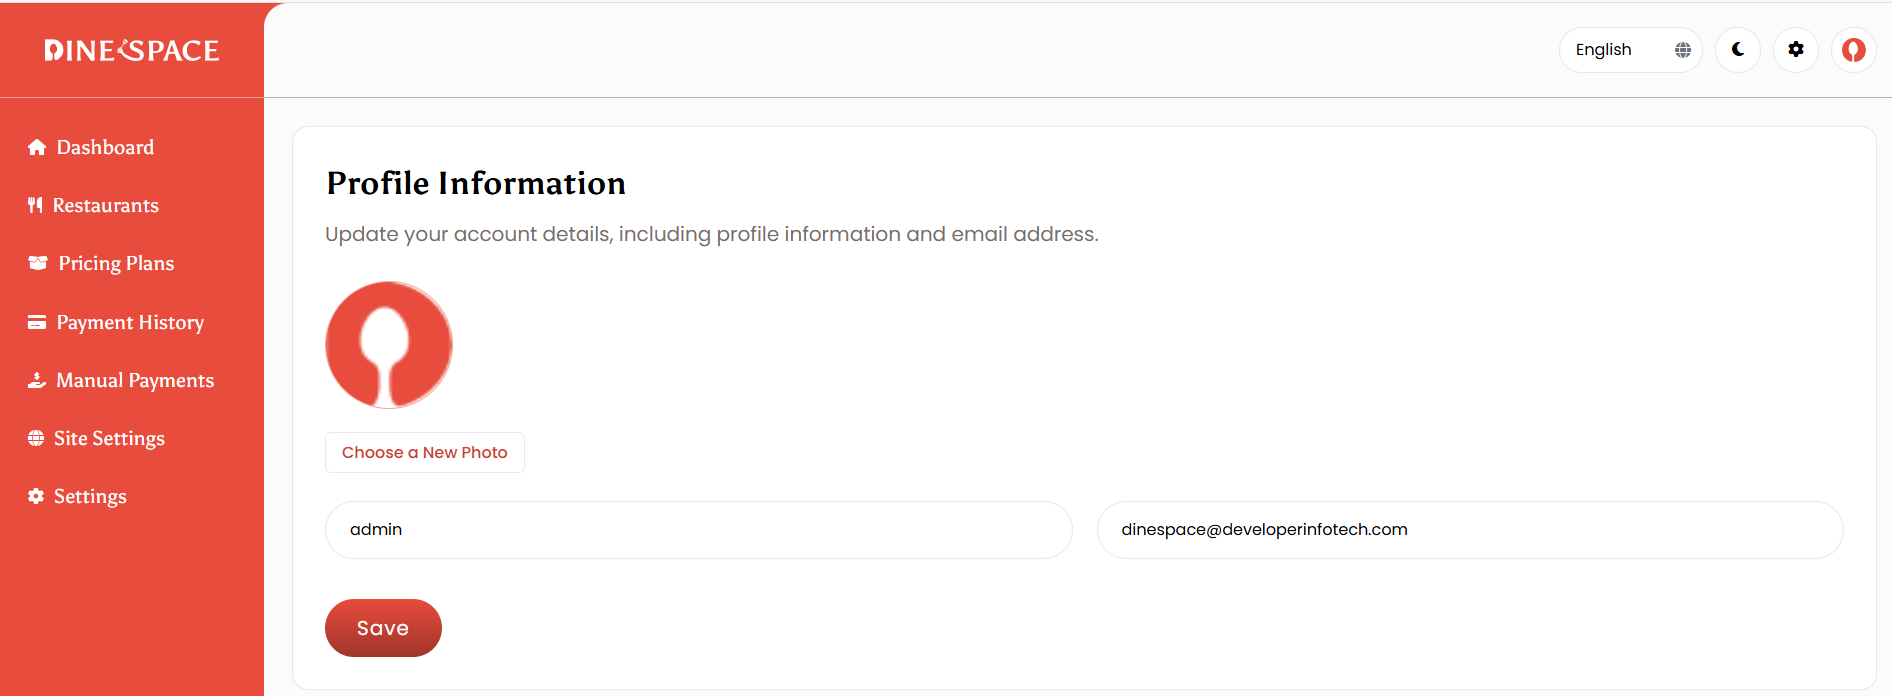
Profile
Profile Information
From here you can update your account details, including profile information and email address.
Change Password
You can update your password at any time. For better protection, make sure to use a strong and secure password.

Dashboard
The Dashboard provides a comprehensive overview of the system’s key metrics and activities. It displays essential statistics such as the total number of restaurants, active subscriptions, and overall revenue analytics, helping administrators monitor performance and manage operations efficiently from a single view.
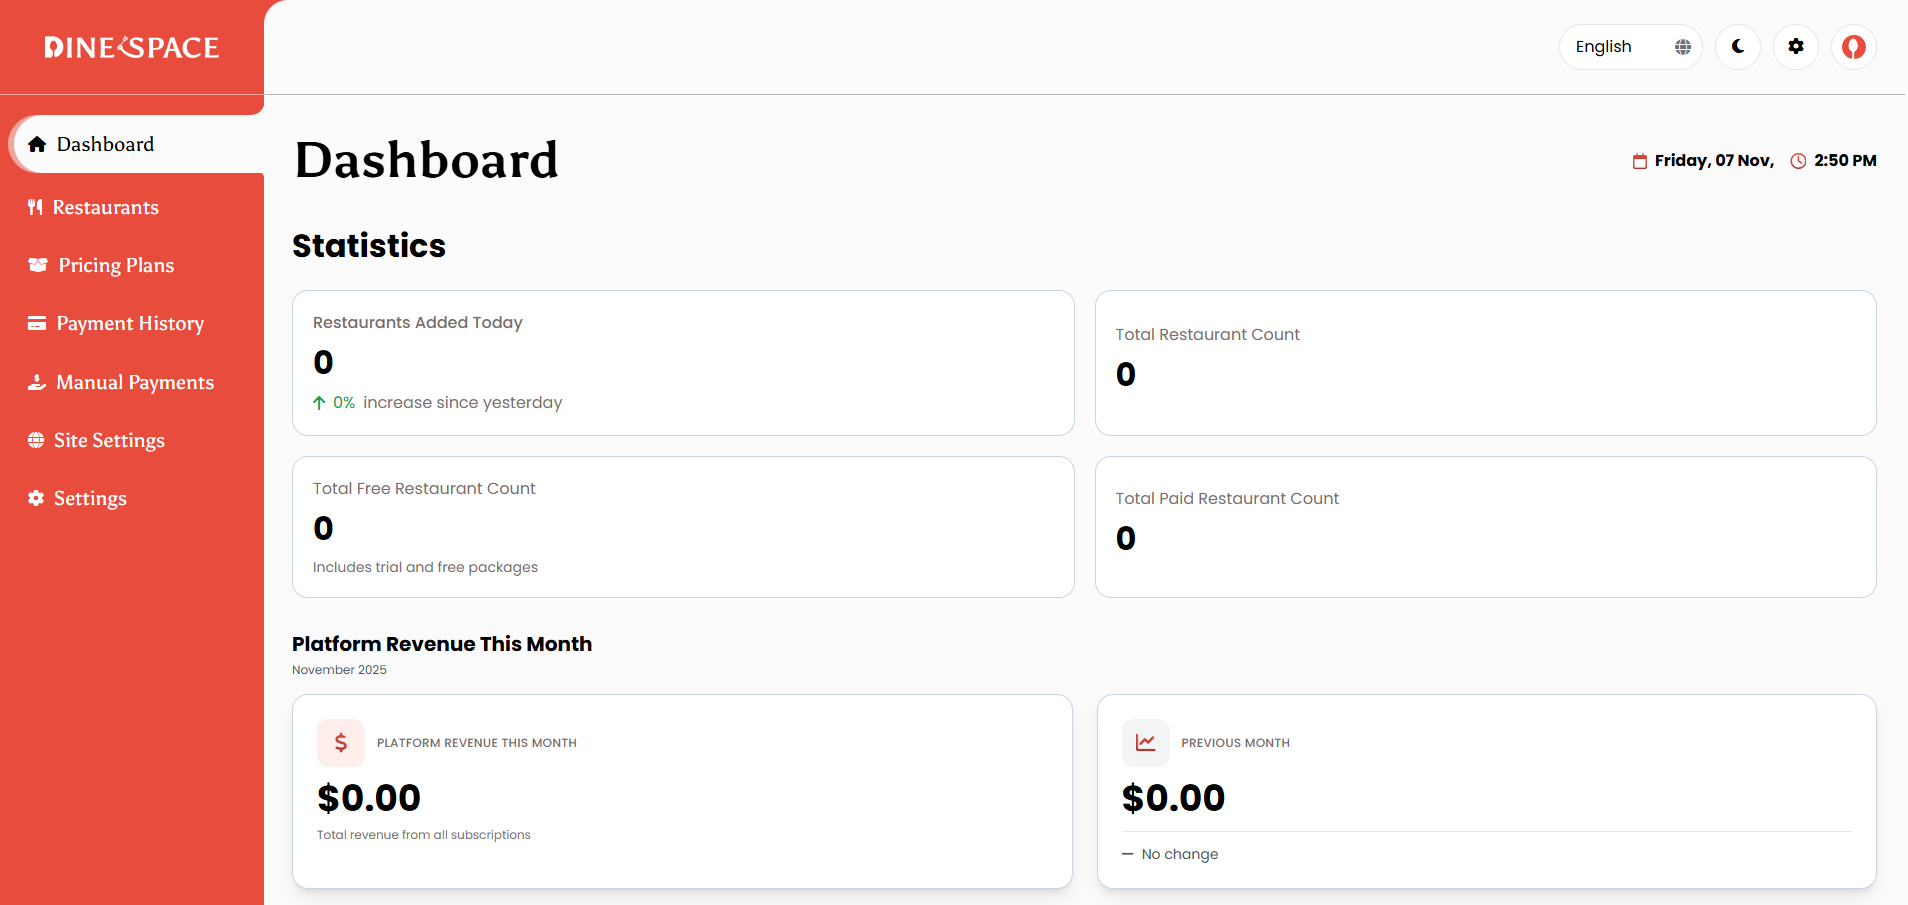
Key Statistics Section:
The Statistics section displays critical metrics at a glance:
- Restaurants Added Today: Shows the number of new restaurants registered today, along with a percentage increase or decrease compared to yesterday. This helps track daily growth trends.
- Total Restaurant Count: Displays the complete count of all registered restaurants in the system.
- Total Free Restaurant Count: Shows restaurants using free packages or trial subscriptions.
- Total Paid Restaurant Count: Displays restaurants with active paid subscriptions.
Platform Revenue Section:
This section provides detailed revenue insights for the current month:
- Platform Revenue This Month: Displays the total revenue generated from all subscriptions in the current month, with a clear breakdown of total revenue from all subscriptions.
- Previous Month Comparison: Shows revenue from the previous month with a trend indicator (increased, decreased, or no change) to help track revenue growth patterns.
- Subscription Type Breakdown: Displays the count of active subscriptions by type:
- Trial Subscriptions: Restaurants currently on trial periods
- Monthly Plans: Active monthly subscription plans
- Annual Plans: Active yearly subscription plans
- Lifetime Access: Lifetime package purchases made this month
- Top Revenue Packages: Lists the top-performing packages by revenue this month, showing package name, number of purchases, and total revenue generated.
Platform Overview Section:
Comprehensive platform-wide metrics and status breakdowns.
- Total Revenue: Cumulative revenue from all completed subscription payments across the platform.
- Total Restaurants: Complete count of all registered restaurants in the system.
- Total Subscriptions: Number of completed payment transactions.
- Total Users: Combined count of restaurants and staff members across the platform.
Status Breakdowns:
- Subscription Status: Visual breakdown showing
- Active – Restaurants with active paid subscriptions
- Trial – Restaurants currently in trial period
- Inactive – Restaurants with expired, cancelled, or suspended subscriptions
- Restaurant Status: Overview of restaurant account status
- Active – Restaurants with active accounts
- Inactive – Restaurants with deactivated accounts
- Monthly Growth – Percentage growth in restaurant registrations for the current month
Recent Data Section:
Provides real-time insights into recent platform activity.
- Recent Restaurants: Shows the 5 most recently registered restaurants with
- Restaurant name, Location (country), Package information, Subscription status (Active, Trial, or Inactive), Registration time (relative time display)
- Recent Activity: Displays the 10 most recent platform activities including
- New restaurant registrations, Payment transactions, Subscription updates, User activities, Activity descriptions with timestamps, Payment amounts when applicable
- Activity Summary: Quick overview cards showing
- New Restaurants count, Recent Payments count, Subscription Updates count, New Users count
Restaurant
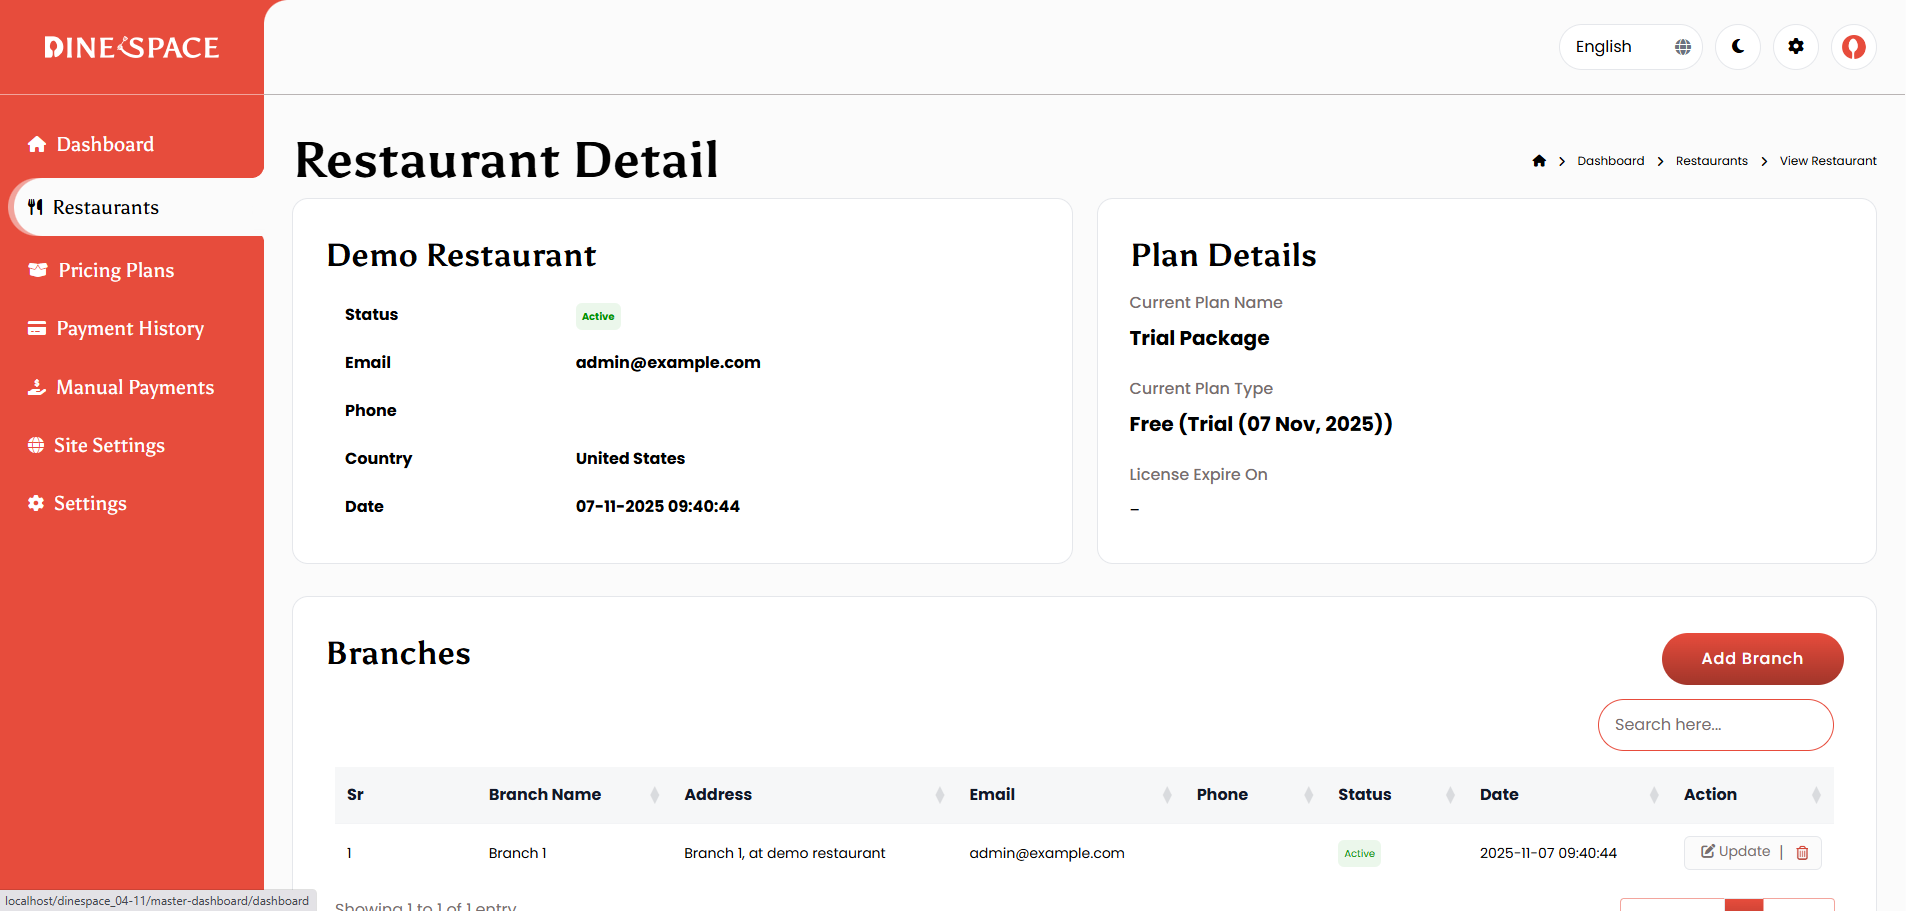
The Restaurant Management module allows the Super Admin to efficiently manage all registered restaurants in the system. Admins can add, edit, activate/deactivate, and view restaurants, along with their payment history and package details.
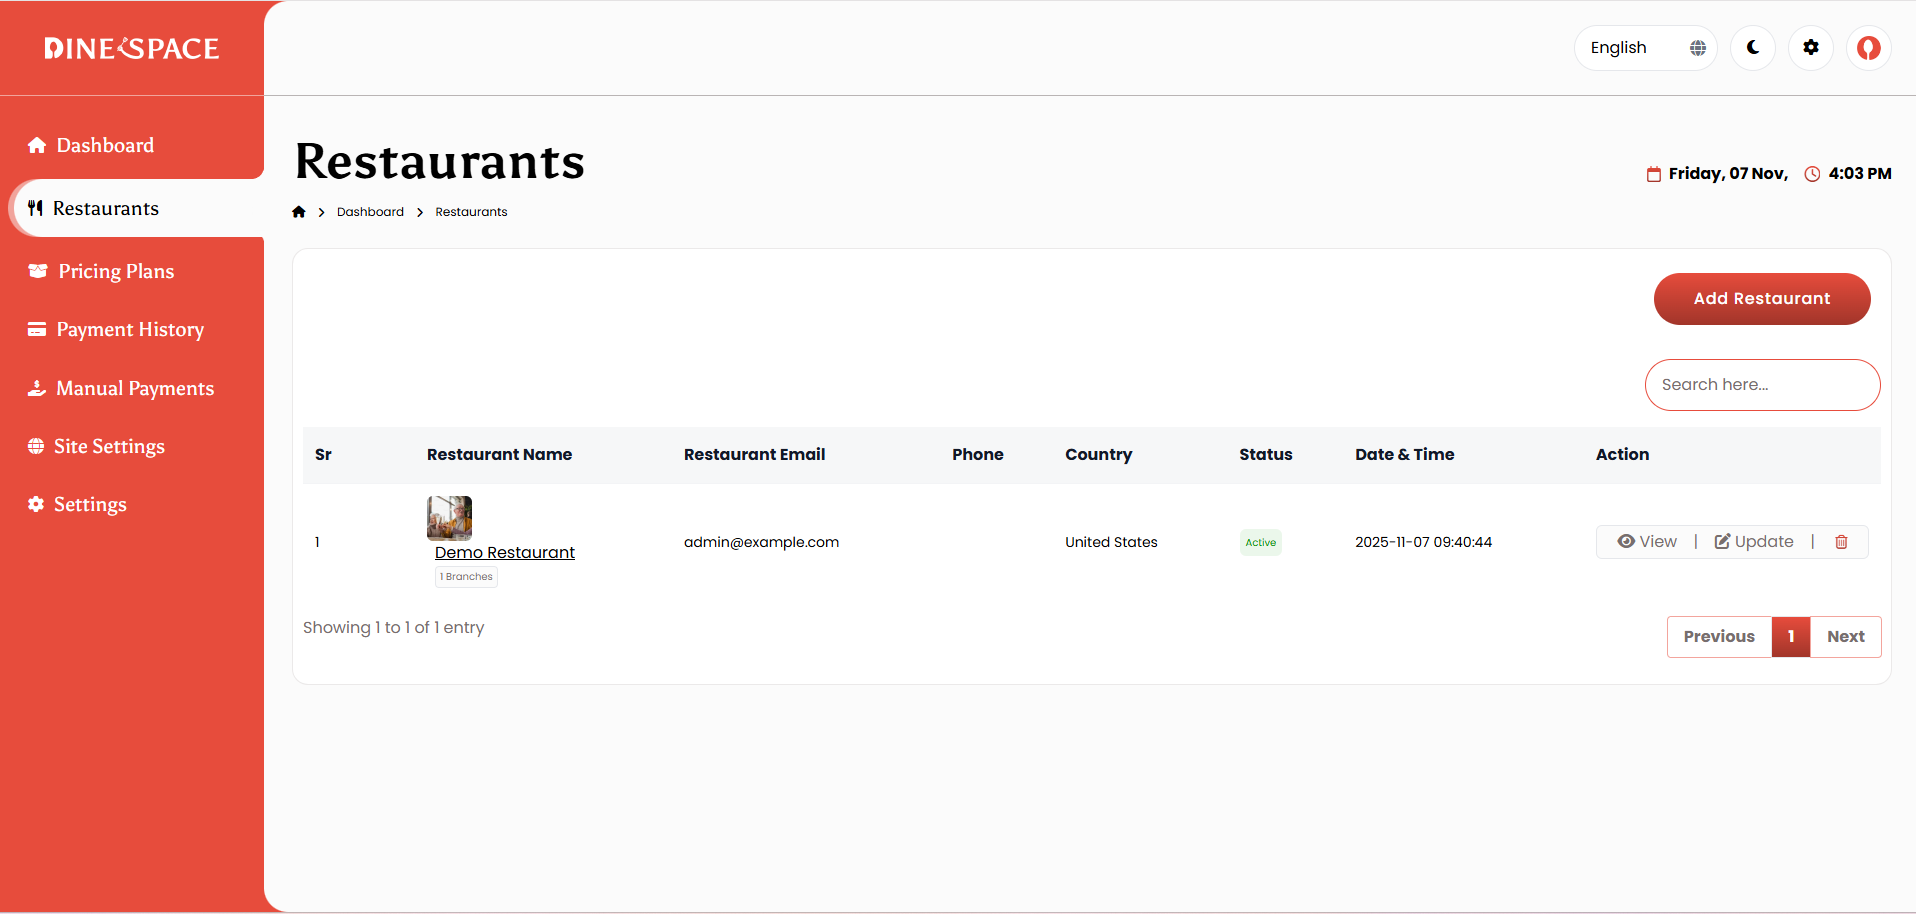
Each restaurant’s profile includes key information such as the name, contact details, address, business hours, status, package information, and registration date, providing a clear overview of all restaurant activities in one place.
Additionally, the module includes Branch Management, which enables the Super Admin to handle multiple branches for each restaurant. Admins can create new branches, edit branch details, and view a complete list of branches, ensuring smooth and efficient management of multi-location restaurants.
Key Actions
Add Restaurant
Create a new restaurant by entering basic details such as name, email, phone, country, and password.
A unique restaurant slug is automatically generated, and a trial plan is assigned by default.
Edit Restaurant
Update restaurant information at any time, including contact details, address, and account status.
Delete Restaurant
Remove a restaurant and its related data from the system when no longer needed.
Activate/Deactivate Restaurant
Control restaurant access to the platform by toggling their active status.
Branch Management
Manage multiple branches under each restaurant.
- Add or edit branch details such as name, address, email, and phone.
- View all branches linked to a restaurant.
- Activate or deactivate individual branches.
Subscription & Payment Tracking
Track each restaurant’s subscription activity, including:
- Current plan name and status (Active, Trial, Expired, or Cancelled)
- Billing cycle and next payment date
- Full payment history with invoice access
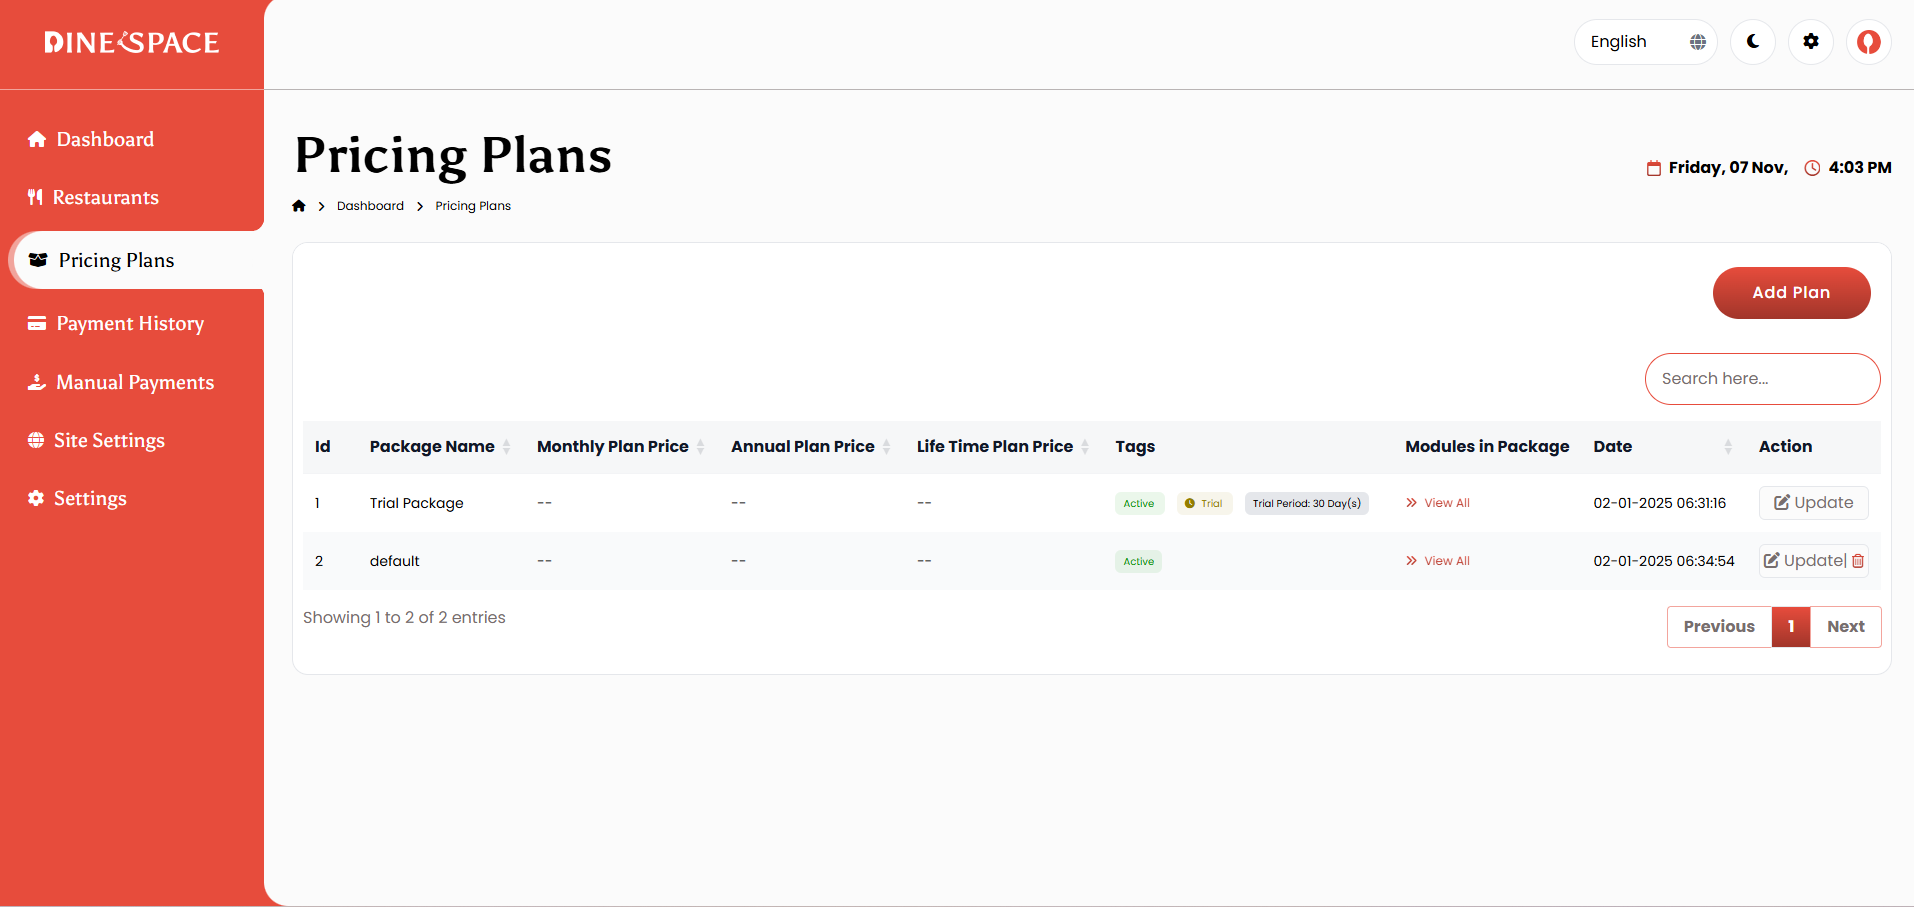
Pricing Plans
The Pricing Plans Management module allows the Super Admin to create and manage subscription packages for restaurants. Admins can add new packages, edit existing ones, and configure essential details such as pricing, duration (monthly or yearly), and package features. This module also supports multi-currency pricing and allows administrators to activate or deactivate packages as needed.
Each package can be customized with detailed configuration options, including the package name and description, price and currency, duration type, and feature list. The system also provides package comparison functionality, helping users easily evaluate and choose the plan that best fits their business needs.
Key Actions
Add New Plan
Create a new pricing plan by entering details such as name, description, price, duration type, and features.
Admins can set monthly, yearly, or lifetime prices and assign modules or additional features included in the package.
Edit Plan
Update any plan details, including pricing, description, duration type, status, and module permissions. Changes apply to new subscriptions automatically.
Delete Plan
Remove an existing package from the system when no longer required. (Trial packages cannot be deleted.)
Activate/Deactivate Plan
Control which plans are visible and available for new subscriptions. Active plans appear in the pricing list, while inactive plans are hidden but preserved in the system.
Plan Details
Each pricing plan includes the following configurable fields:
- Package Name and Description – Displayed name and overview of plan features.
- Plan Type – Free or Paid.
- Billing Options – Monthly, Yearly, or Lifetime.
- Pricing and Currency – Multi-currency support for flexible billing.
- Trial Configuration – Optional trial duration and message.
- Module Permissions – Select which system modules are included in the package.
- Additional Features – Add optional extra features per plan.
- Display Settings – Recommended badge, private visibility, and sort order.
Package List View
All packages are displayed in a structured table view showing:
- Package Name
- Monthly, Annual, and Lifetime Prices
- Package Tags (Active, Recommended, Private, Trial)
- Included Modules
- Created Date
- Status
- Actions (Edit, Delete, Activate/Deactivate)
Subscription & Feature Control
Each package determines the modules and features restaurants can access.
Admins can:
- Assign modules such as Menu Management, Orders, POS, Reservations, etc.
Payment History
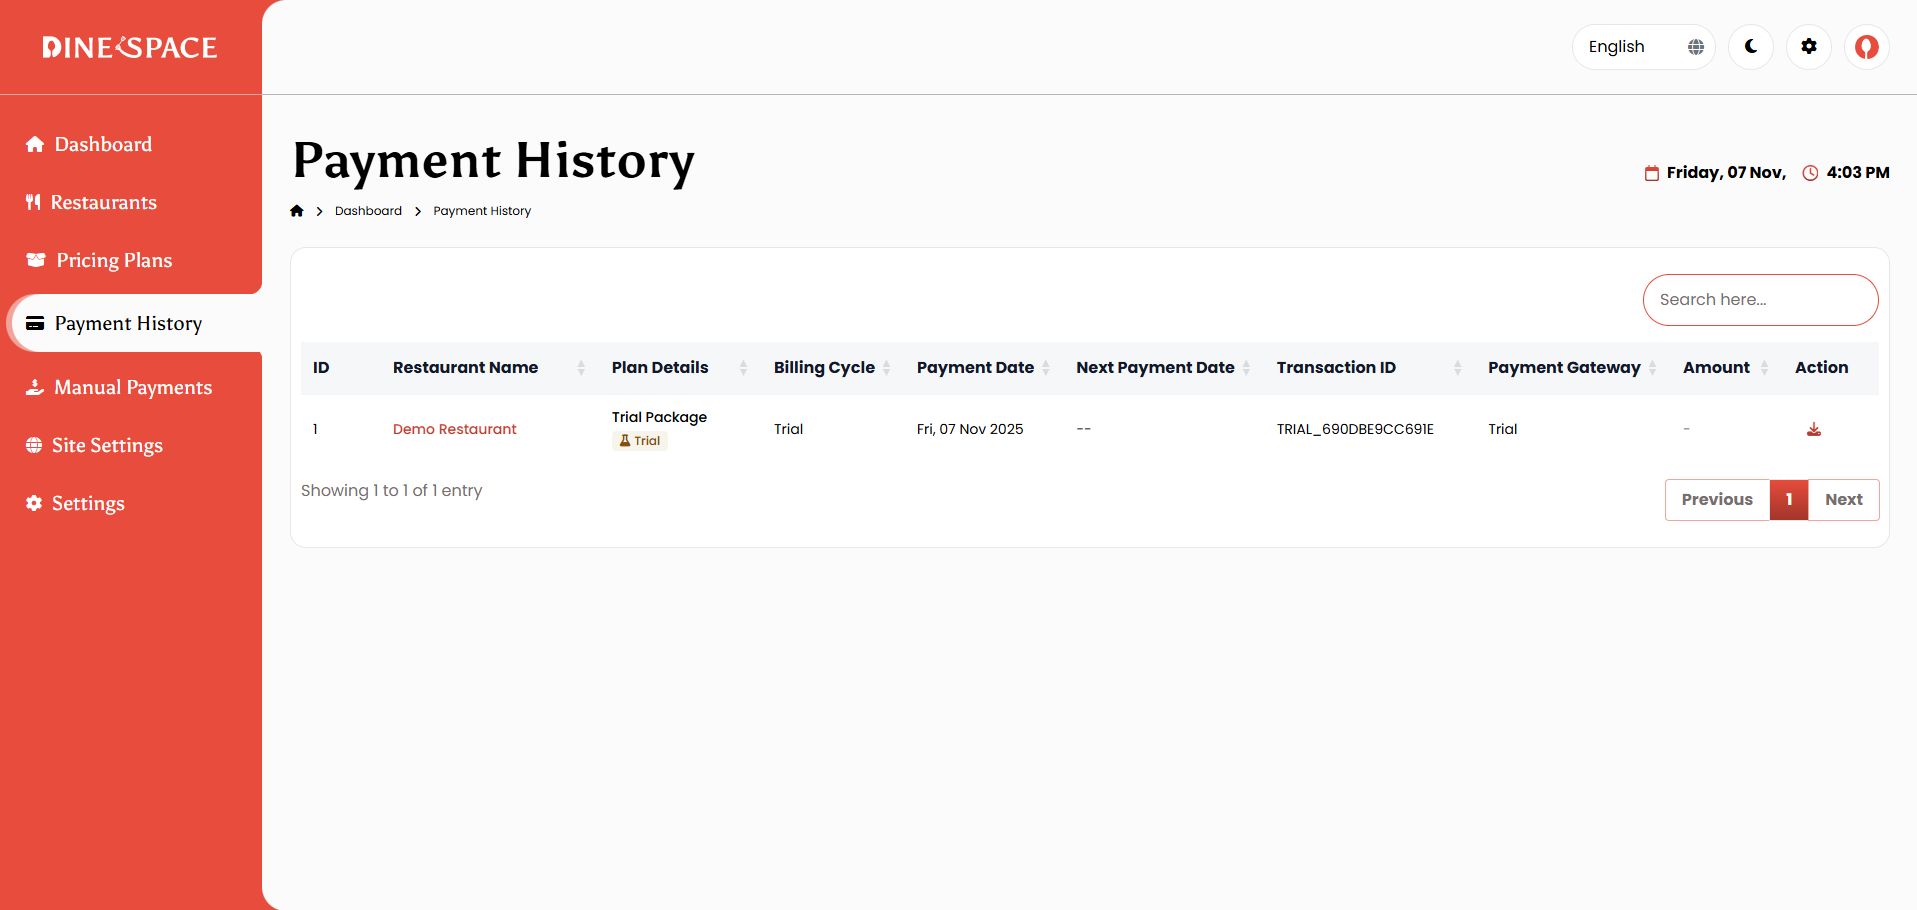
The Payment History module lets the Super Admin view and manage all restaurant payment transactions. Admins can filter payments by restaurant, date, or status, view details, download invoices, and track payment methods and subscription history for accurate financial management.
Manual Payments
The Manual Payments Management module allows the Super Admin to handle offline payment requests for package purchases. Through this module, admins can view, approve, or reject payment requests and update their status as needed. It also provides access to detailed payment information and enables management of offline packages, including the ability to suspend or reactivate them. This ensures smooth processing and tracking of manual transactions within the system.
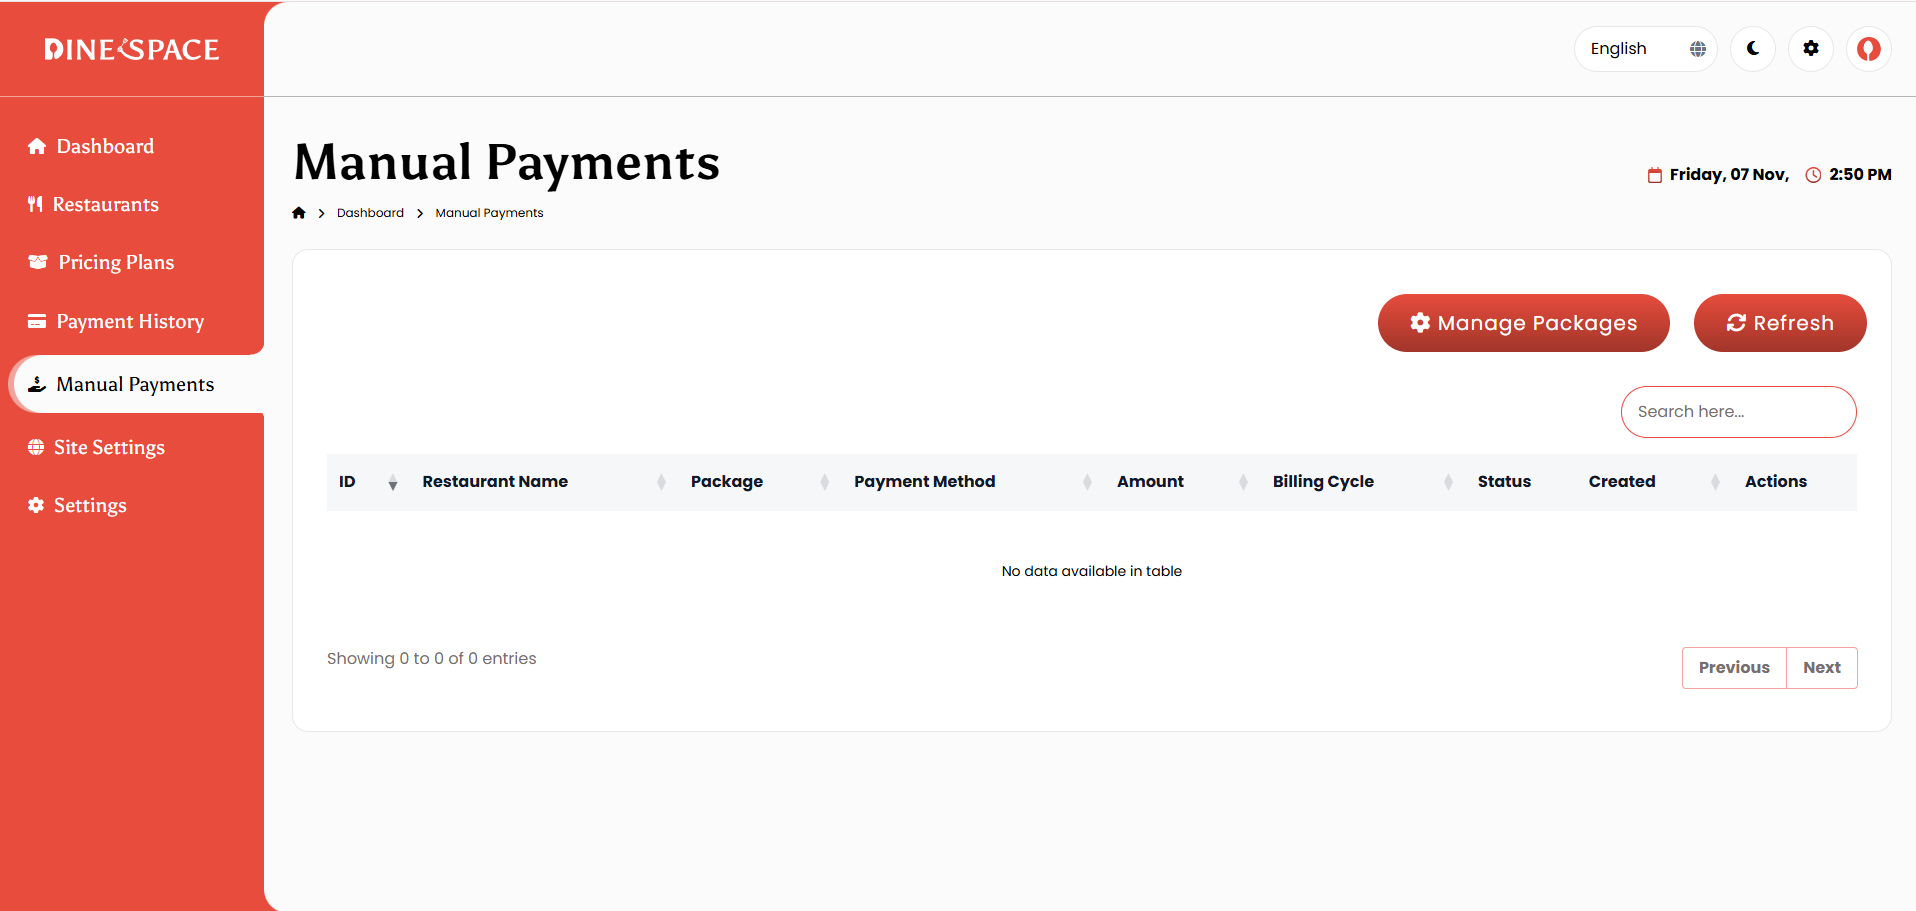
Payment Requests
All offline payment requests are displayed in a list with key details such as restaurant name, package, amount, billing cycle, and payment method.
Admins can:
- View full request details
- Approve or reject payments
- Add admin notes for records
Approving Payments
When a payment is approved:
- The selected package is automatically activated for the restaurant
- Subscription dates are set based on the billing cycle
- A payment record is added to the payment history
- The restaurant is notified of the approval
Rejecting Payments
If a payment is rejected:
- The request status changes to Rejected
- The restaurant is notified
- Admins can add notes explaining the reason for rejection
- The package remains inactive
Managing Offline Packages
Admins can view and manage all approved offline packages.
Available actions include:
- Suspend Package – Temporarily disable an active package due to payment issues or policy reasons
- Reactivate Package – Restore a suspended package once the issue is resolved
Each package shows its restaurant name, plan details, status, and billing information.
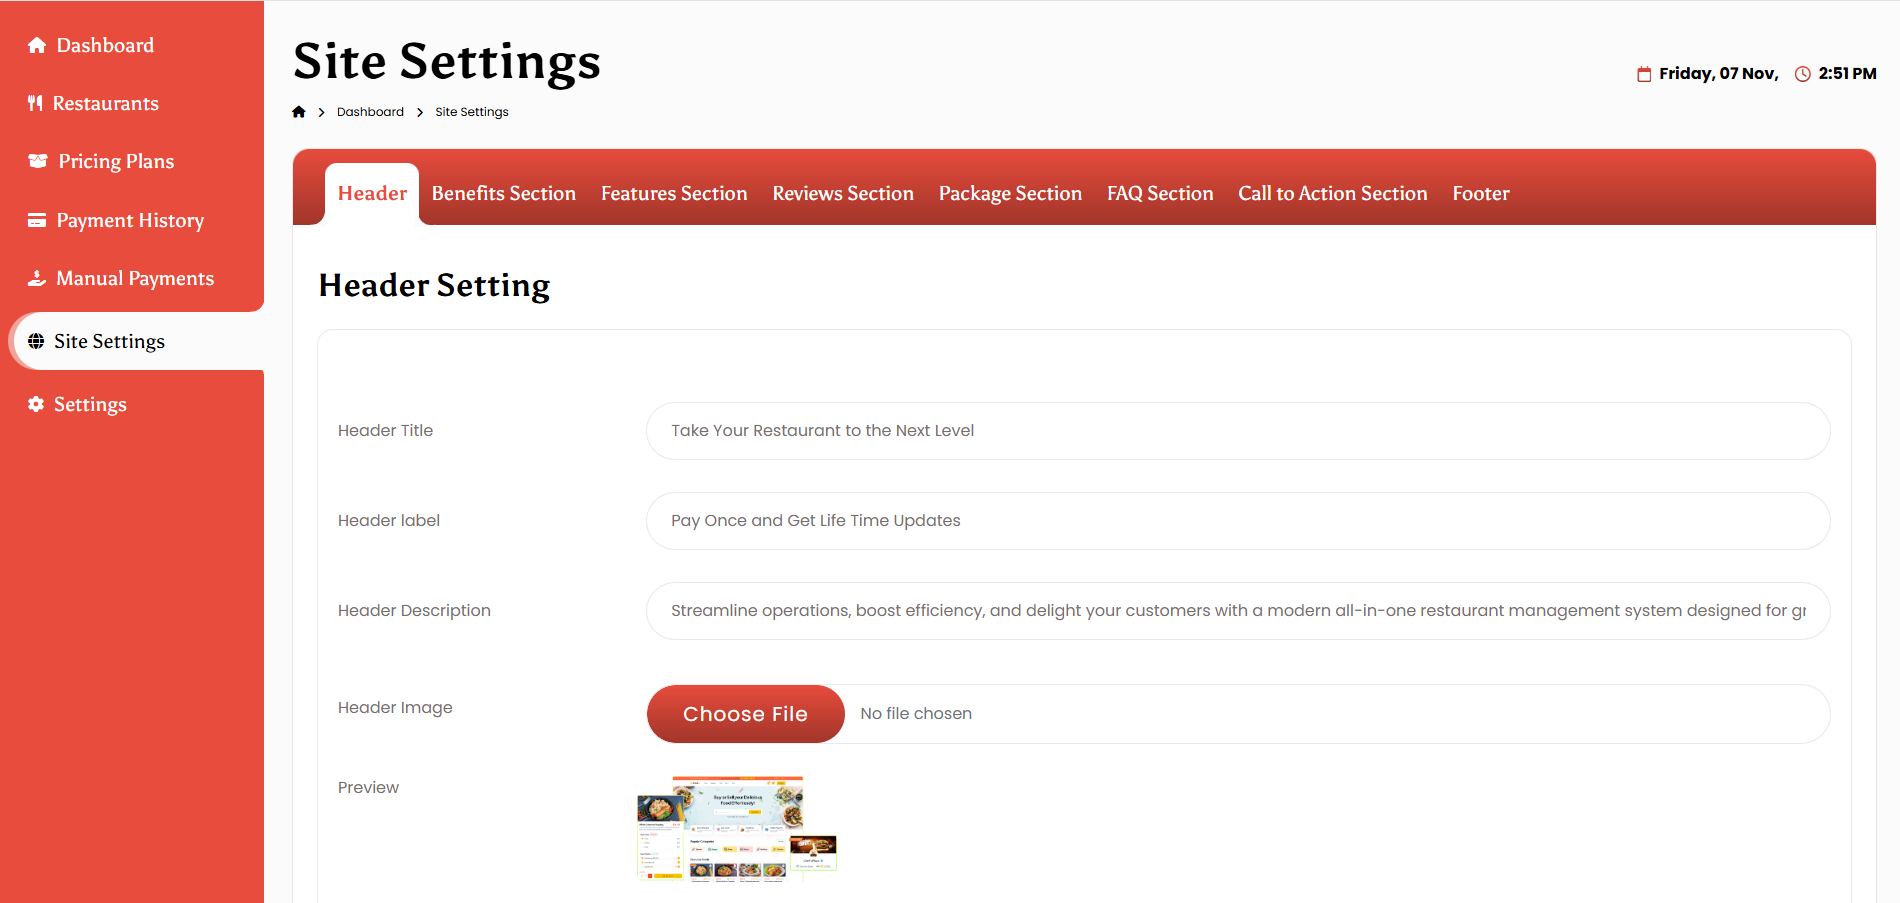
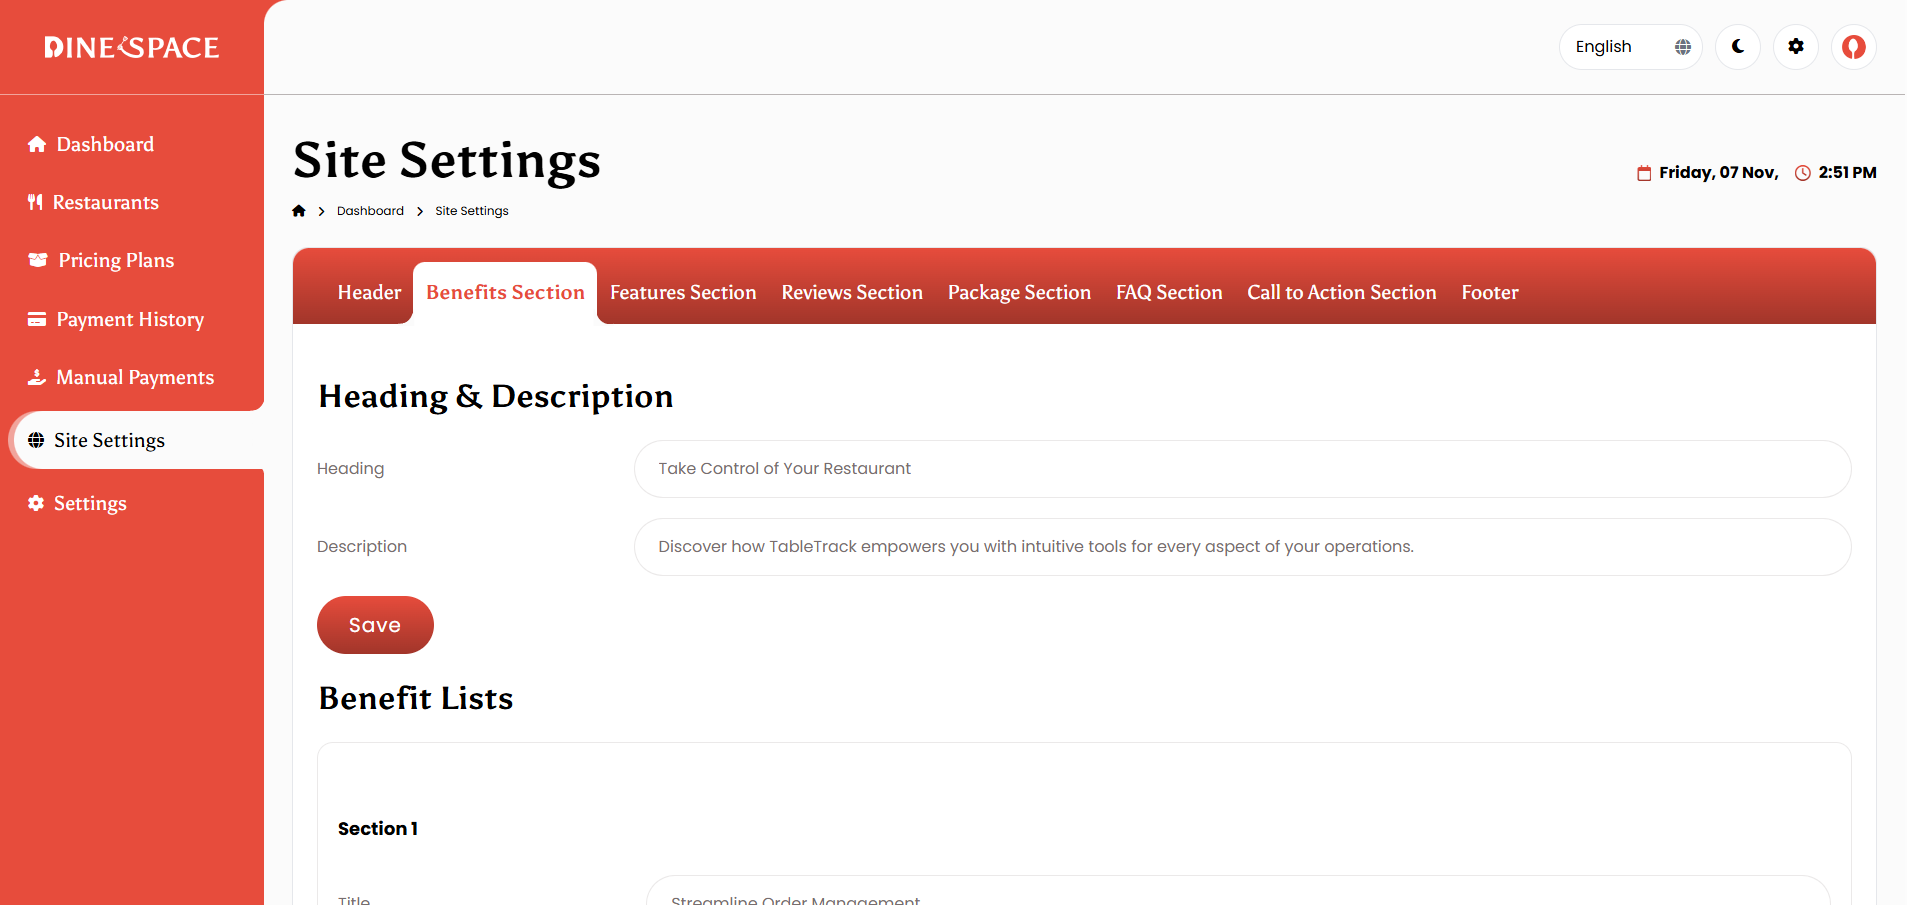
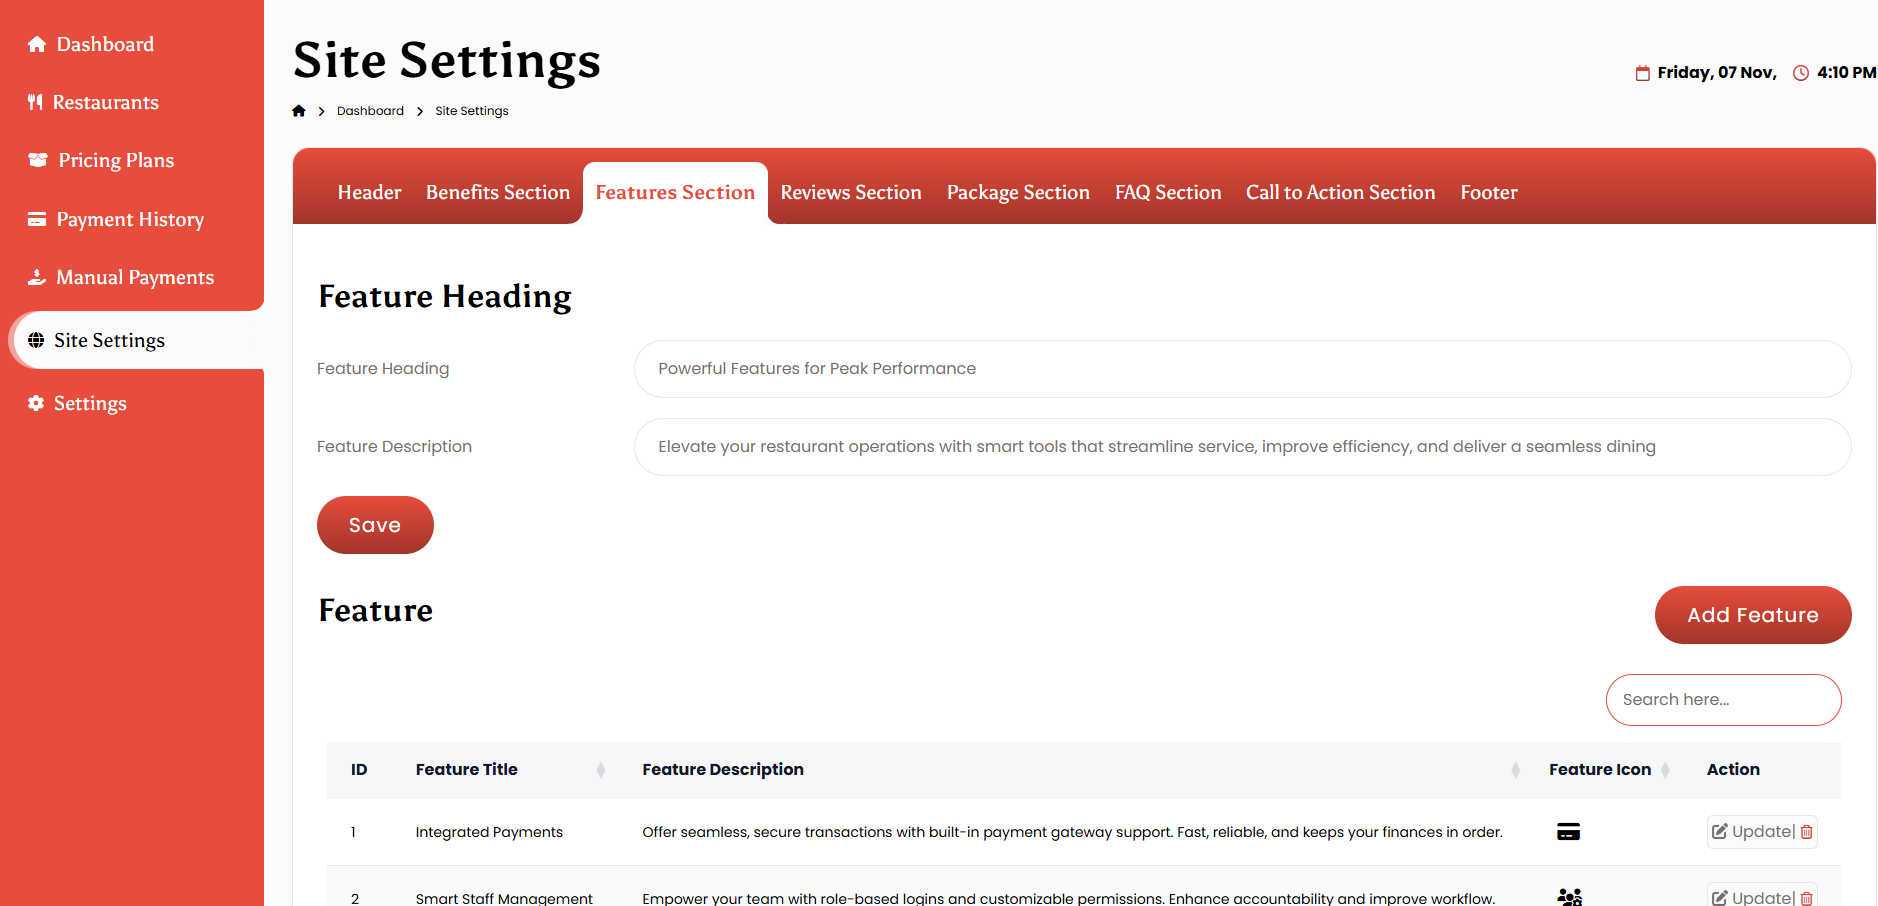
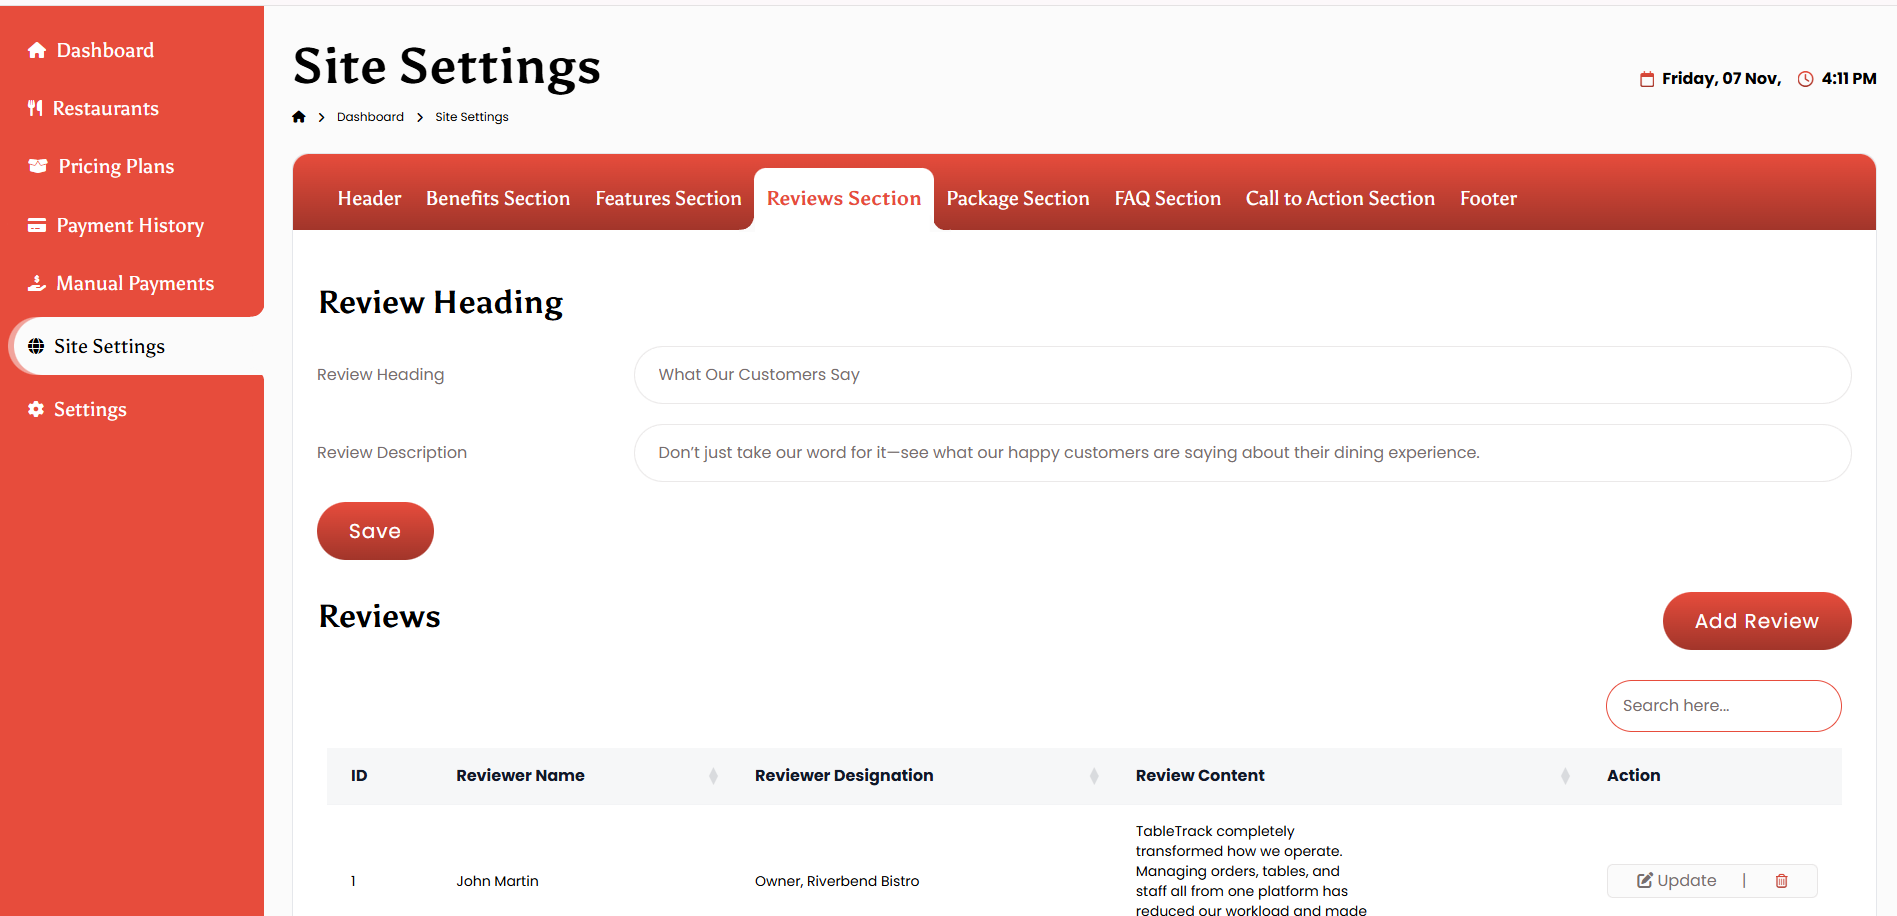
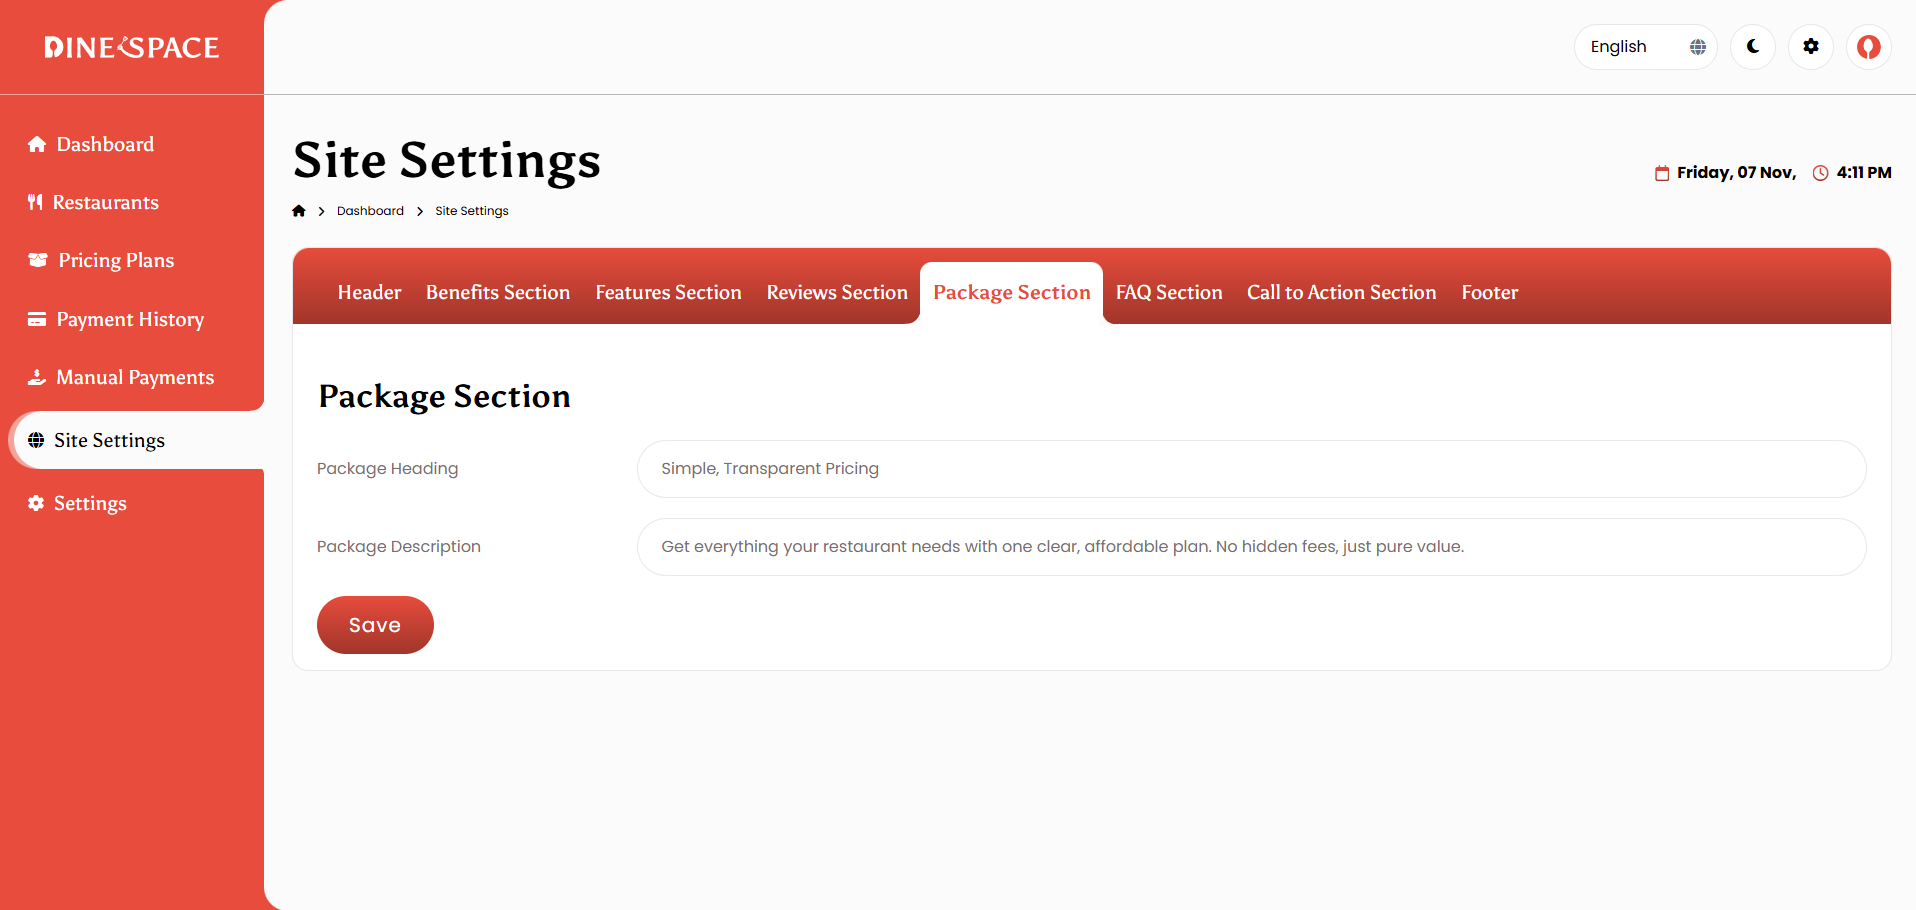
Site Settings
The Site Settings module allows the Super Admin to manage and customize all frontend website sections. From here, you can easily update content, images, and headings to keep your website up to date and visually appealing.
-
Header Section
-
Benefits Section
-
Features Section
-
Reviews Section
-
Package Section
-
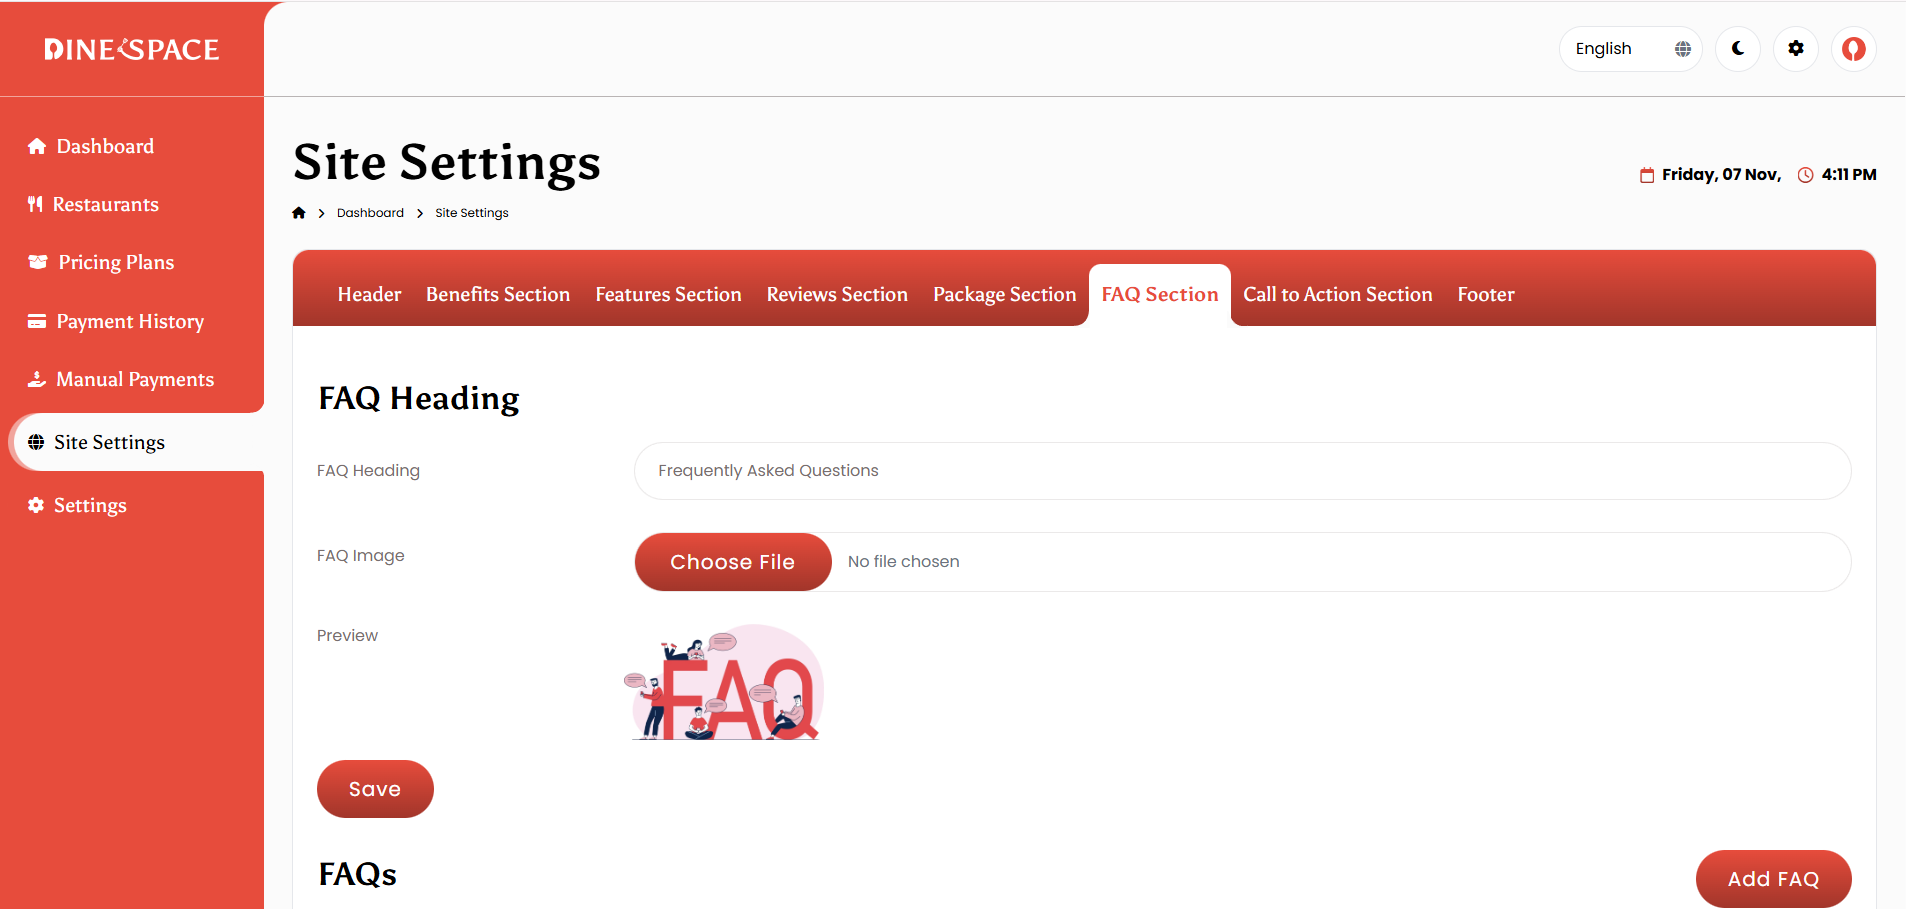
FAQ Section
-
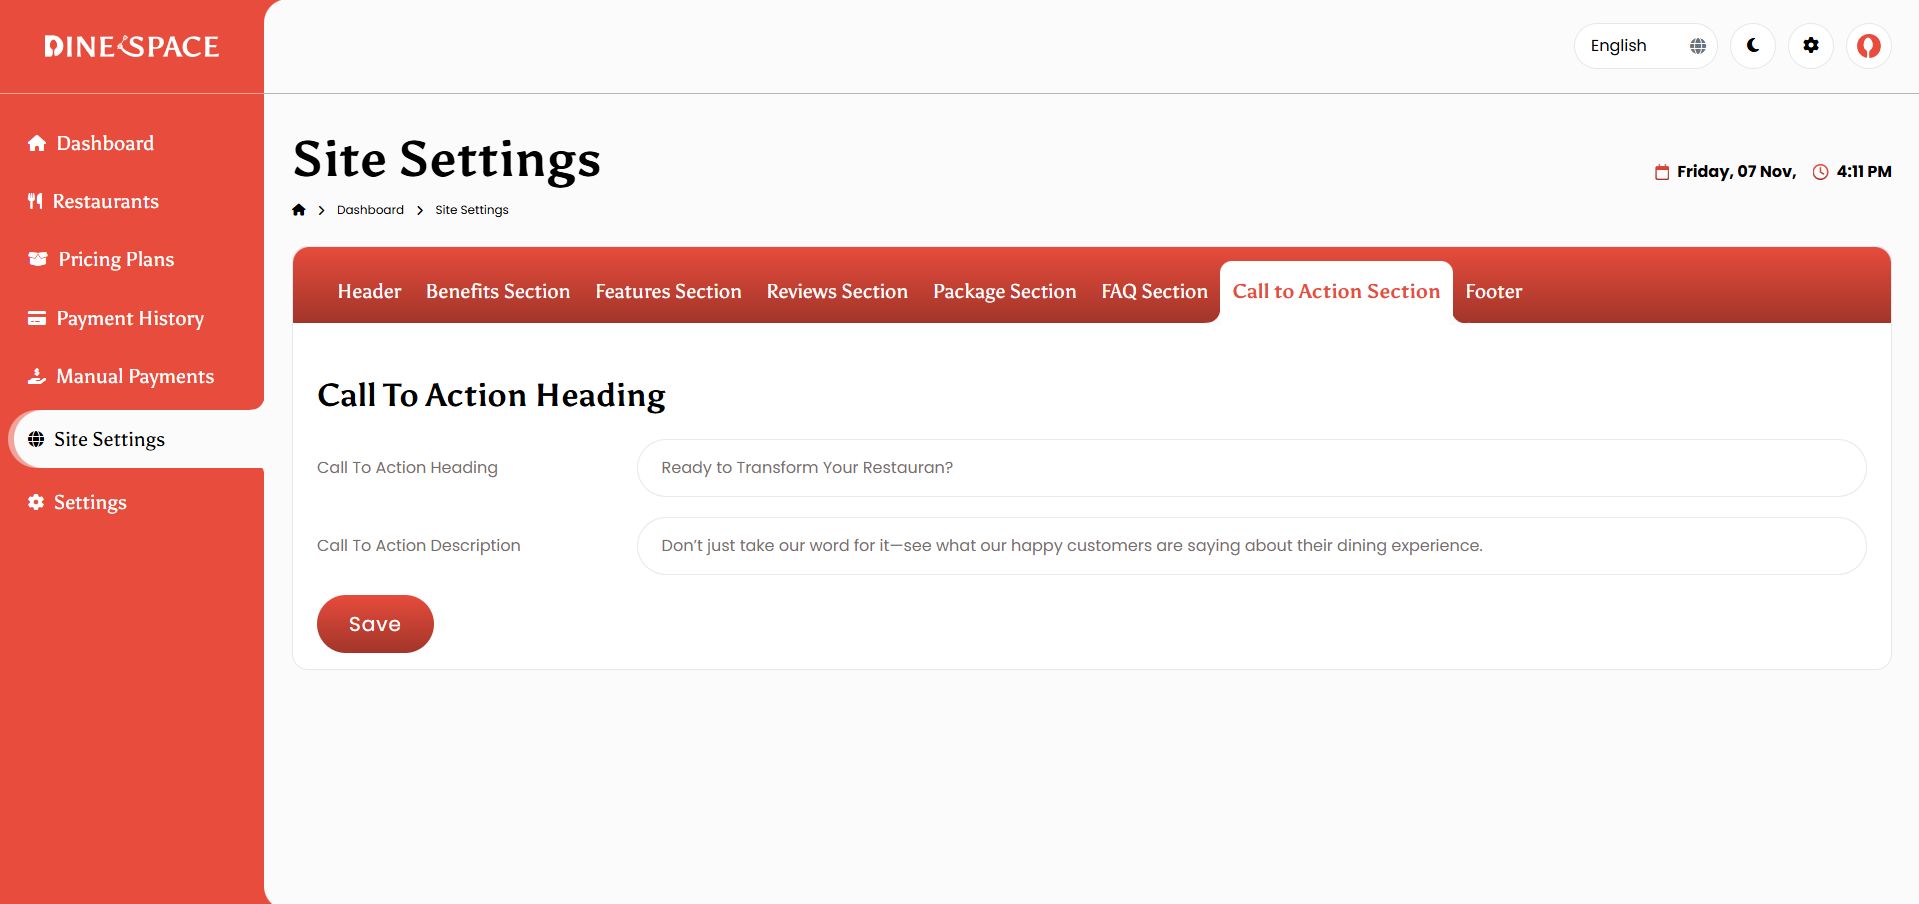
Call to Action Section
-
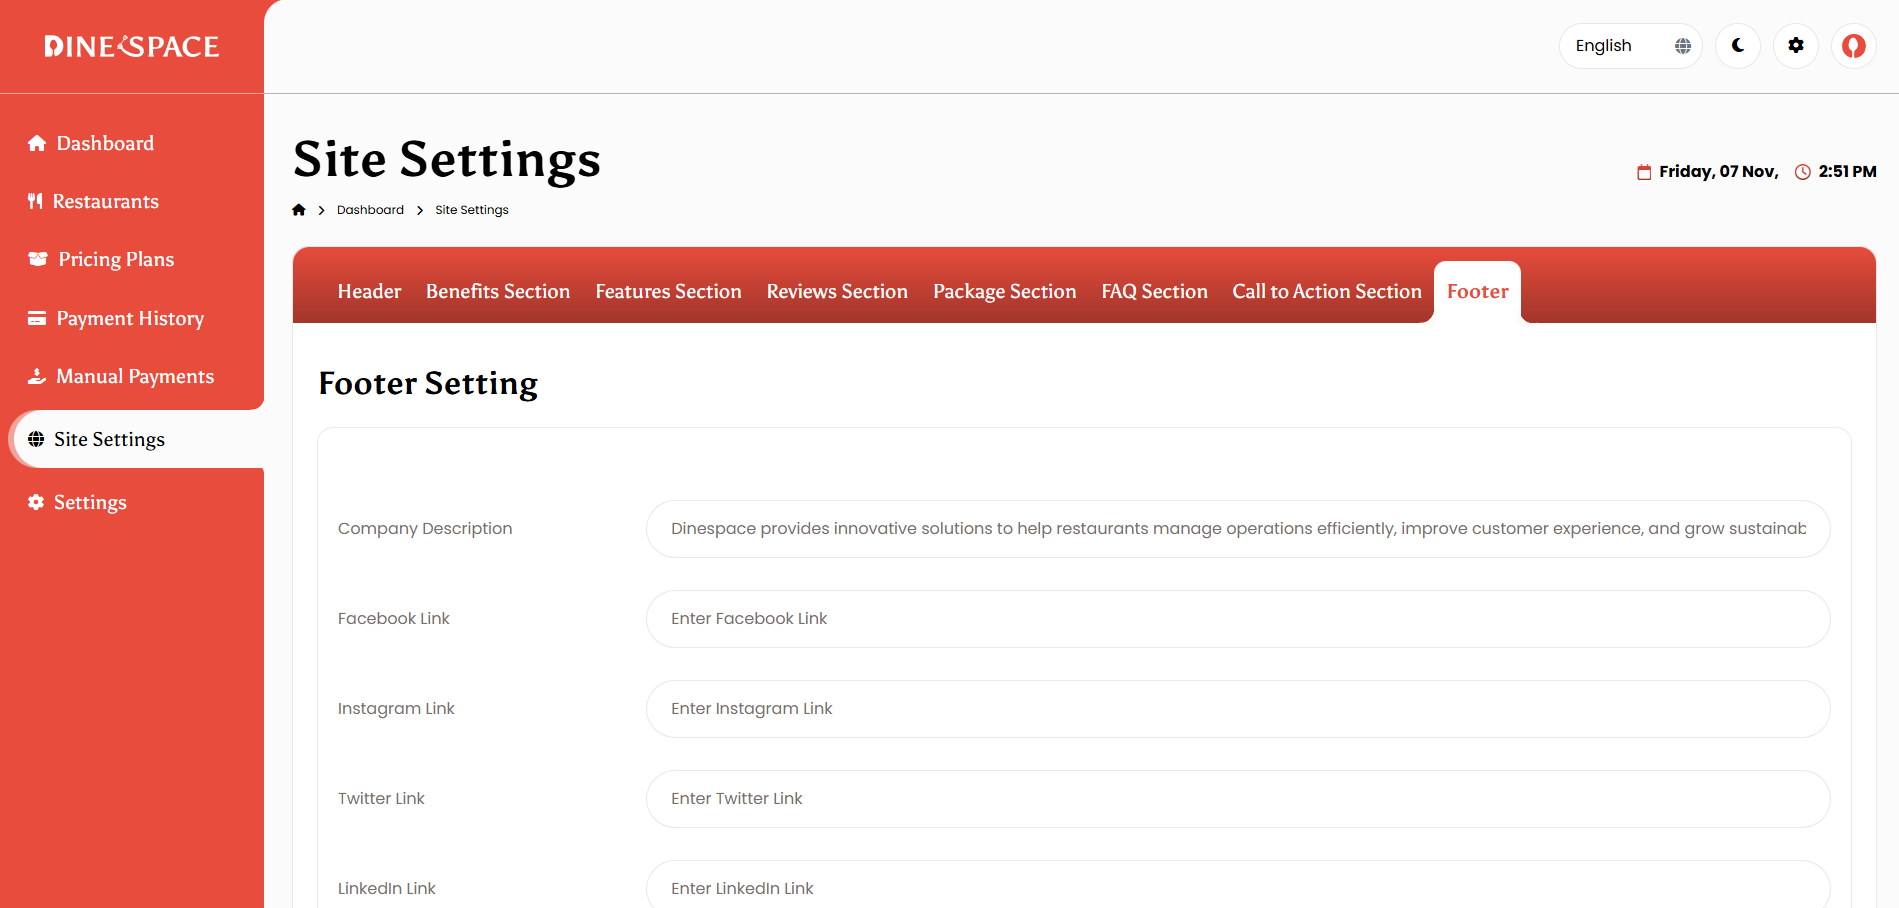
Footer Section
1. Header Setting: Configure the main header section of the website by updating the title, tagline, description, and header image.
2. Benefits Section: Manage the benefits displayed on the homepage by adding or editing items, updating headings, descriptions, and images.
3. Features Section: Showcase system features by managing feature titles, descriptions, icons, as well as updating the section heading.
4. Reviews Section: Control customer testimonials by adding or editing reviews, updating reviewer names, comments, and photos.
5. Package Section: Manage the pricing package display, including section headings, package descriptions, and visibility settings.
6. FAQ Section: Add and edit frequently asked questions, manage categories, and update section headings to help users find answers easily.
7. Call to Action Section: Configure the call-to-action content by customizing headings, texts, buttons, and links to enhance user engagement.
8. Footer: Manage footer details, including text, links, social media icons, contact information, and copyright settings.
Settings
Settings Management allows the Super Admin to configure core system settings like app details, payments, languages, currencies, and themes to ensure smooth operation and brand consistency.
-
App Settings
-
Email Settings
-
Payment Settings
-
Language Settings
-
Currency Settings
-
Theme Settings
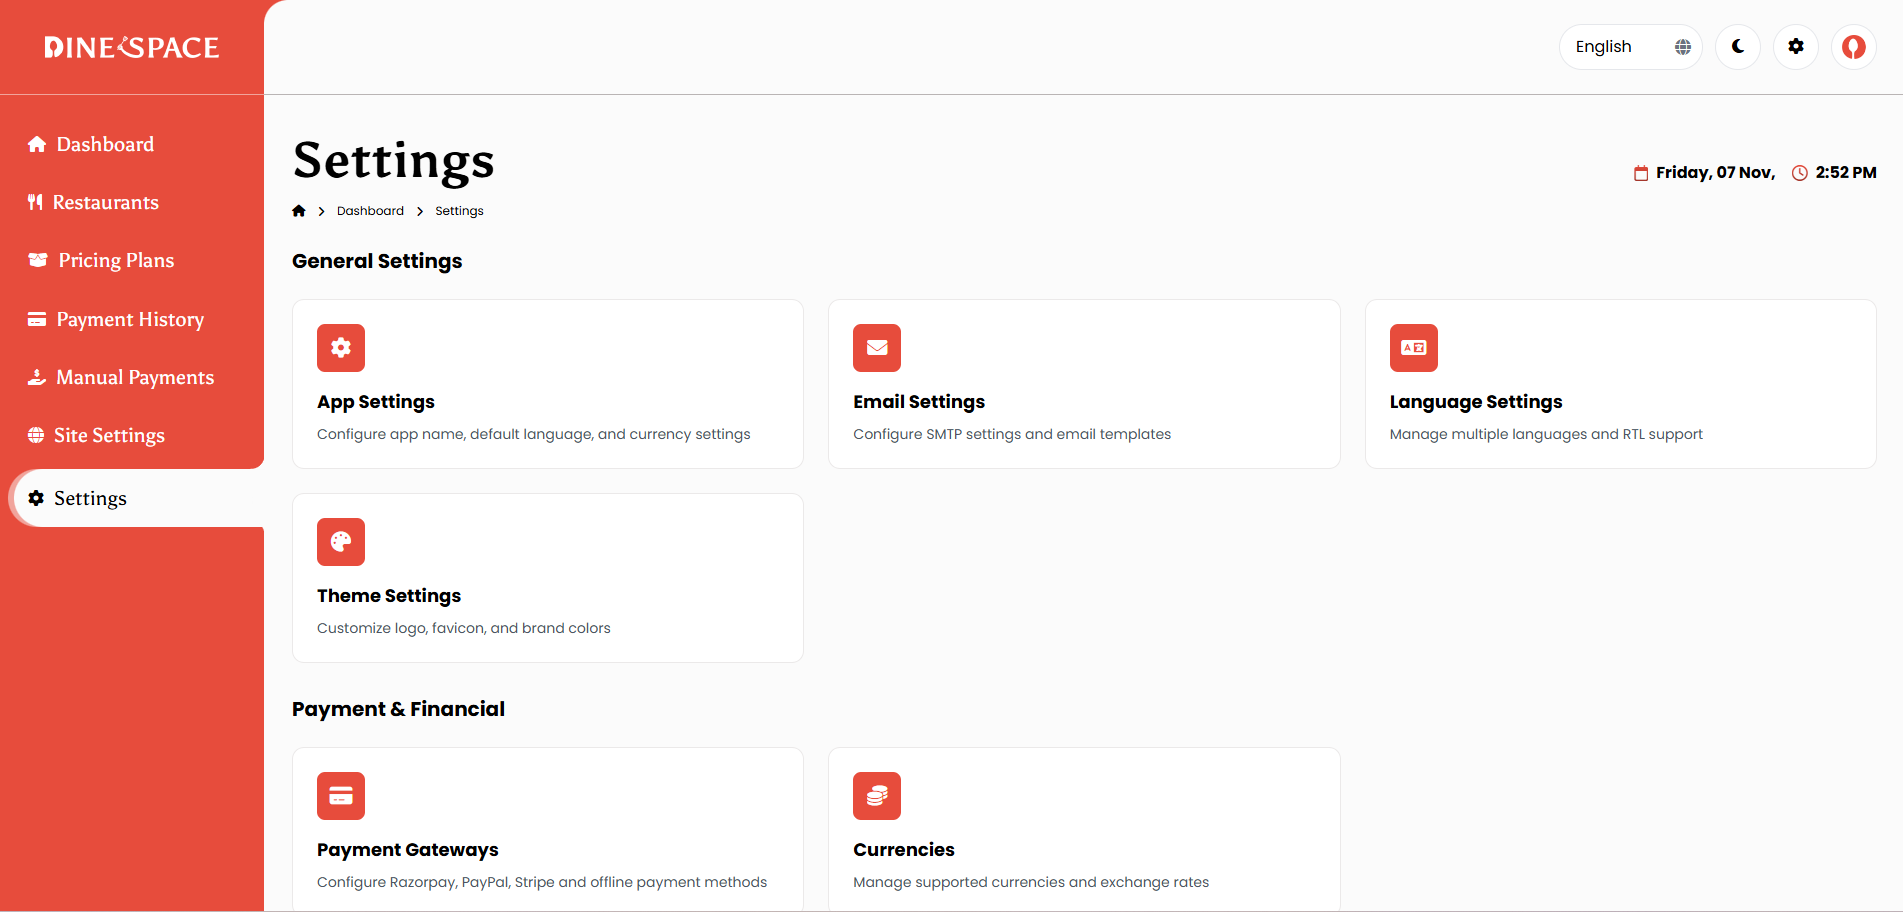
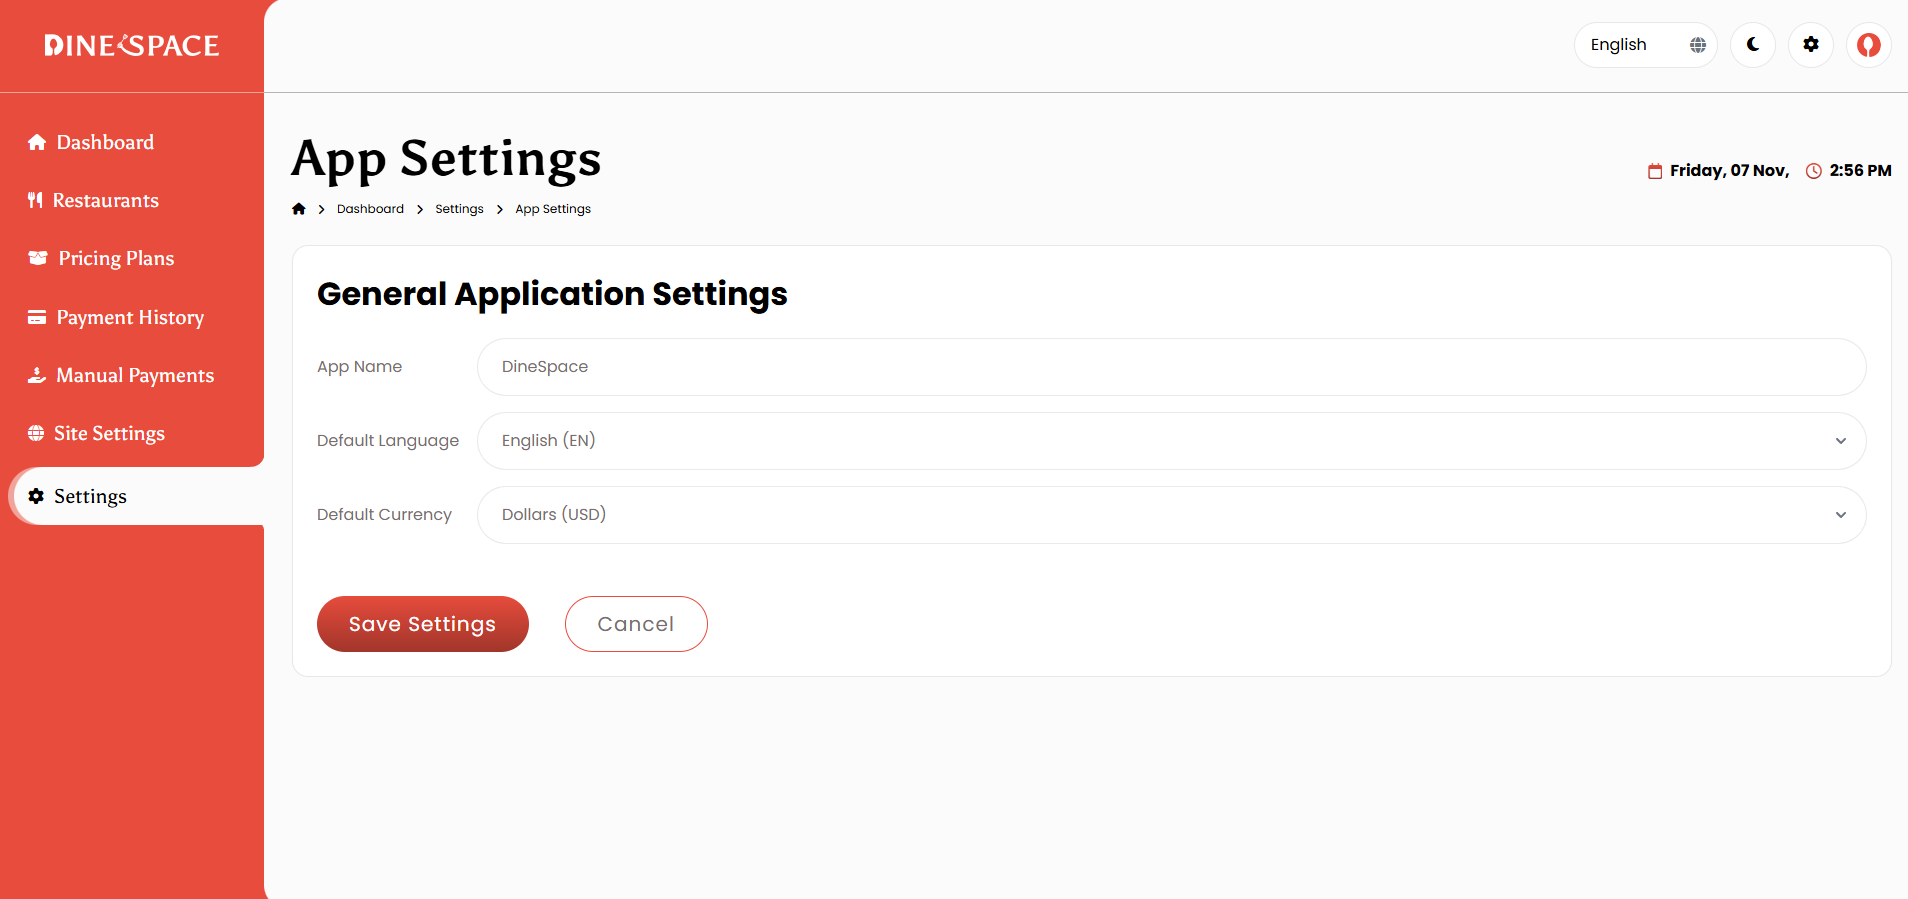
1. App Settings: The App Settings module allows the Super Admin to manage the core configuration of the system. From here, you can set the App Name, choose the Default Language, and define the Default Currency to ensure consistent settings across the application.
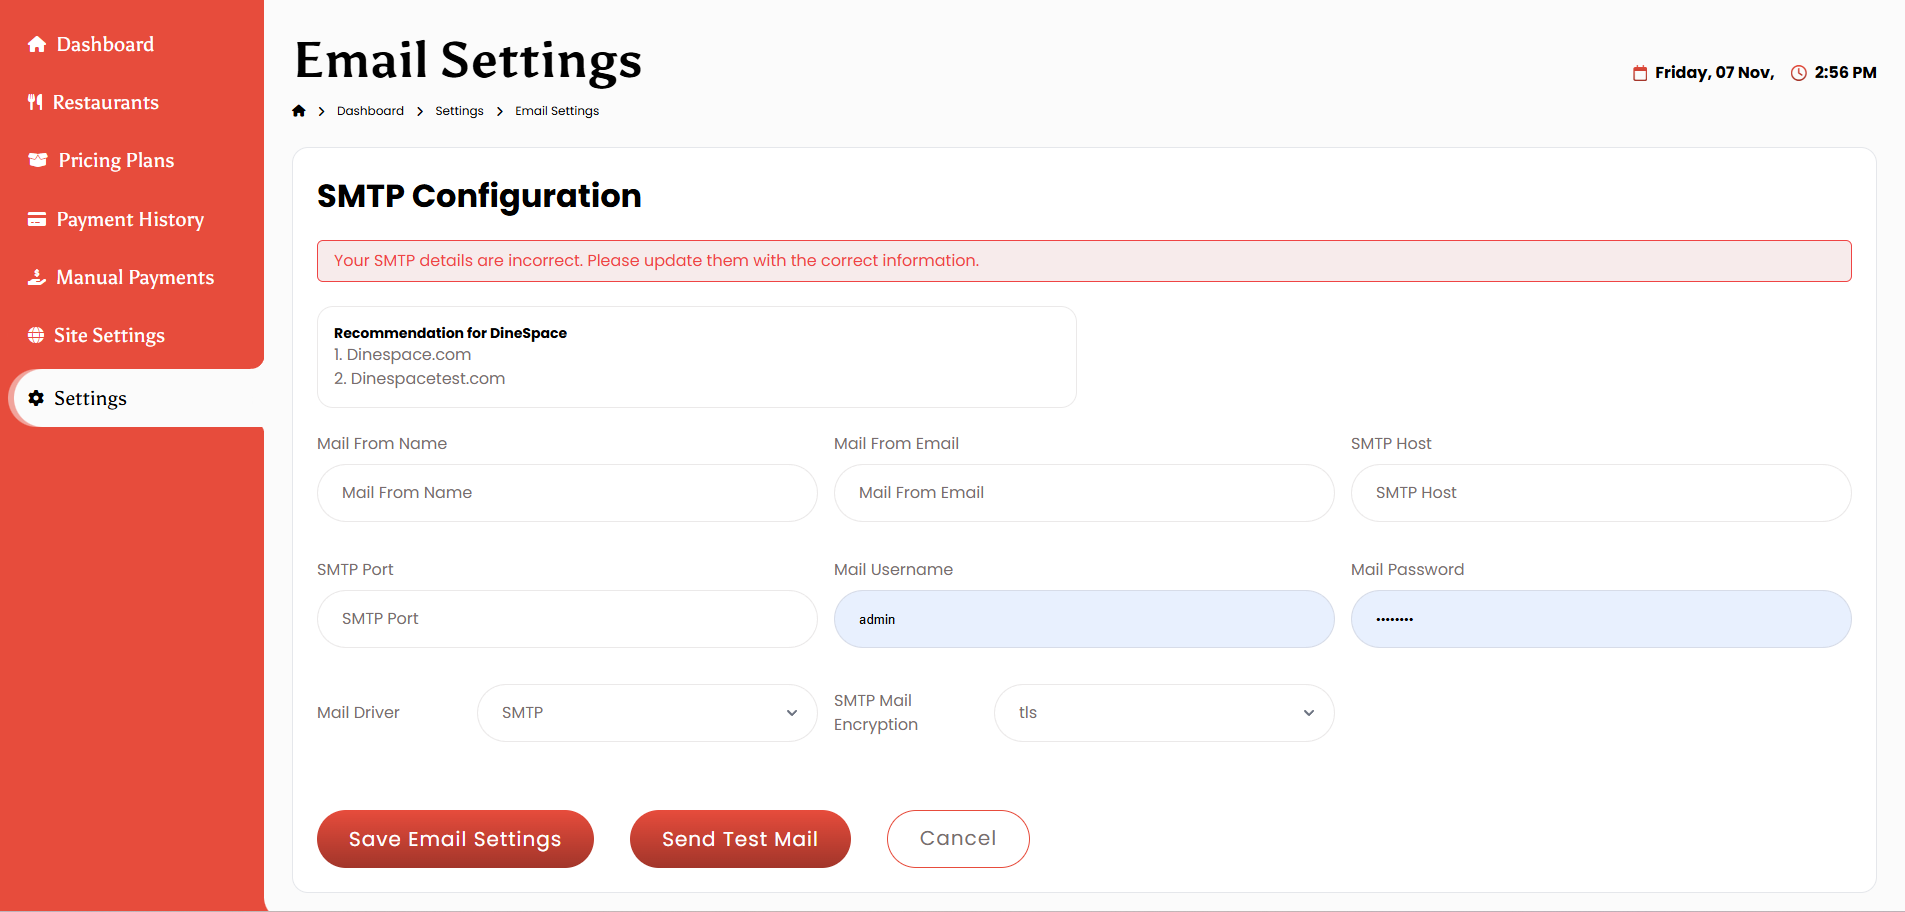
2. Email Settings: Configure SMTP details, including host, port, username, password, and encryption type. You can also set the mail send without SMTP.
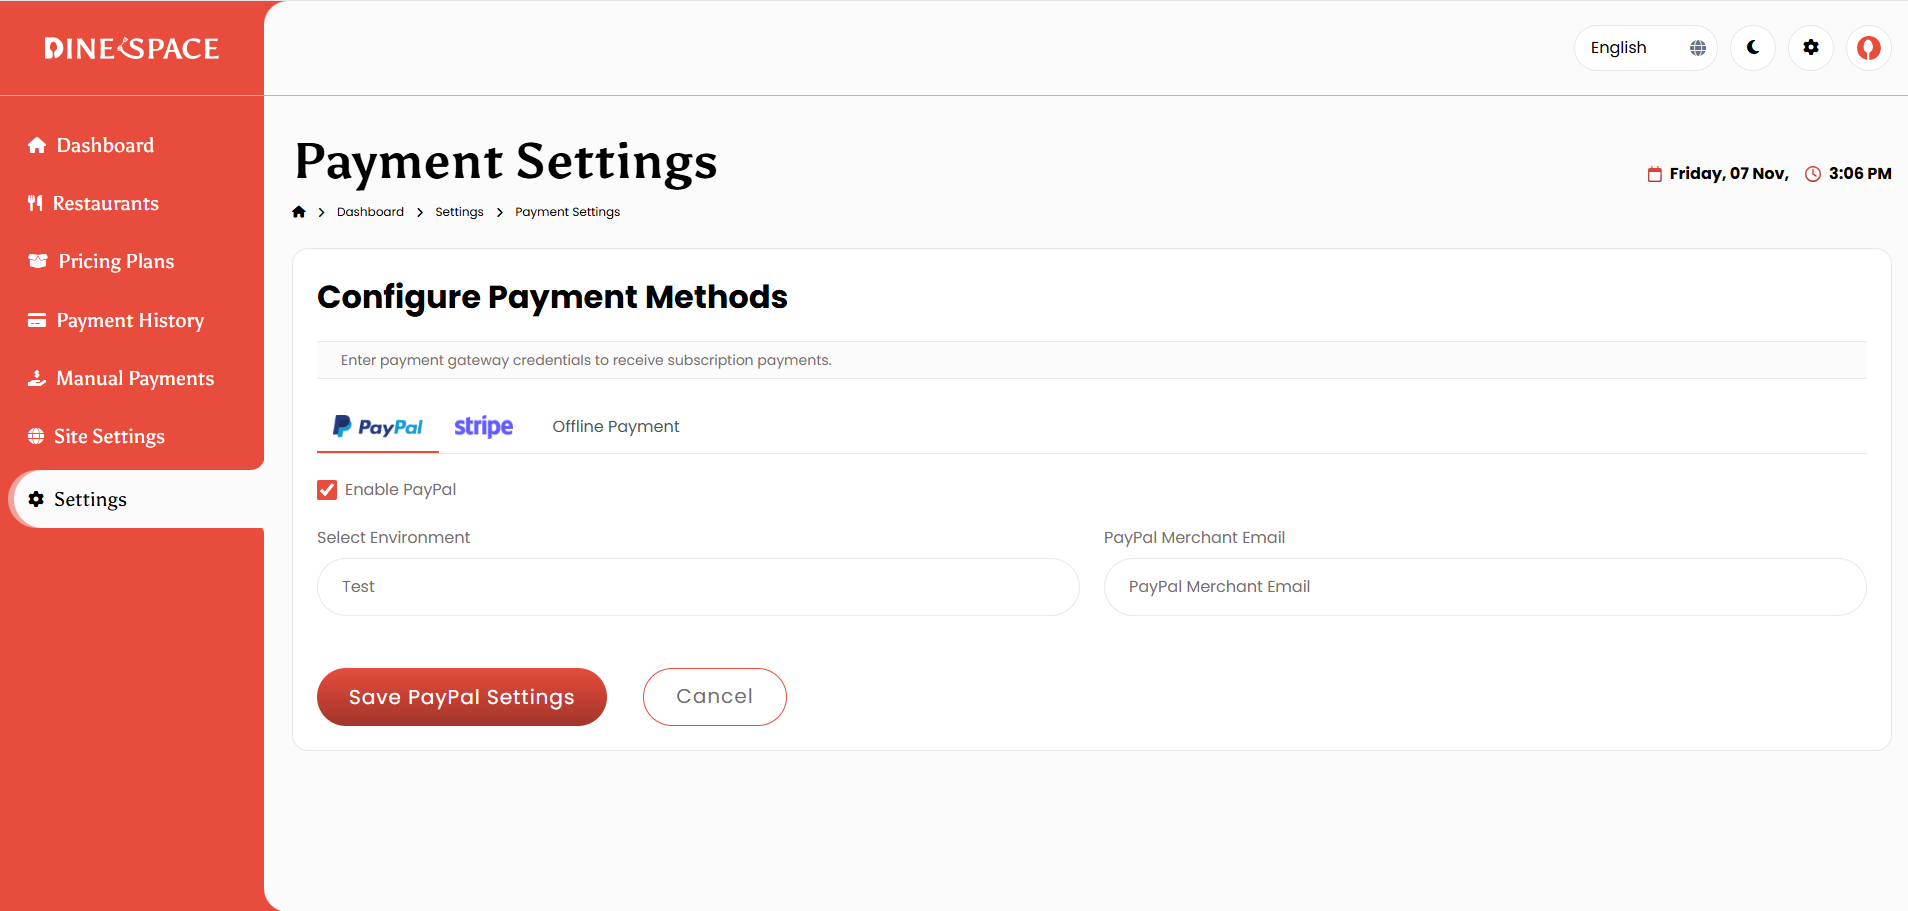
3. Payment Settings: Manage all payment gateways and methods from one place. Configure PayPal (Client ID, Secret, Mode), Stripe (Publishable Key, Secret Key), and Offline Payment Methods with custom instructions and activation options.
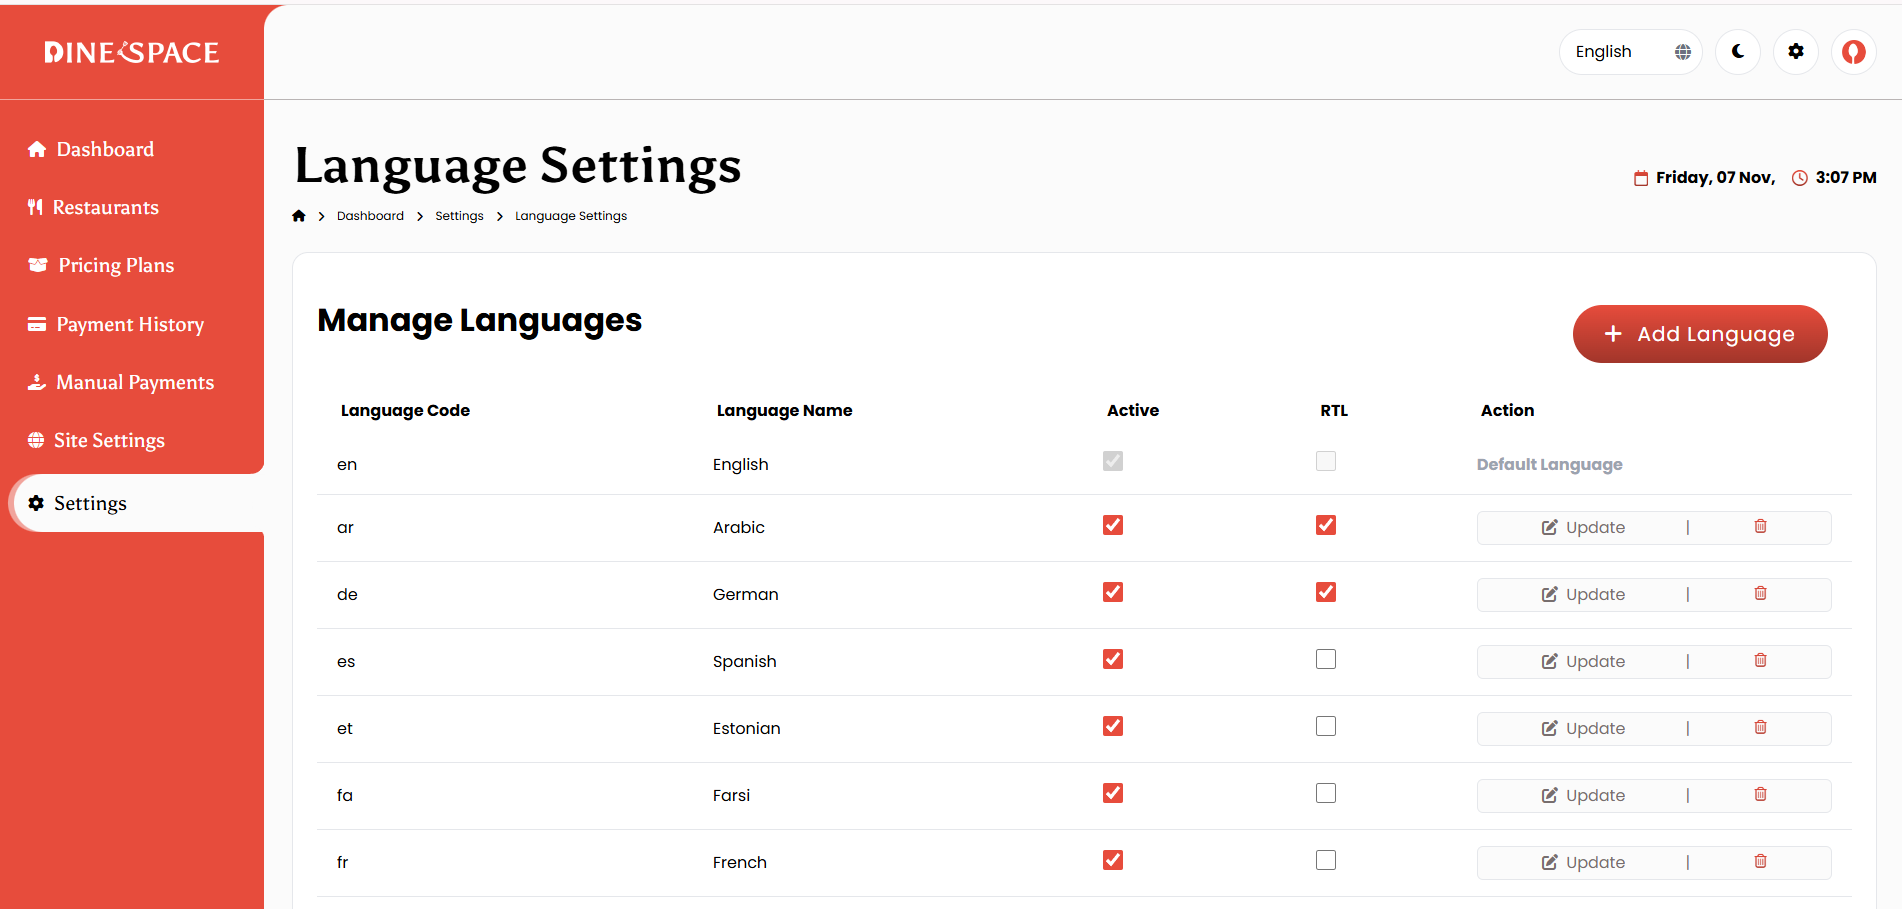
4. Language Settings: Add and manage multiple languages, set the Default Language, edit translations, and enable or disable specific languages.
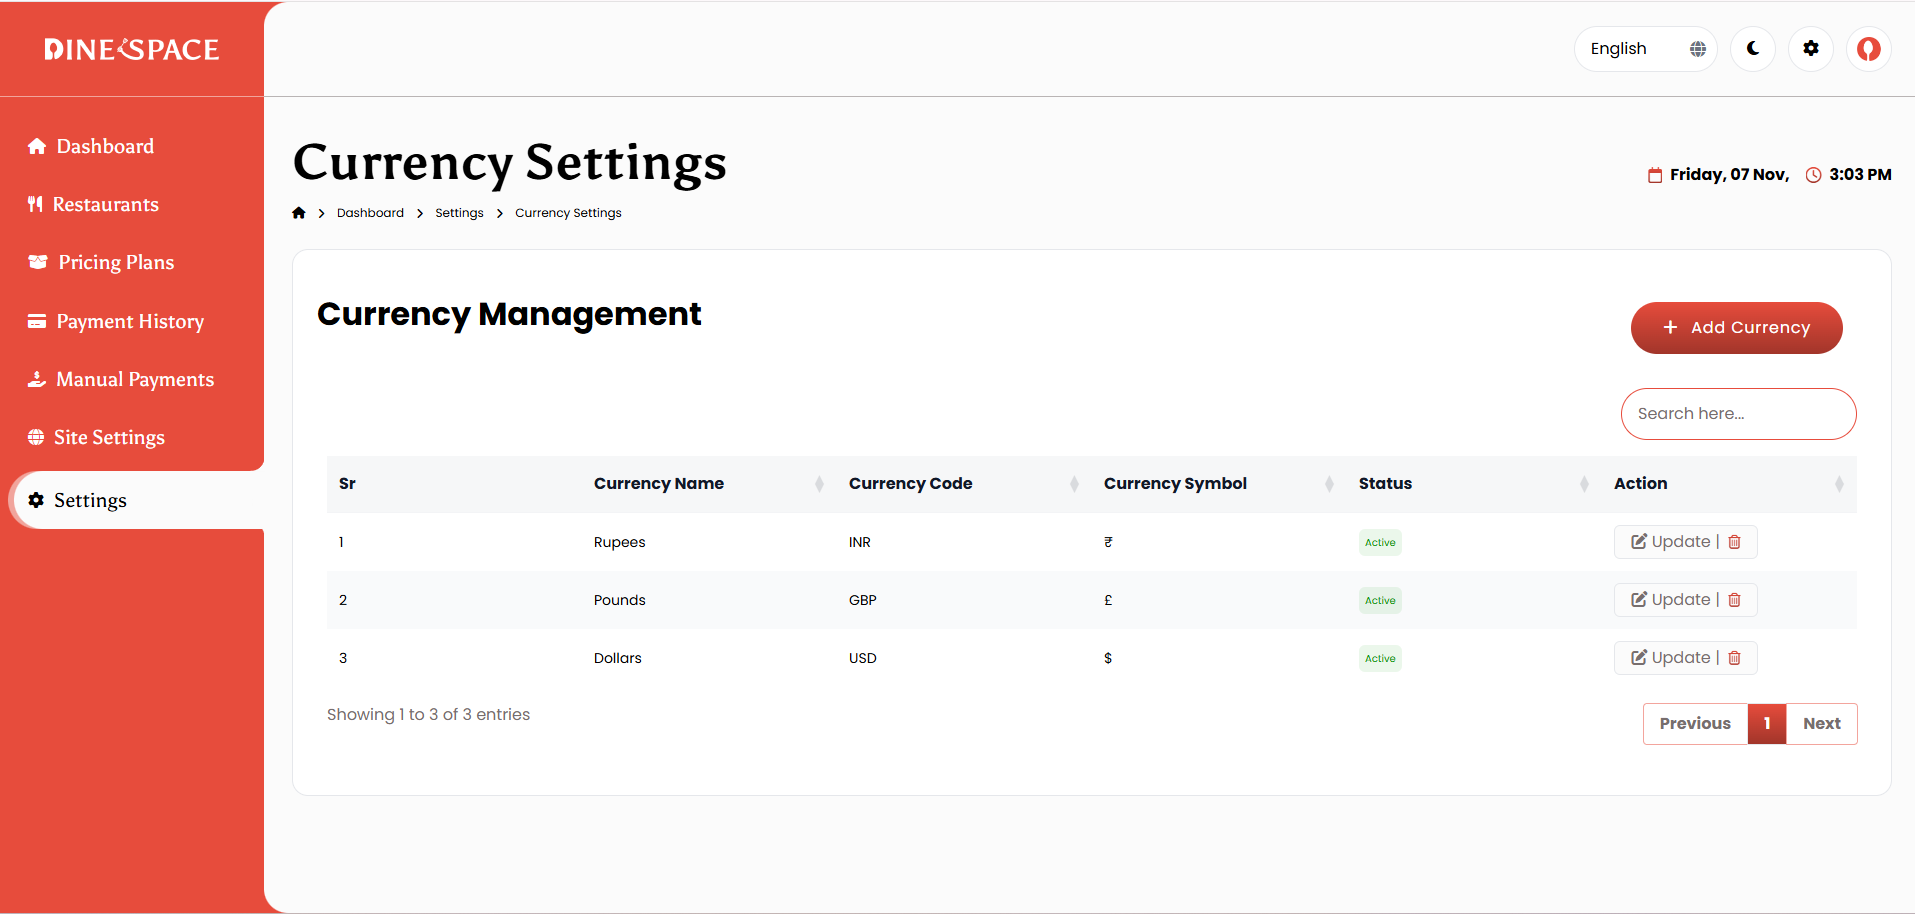
5. Currency Settings: Add or edit currencies, configure symbols, set the Default Currency, and adjust decimal places and position to ensure proper financial formatting.
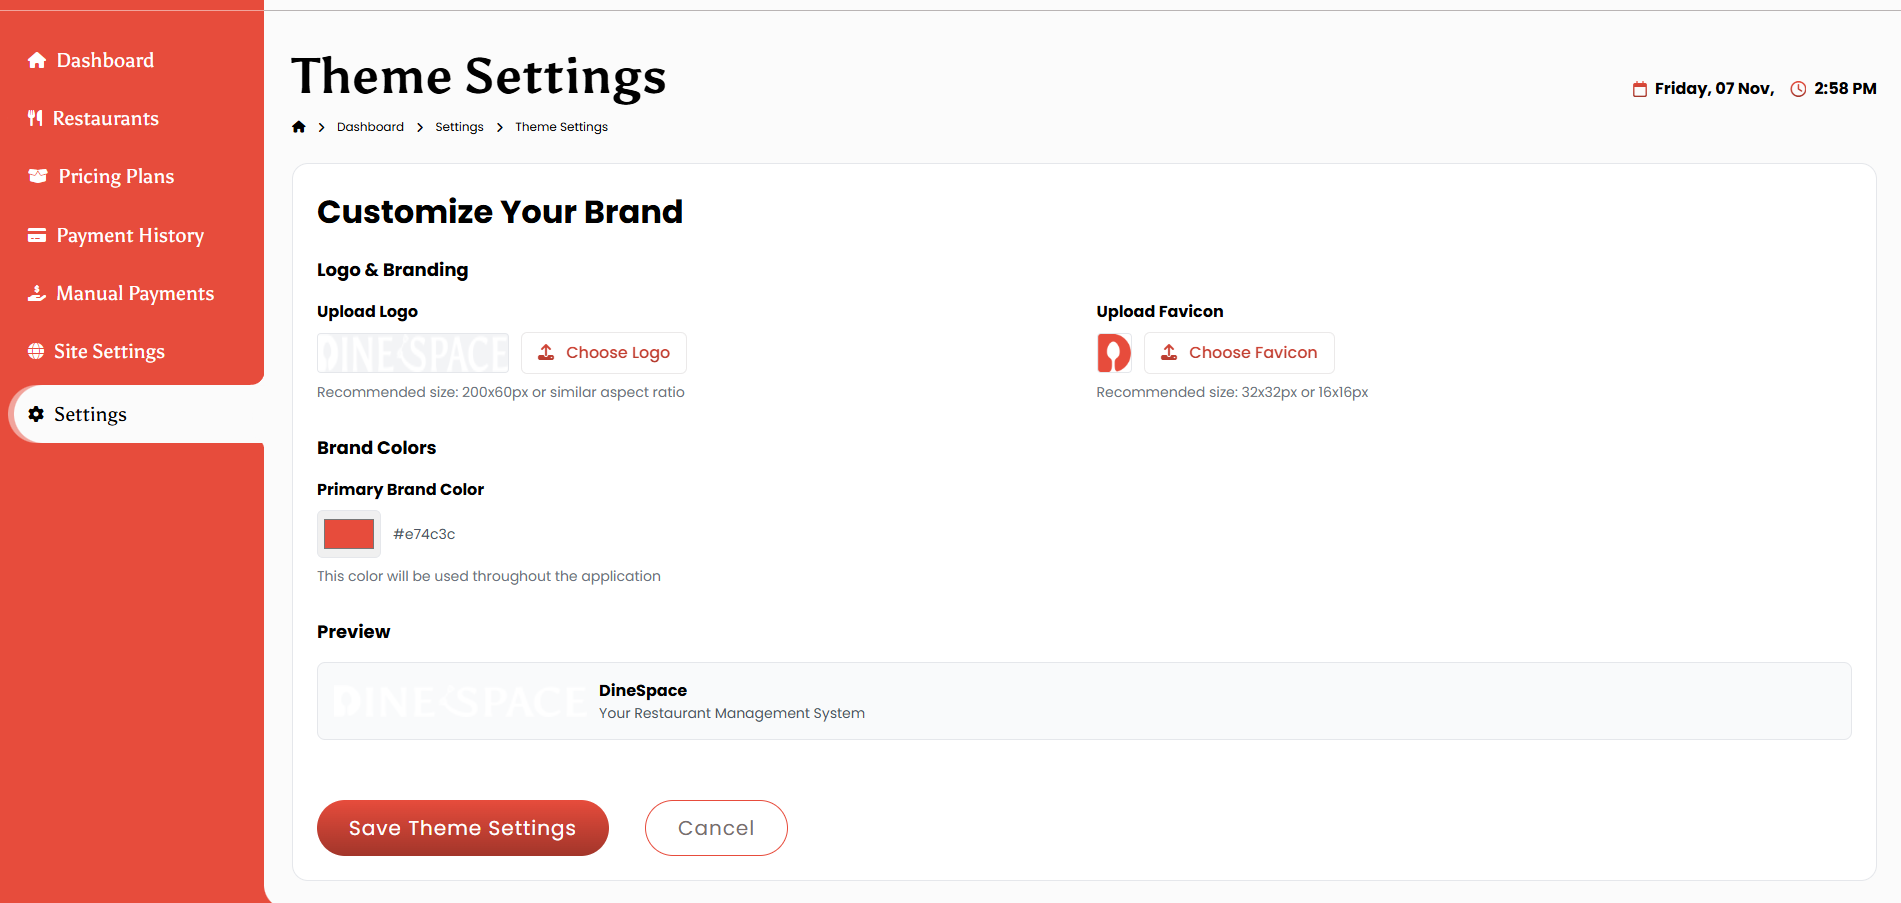
6. Theme Settings: Customize the system’s look and feel by managing the color scheme, logo, and branding elements.
Restaurant Panel
Profile
Dashboard
The Dashboard gives a quick overview of restaurant performance, showing key metrics like revenue, orders, and customers. It also displays today’s and recent orders, popular items, low stock alerts, and a summary of reservations for easy daily monitoring.
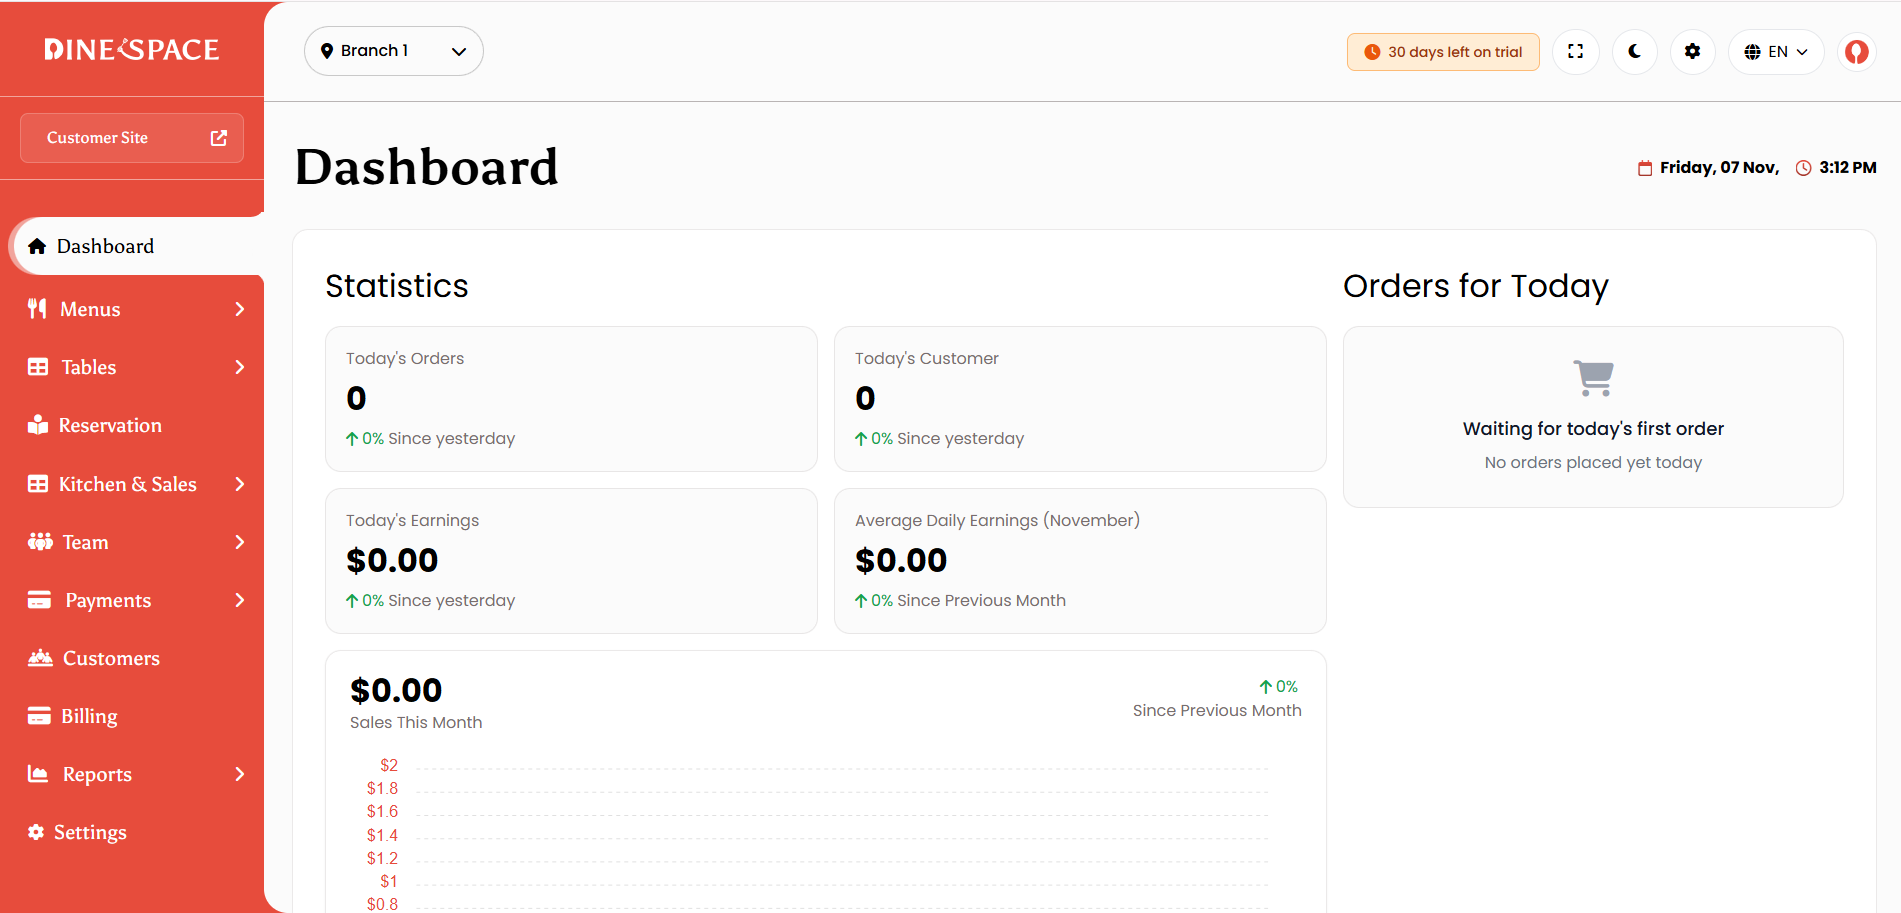
Today’s Overview
Shows live performance metrics for the current day.
- Today’s Orders – Total number of orders placed today.
- Today’s Customers – Count of unique customers who placed orders.
- Today’s Earnings – Total revenue generated from completed orders.
- Average Daily Earnings (November) – Average daily income for the current month.
Sales Chart
Visual representation of revenue trends and performance.
- Displays daily sales for the current month
- Highlights high and low sales days
- Helps identify performance and growth patterns
Payment Method (Today)
Shows the share of payments by method for today’s transactions.
- Breakdown of Cash, Card, and Online payments
- Percentage and amount contribution per method
- Helps understand customer payment preferences
Today’s Top Selling Dish
Highlights the best-performing menu items.
- Displays top-selling dishes with images
- Shows total quantity sold and revenue per item
- Helps identify popular items for promotions
Today’s Top Performing Table
Shows which tables generated the most activity.
- Displays top tables by orders and revenue
- Helps optimize seating and service performance
Menu
Menus:
Create, edit, delete, and manage multiple menus with status control and visibility options.
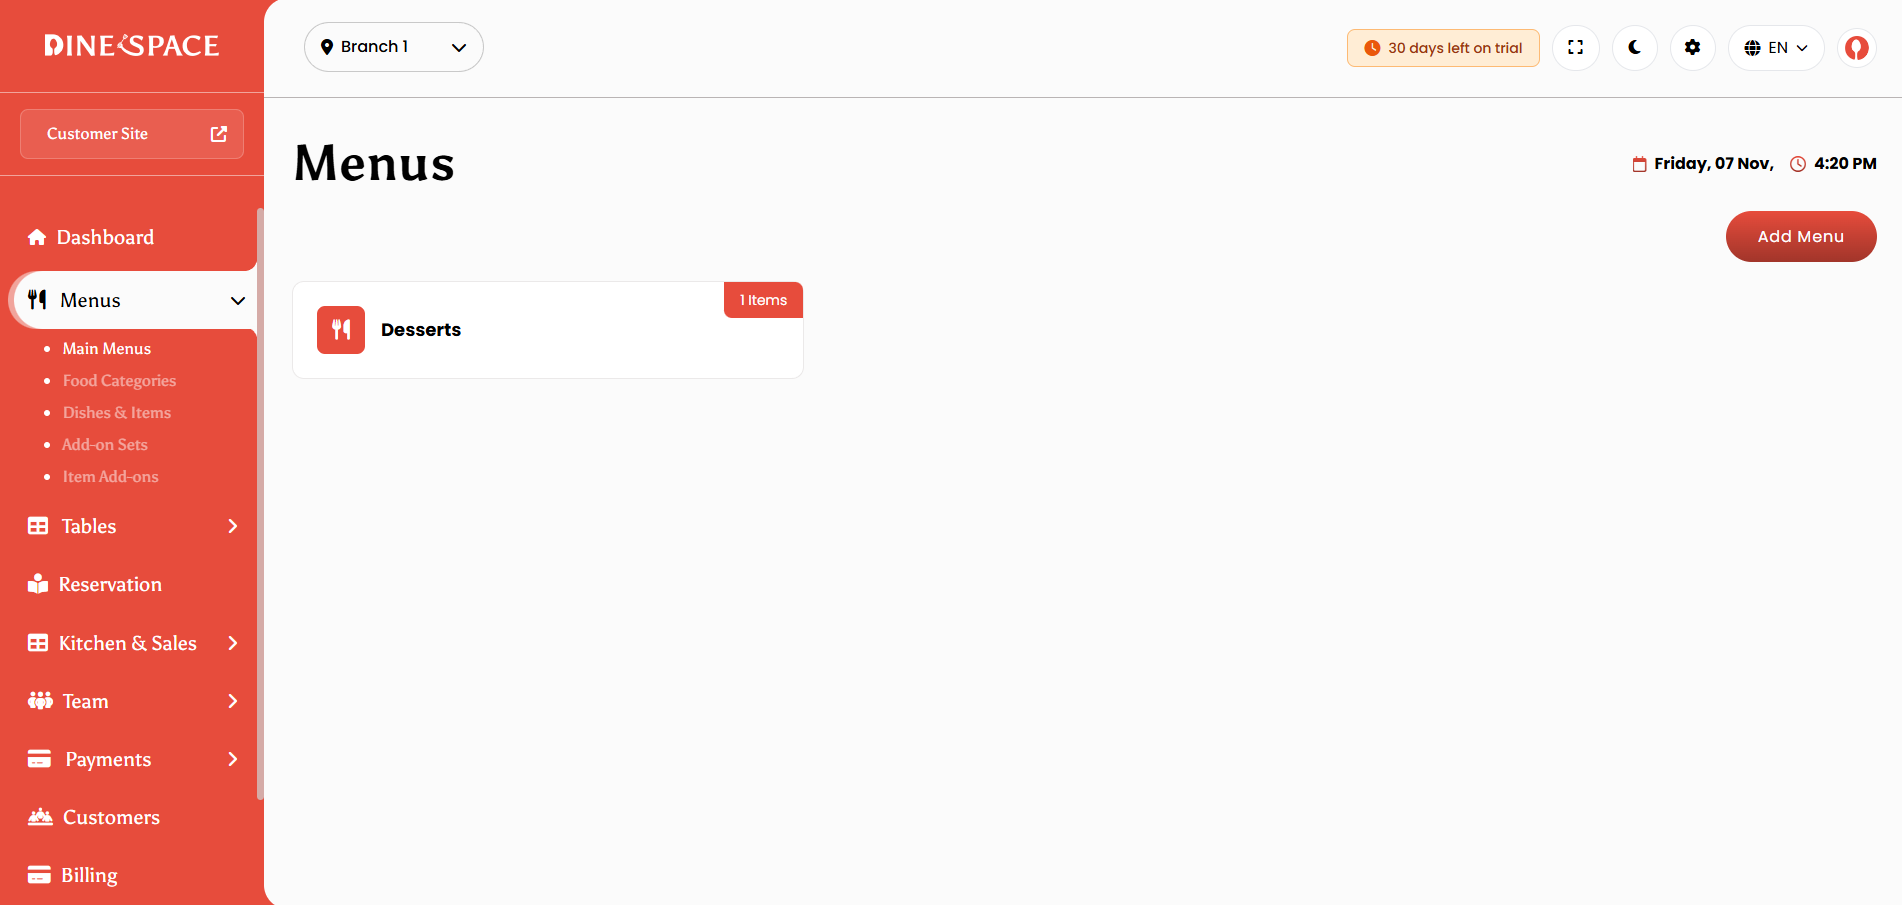
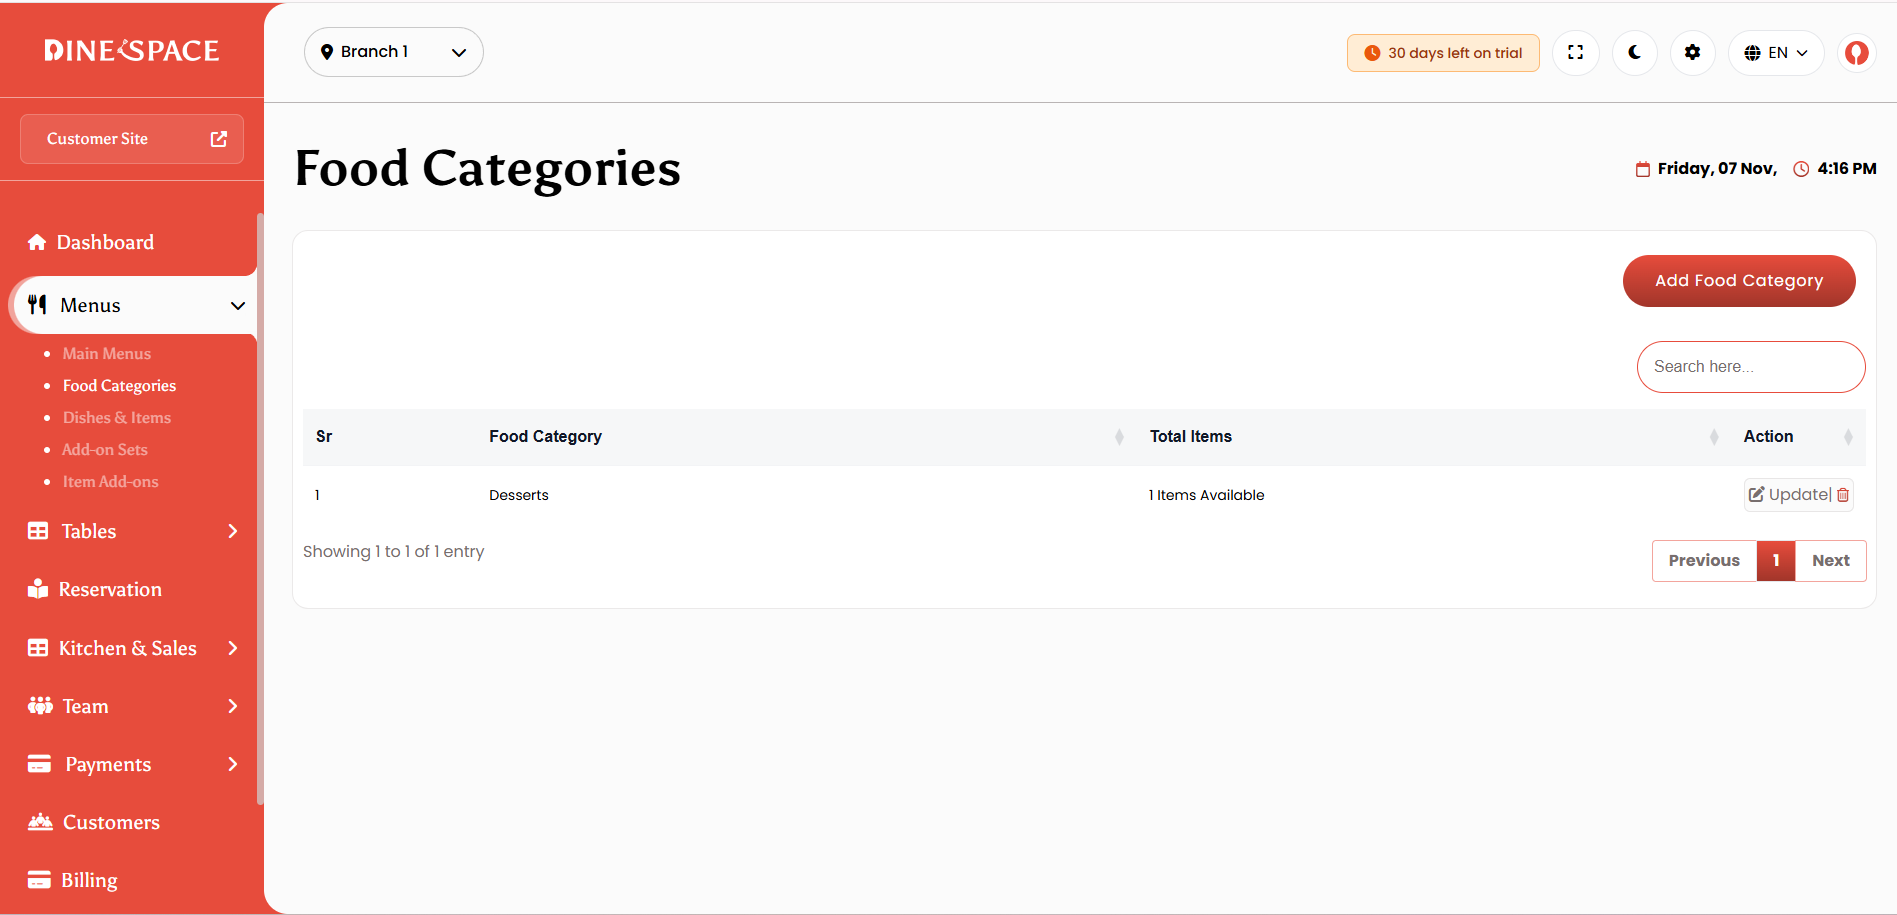
Food Categories:
Add and organize food categories with images, ordering, and status management.
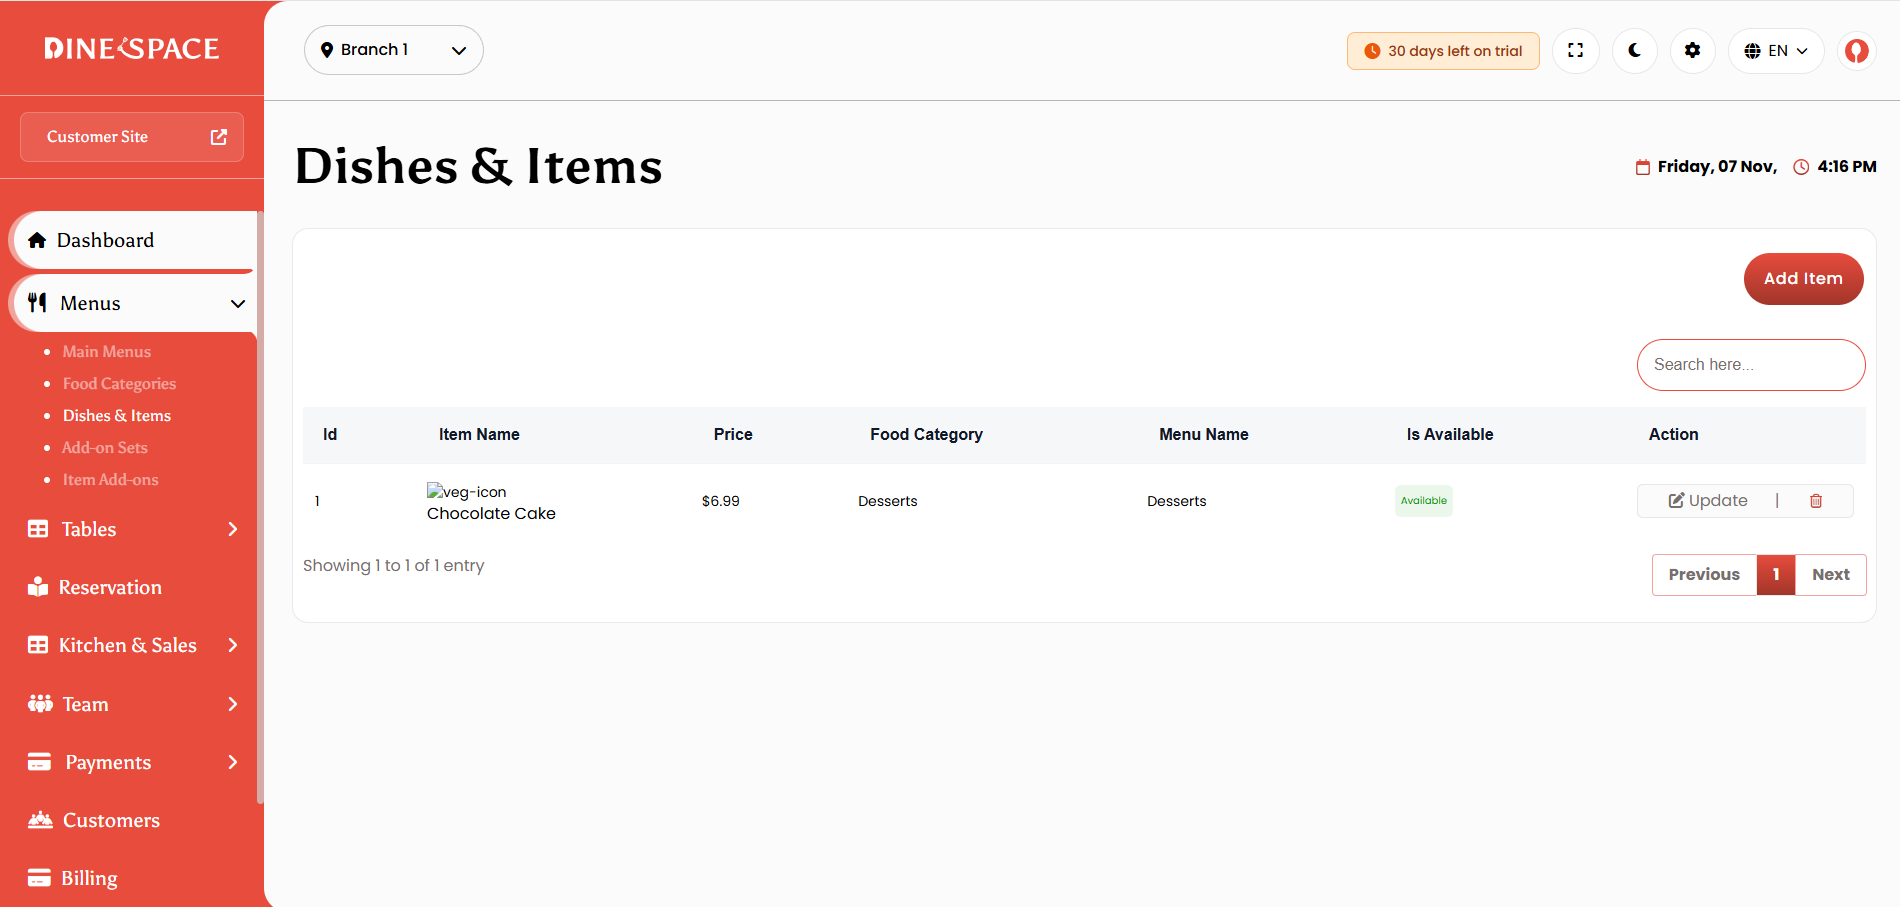
Dishes & Items:
Manage menu items with full control over pricing, availability, images, descriptions, and Veg/Non-Veg type. Includes bulk actions, filters, and category-based listings.
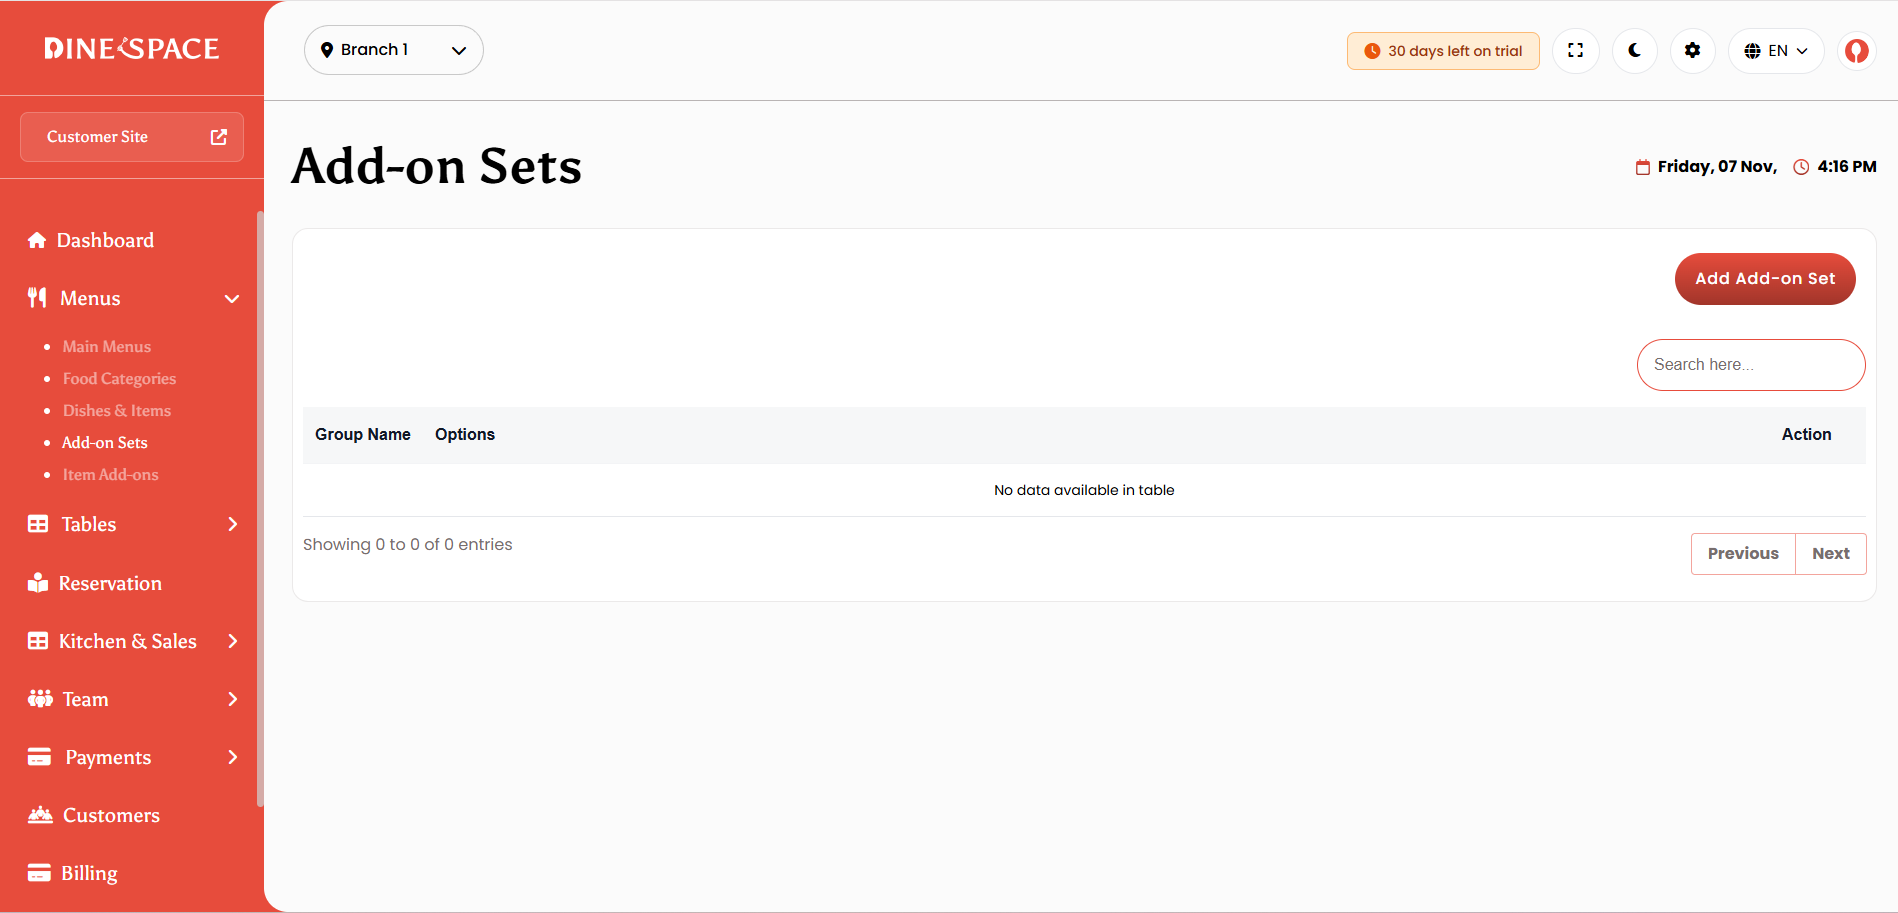
Add-On Sets:
Create and manage add-ons for menu items, allowing customization with ordering and status options.
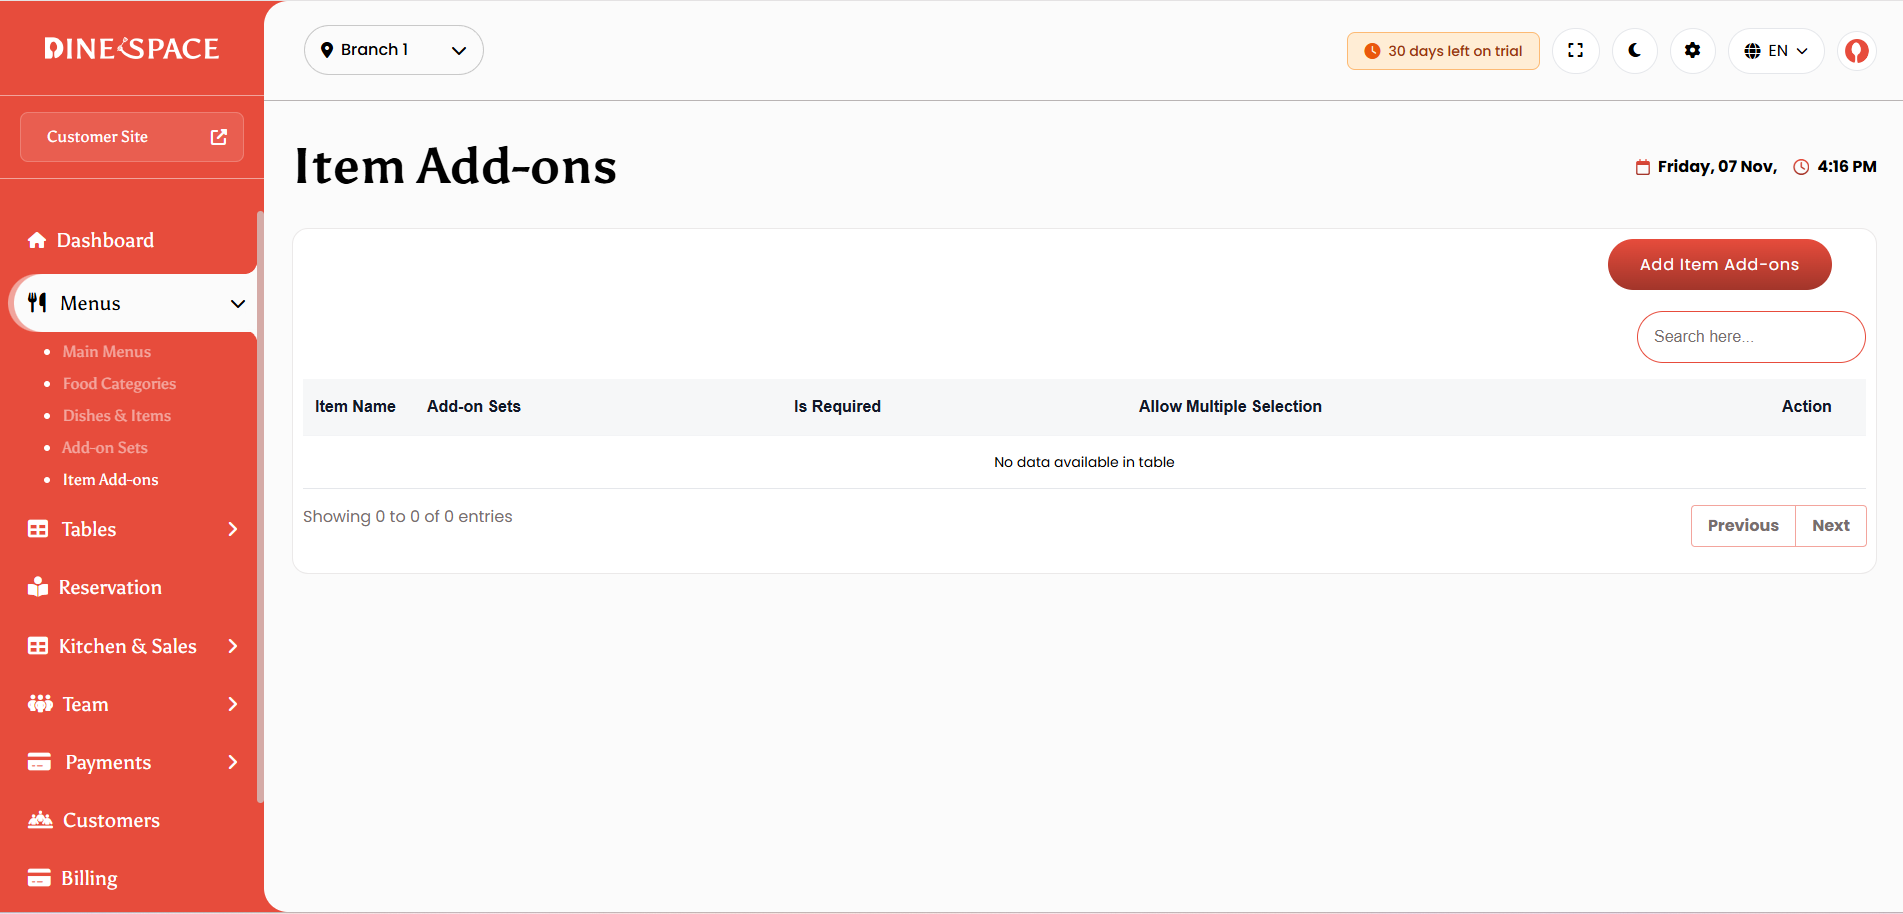
Item Add-Ons :
Add and manage add-ons for items with pricing, optional or required selection, and multiple-choice settings for better order customization.
Tables
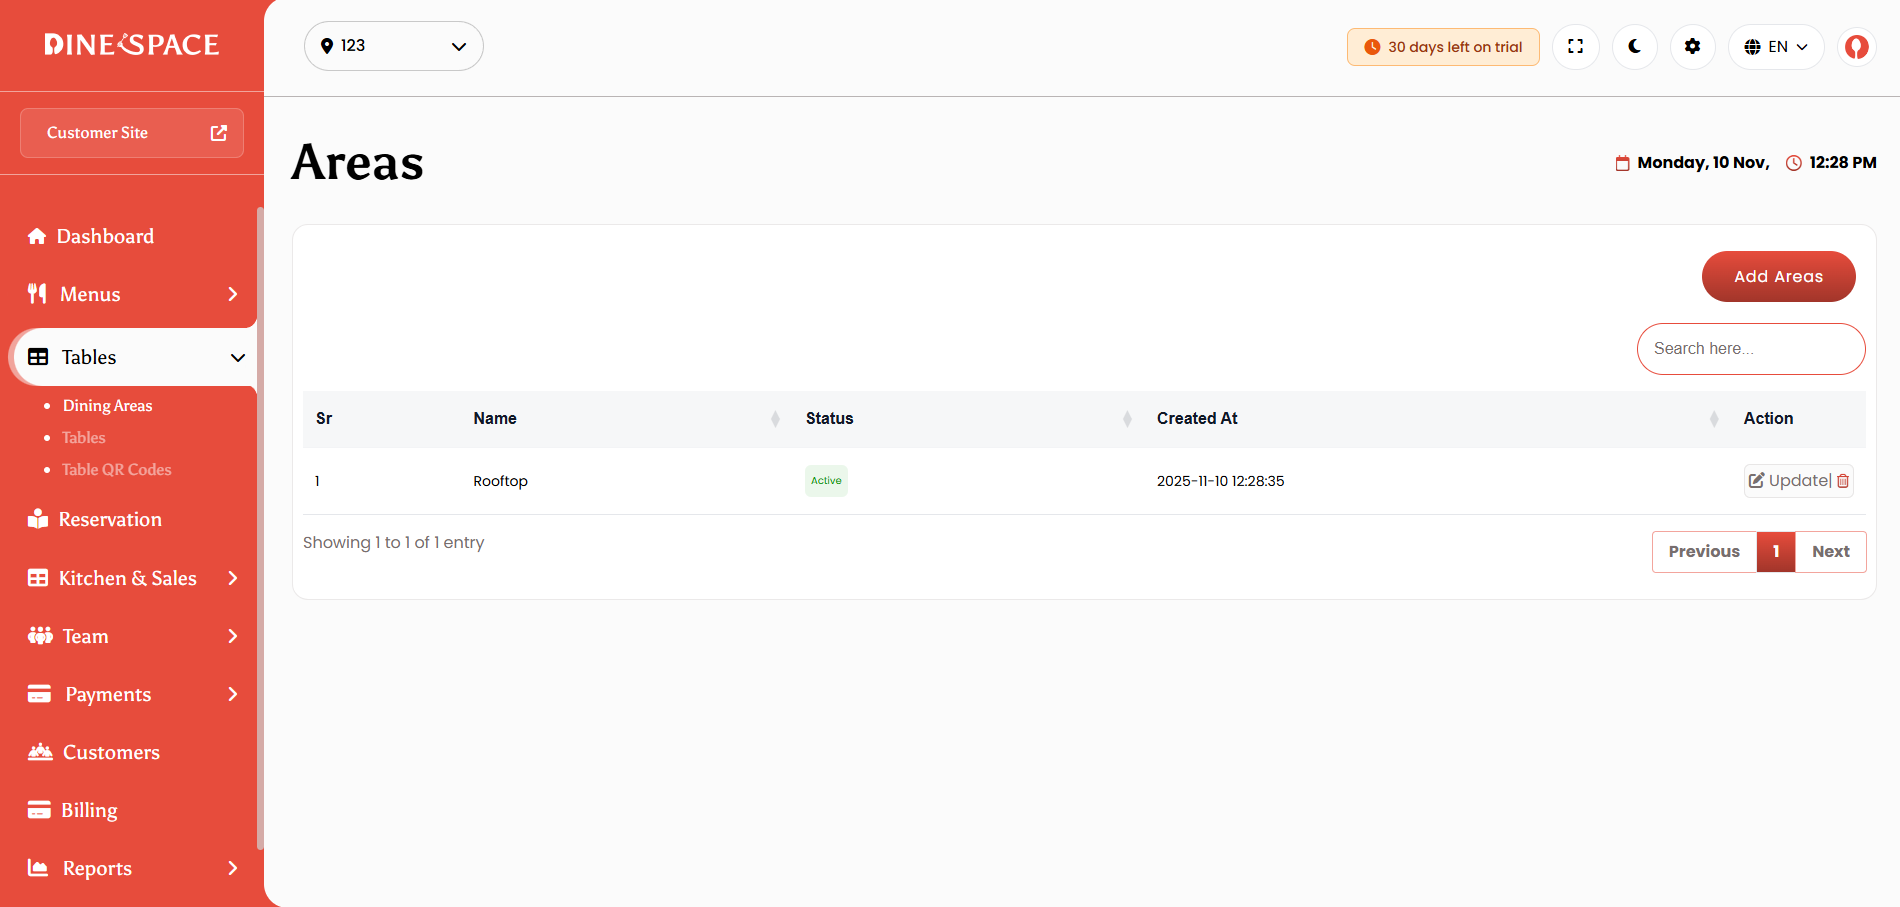
Dining Areas:
Create, edit, and organize different dining areas within the restaurant. You can manage activate or deactivate areas, and maintain a structured layout for better table organization.
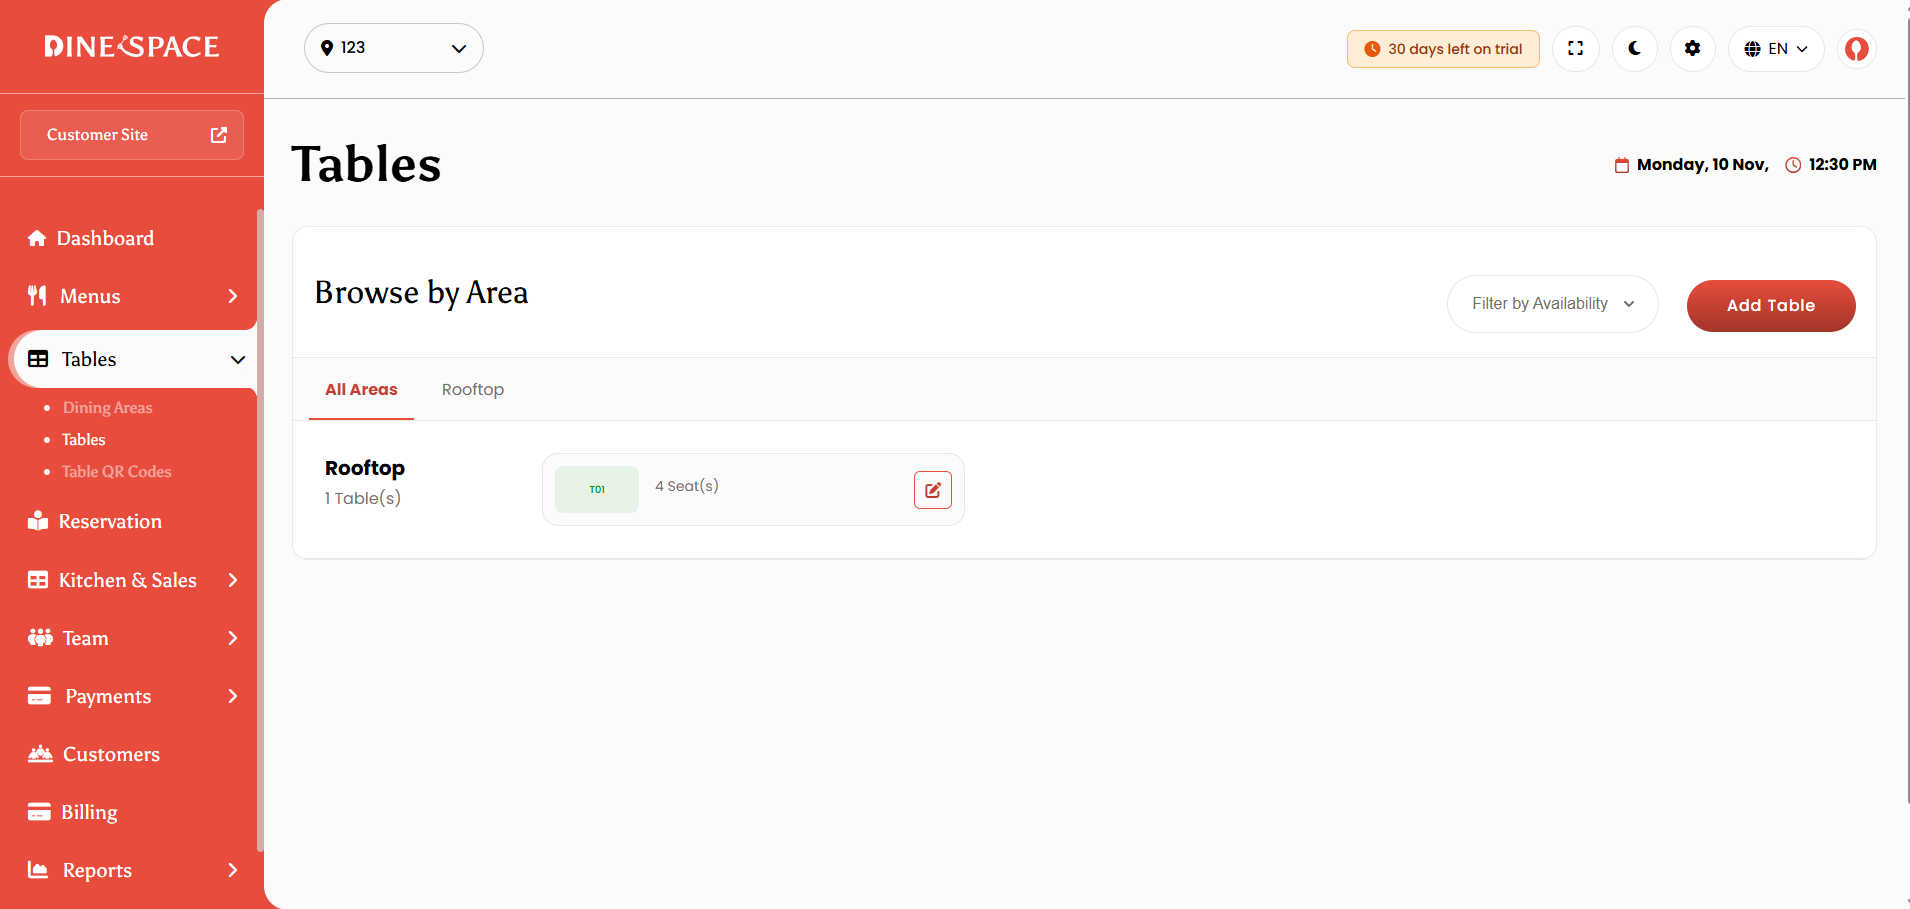
Tables:
Manage tables efficiently by creating and assigning them to specific dining areas. Set table capacity, manage availability and status, and generate unique QR codes for each table.
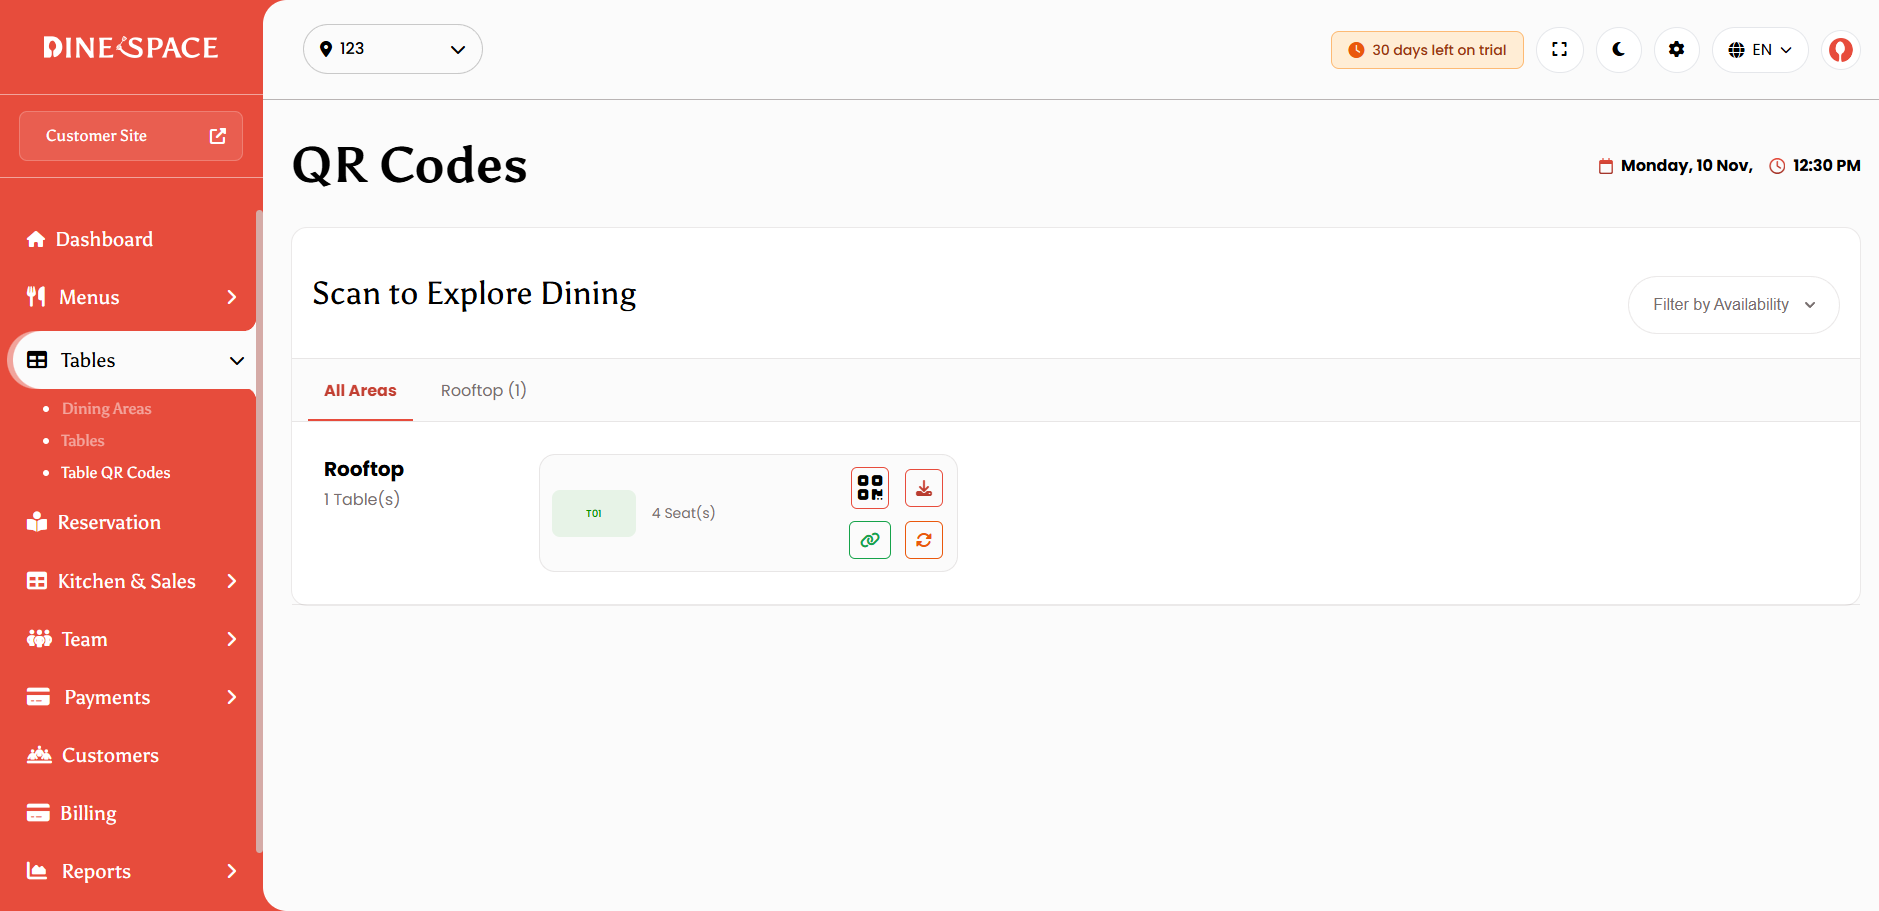
QR Code :
Automatically generate QR codes for tables to streamline the dining experience. These QR codes can be downloaded, or regenerated anytime, allowing customers to access digital menus.
Kitchen & Sales

Team
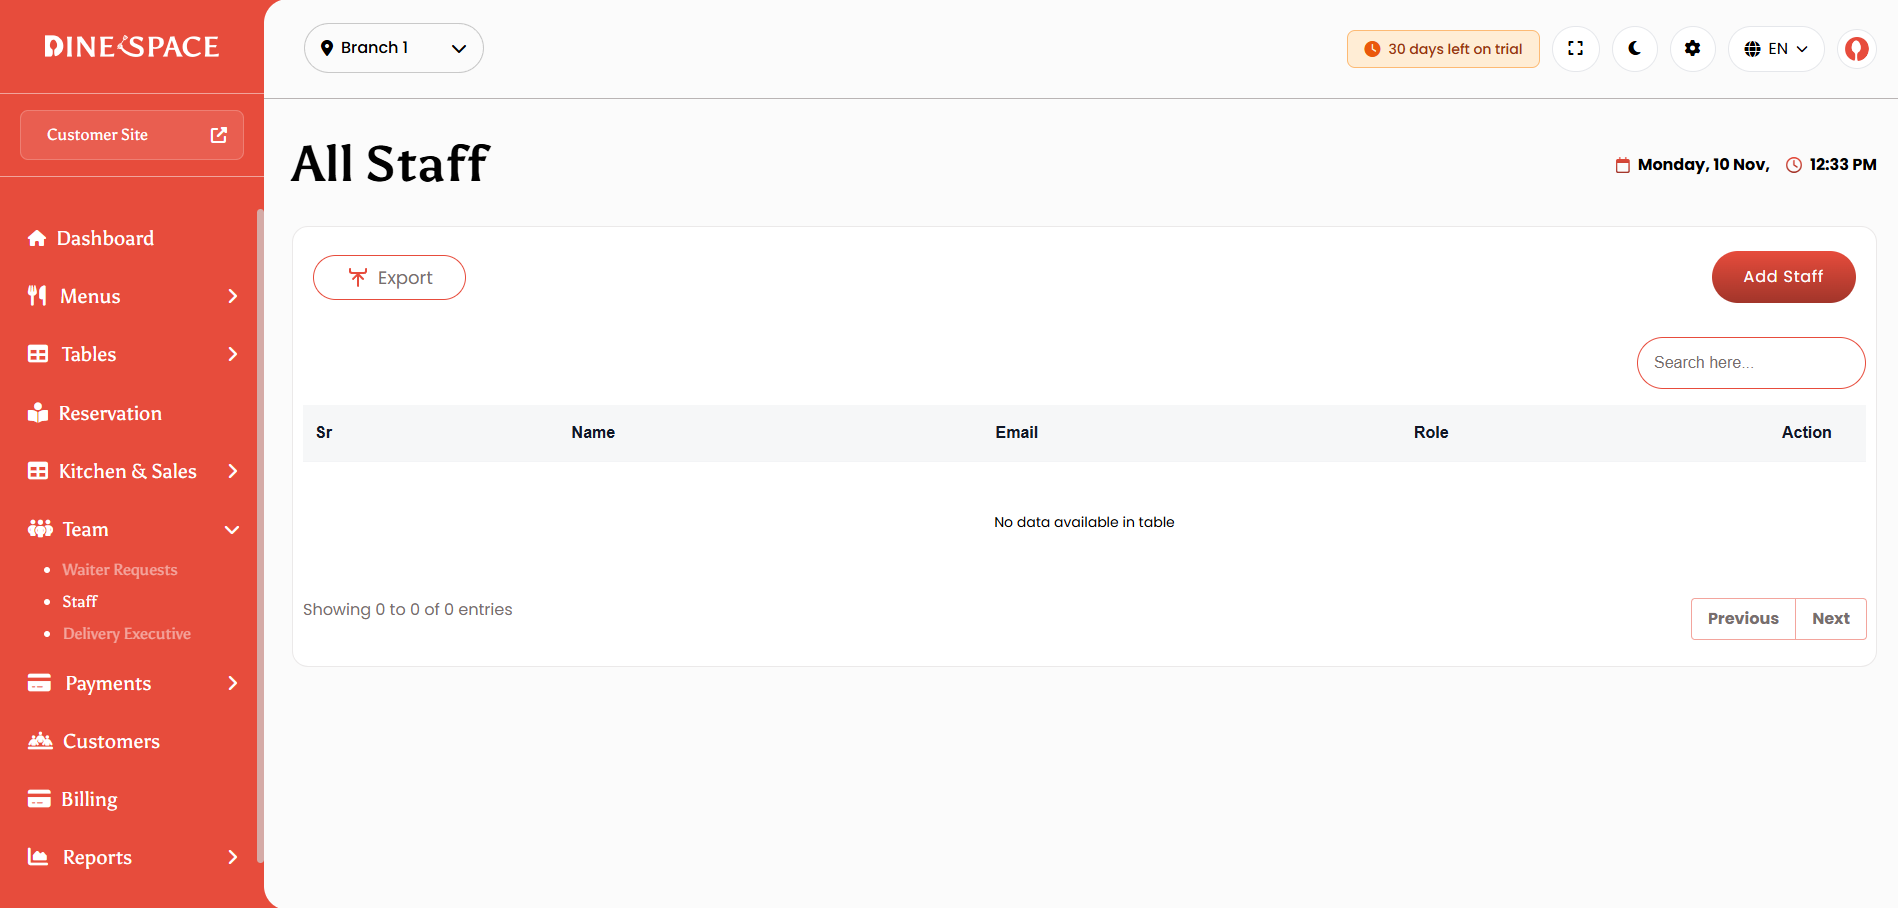
Staff :
Add, edit, or delete staff members, assign specific roles, set permissions, and manage their active status to ensure proper access control within the system.
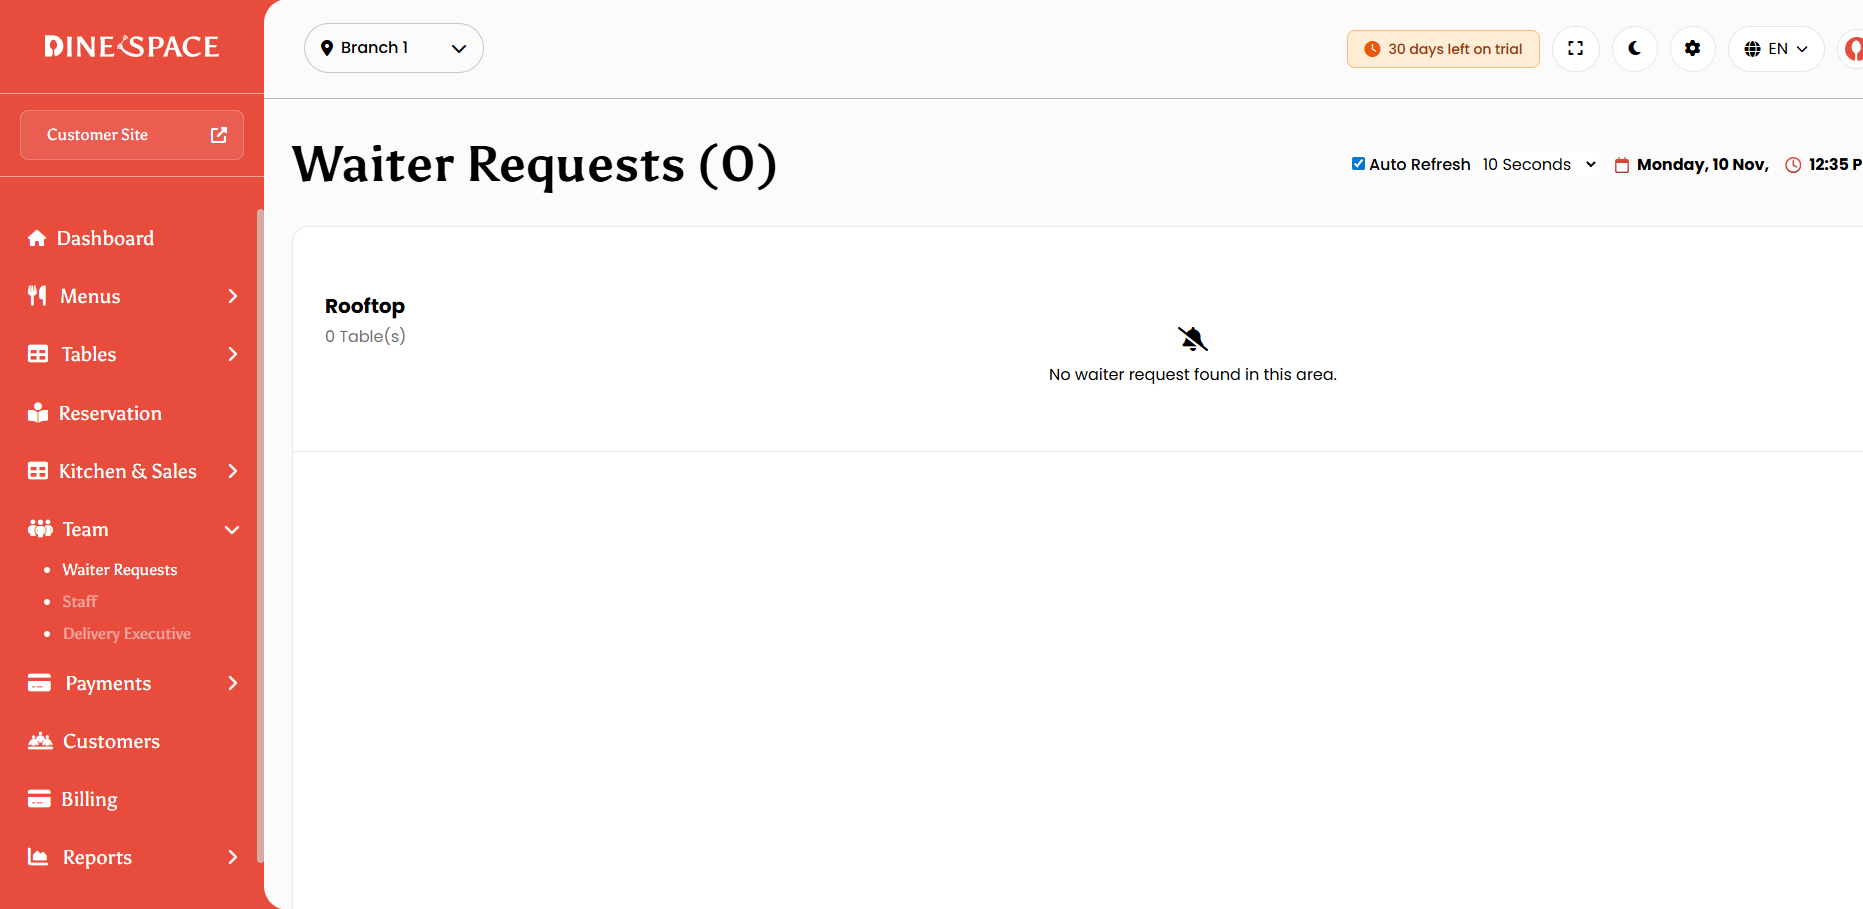
Waiter Requests:
View and manage waiter requests submitted by customers, track their status, and view detailed information about each request and its associated order.
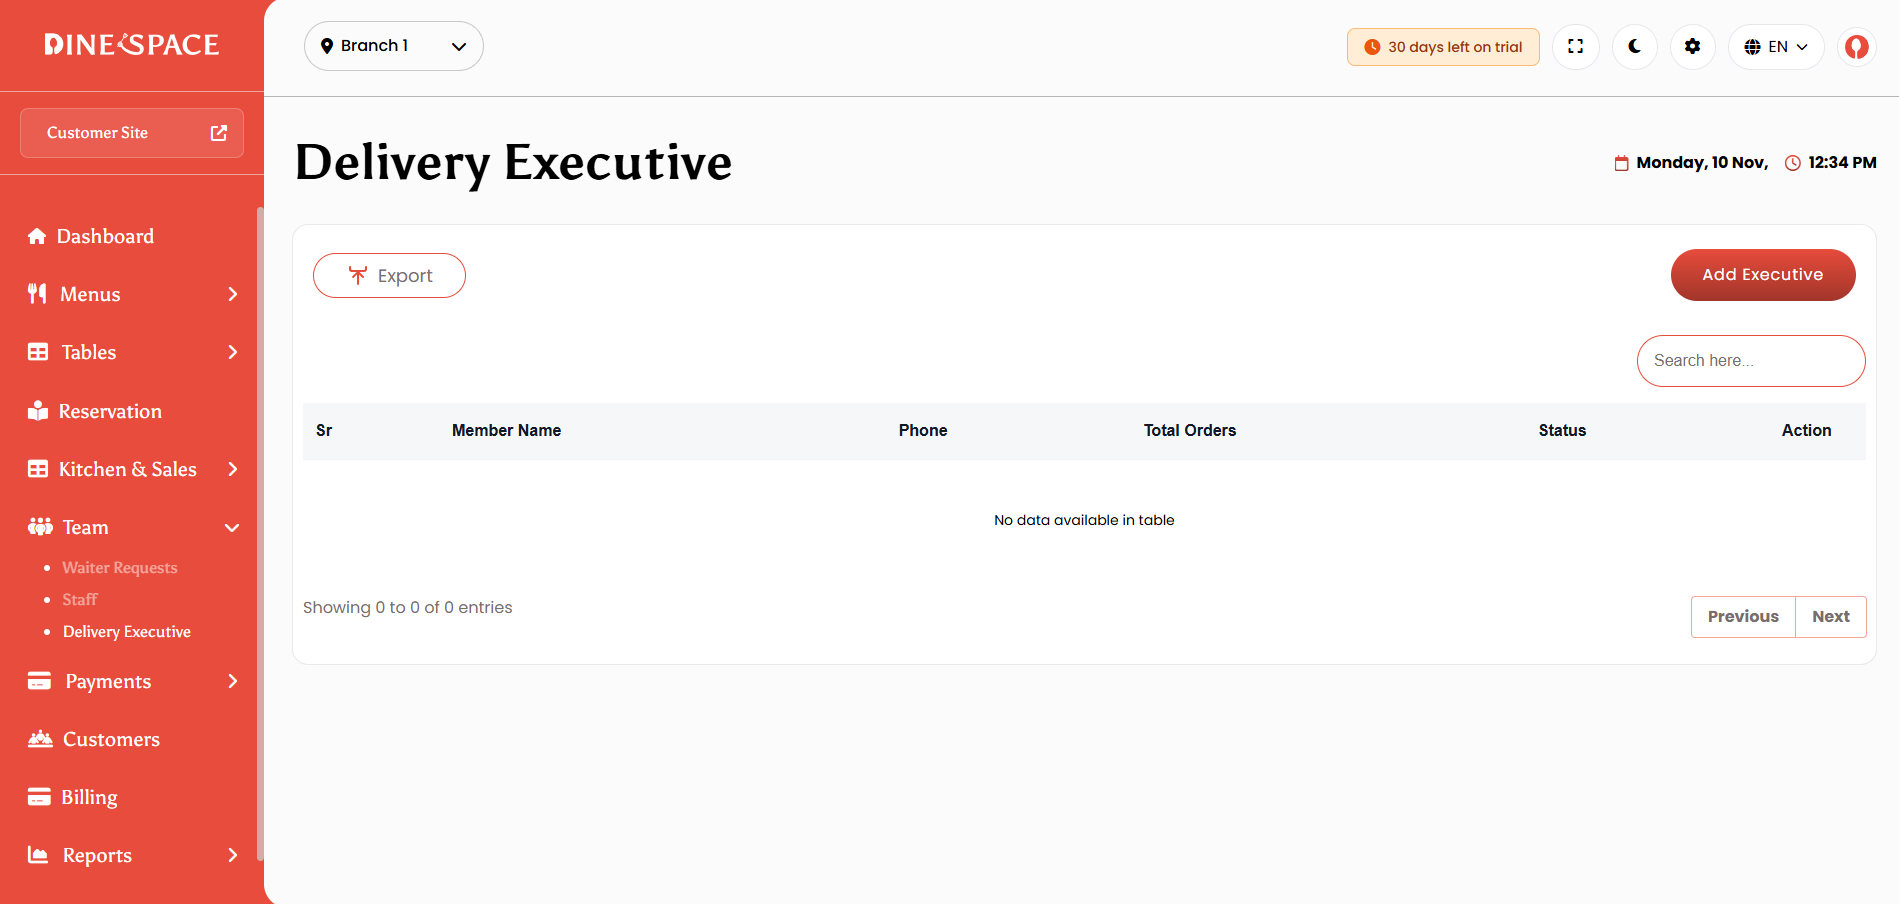
Delivery Executive :
Manage delivery personnel by adding, editing, or deleting delivery executives, controlling their status, and assigning them to takeaway or delivery orders as needed.
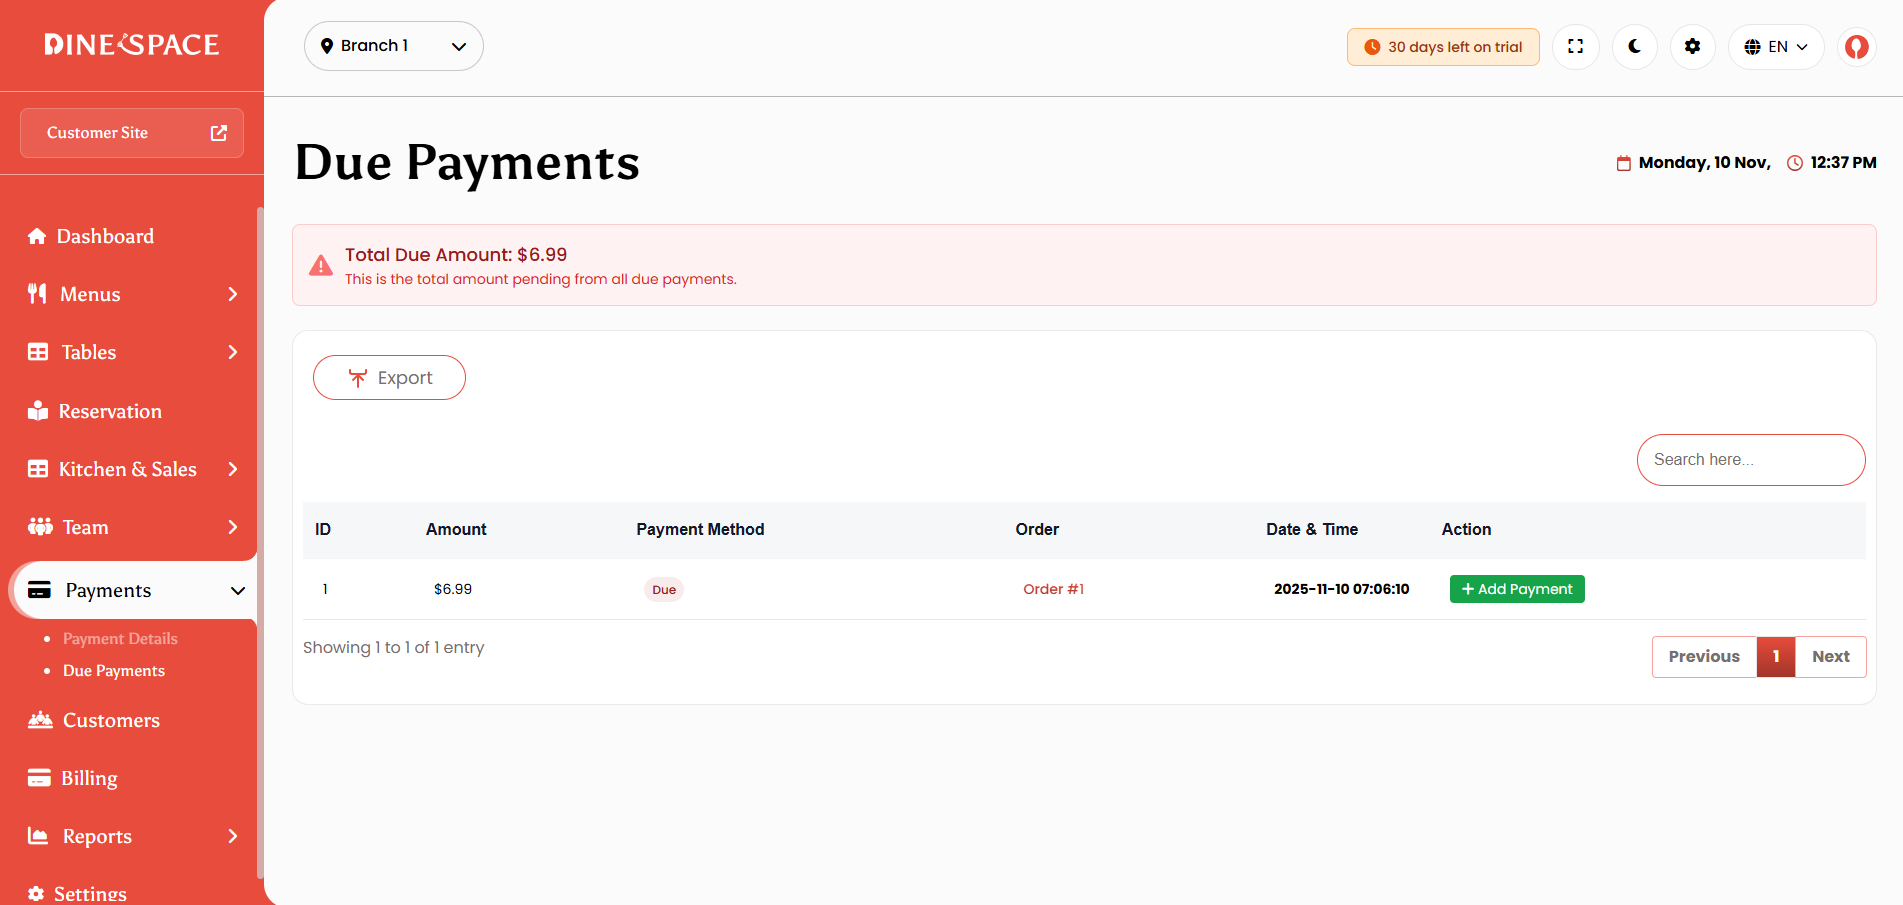
Payment
The Payment Management module is divided into Payment and Due Payment sections to manage all financial transactions efficiently.
Payment Page: Lists all order payments with detailed order information, allowing you to view payment status, method, and history for each order.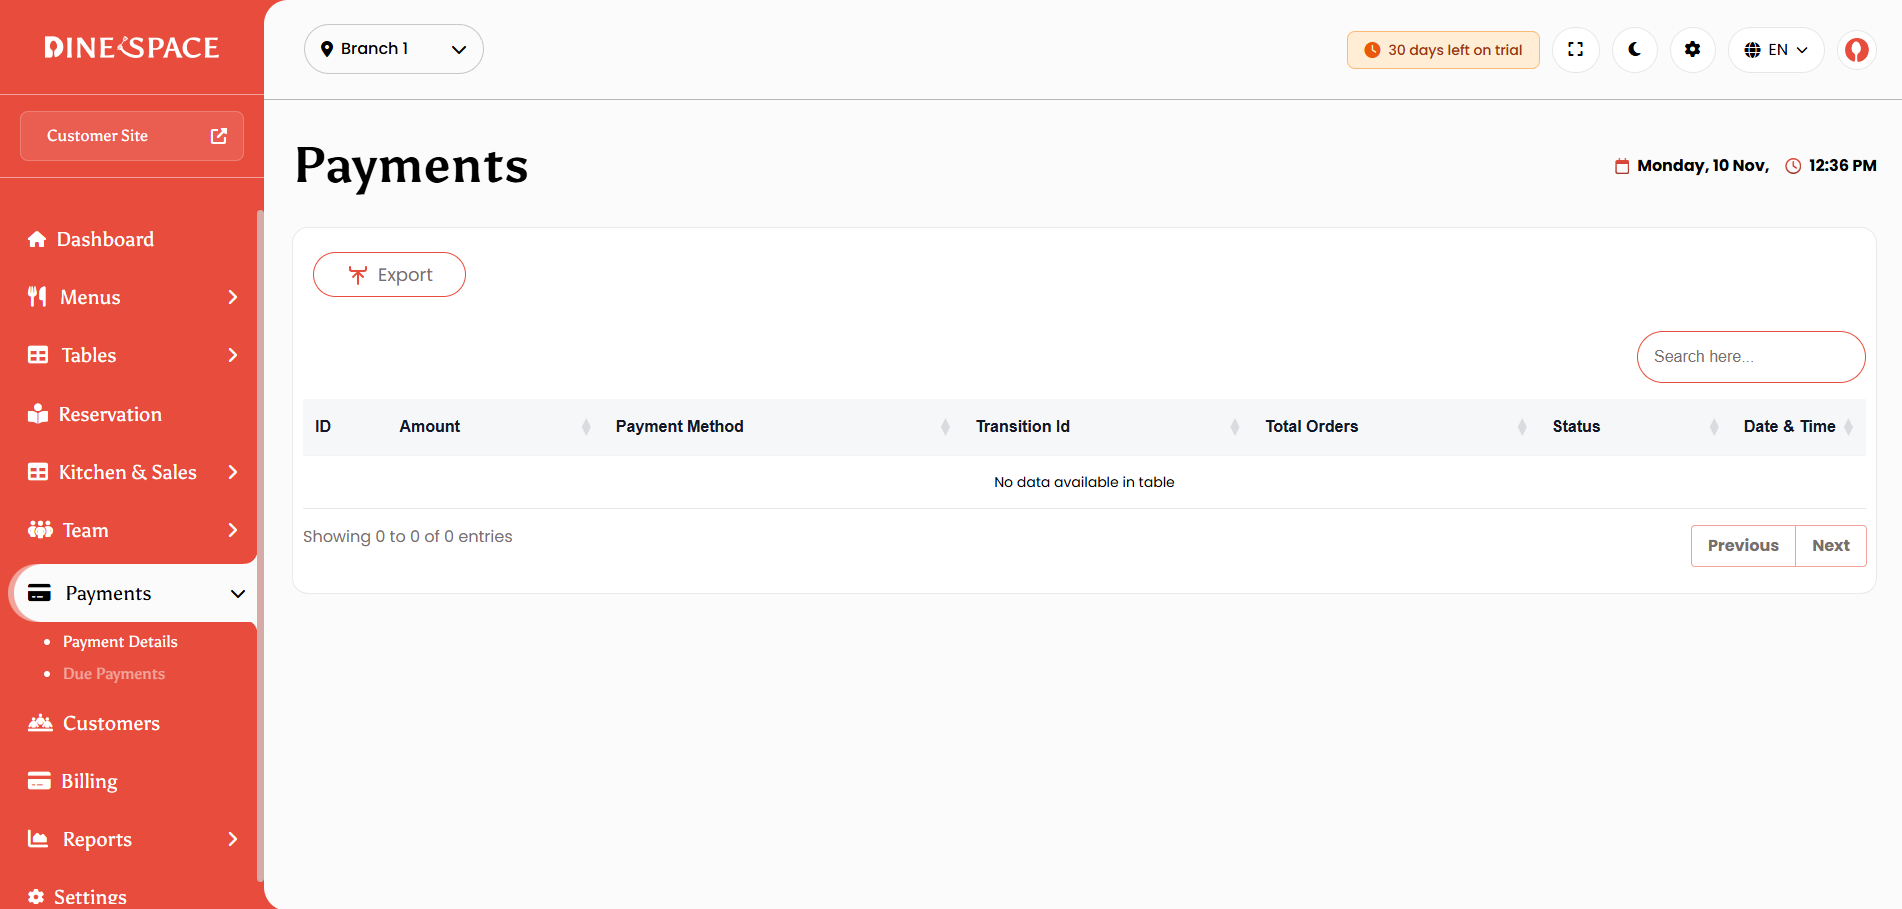
Due Payment Page: Displays existing due payments for orders. You can mark a due payment as completed by selecting a payment method, ensuring all outstanding amounts are settled.
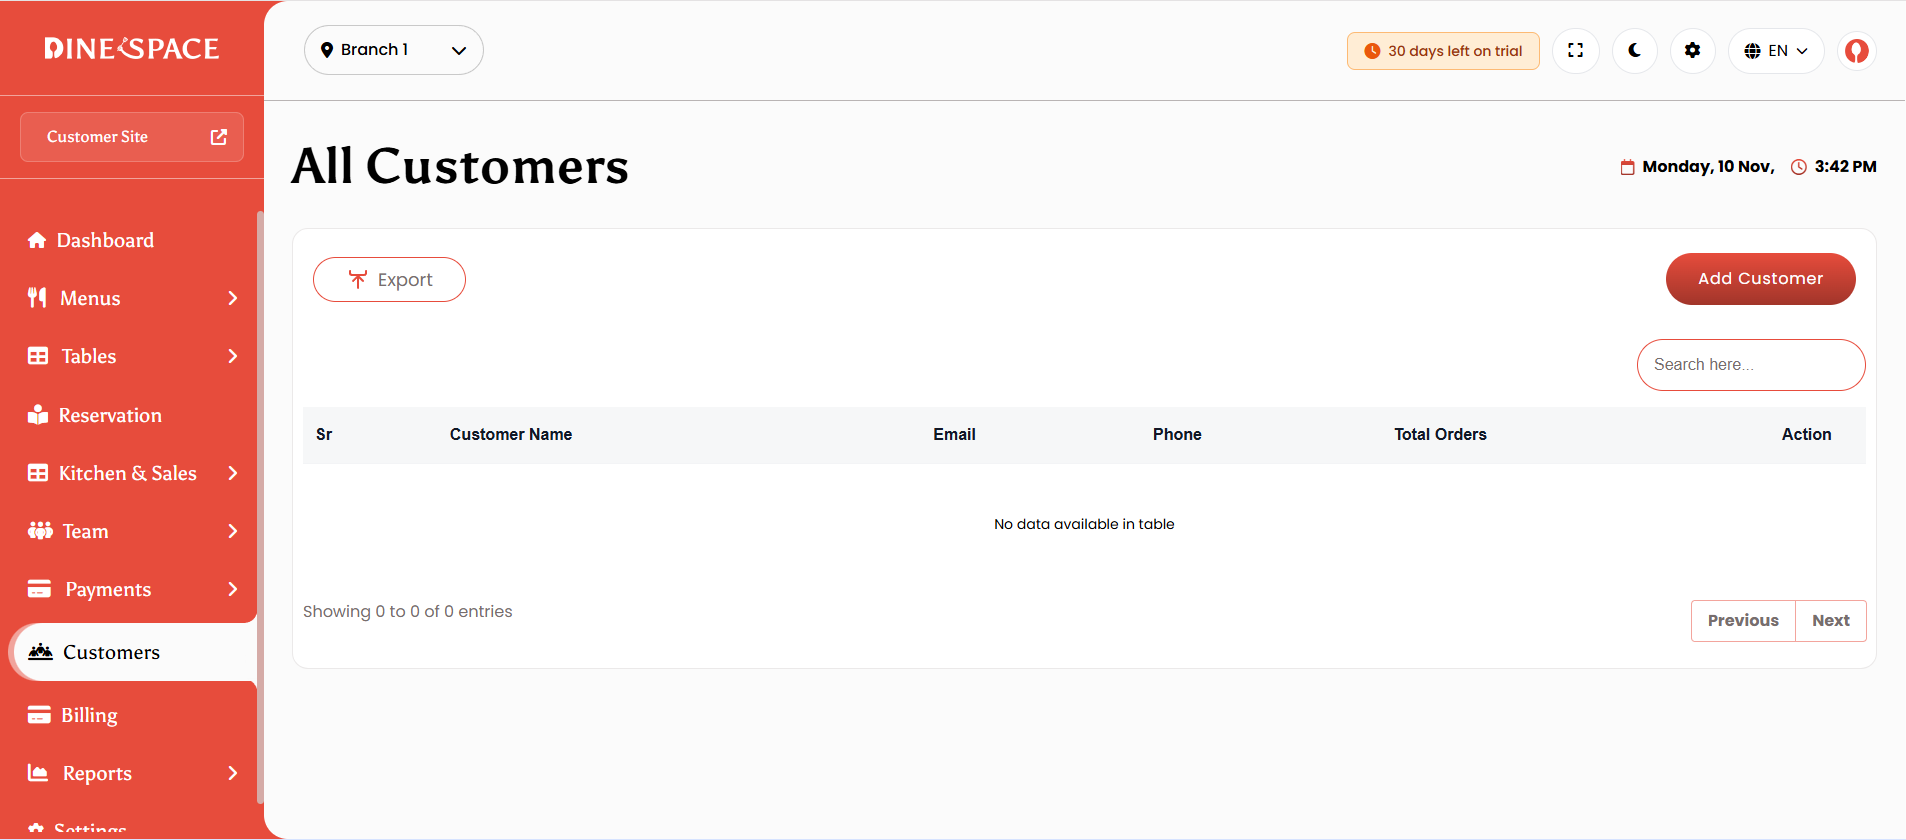
Customers
The Customer Management module allows restaurants to manage their customer database efficiently. You can view the complete customer list, add new customers manually, edit existing customer details, and delete customers if needed. The module also displays the number of orders placed by each customer, providing insights into customer activity and engagement.
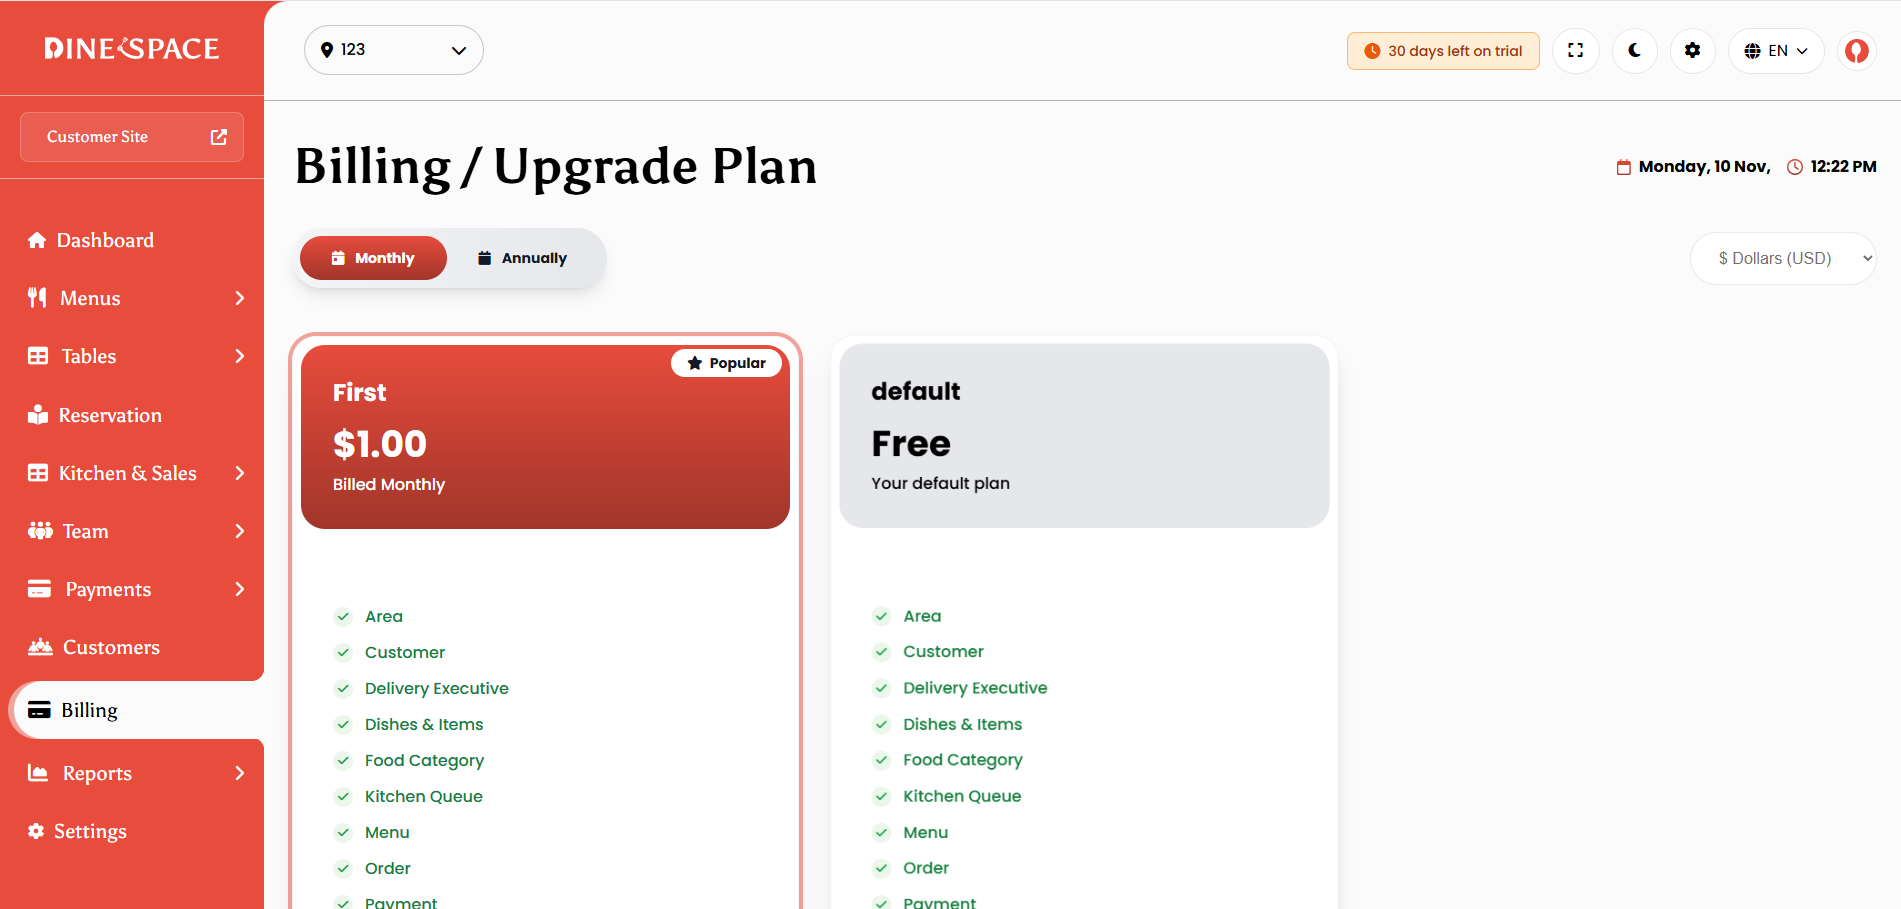
Billing
The Billing section allows restaurants to manage their subscription and payment information. You can view the current package details, upgrade or downgrade the package, access payment history, download invoices, and handle offline payment requests.
Settings
Settings Management allows restaurant owners to configure core settings for smooth operations and consistent branding. This includes restaurant details, app preferences, payment gateways, reservations, staff roles, customer site options, and billing.

Restaurant Information Settings : Manage restaurant name, email, phone, and address.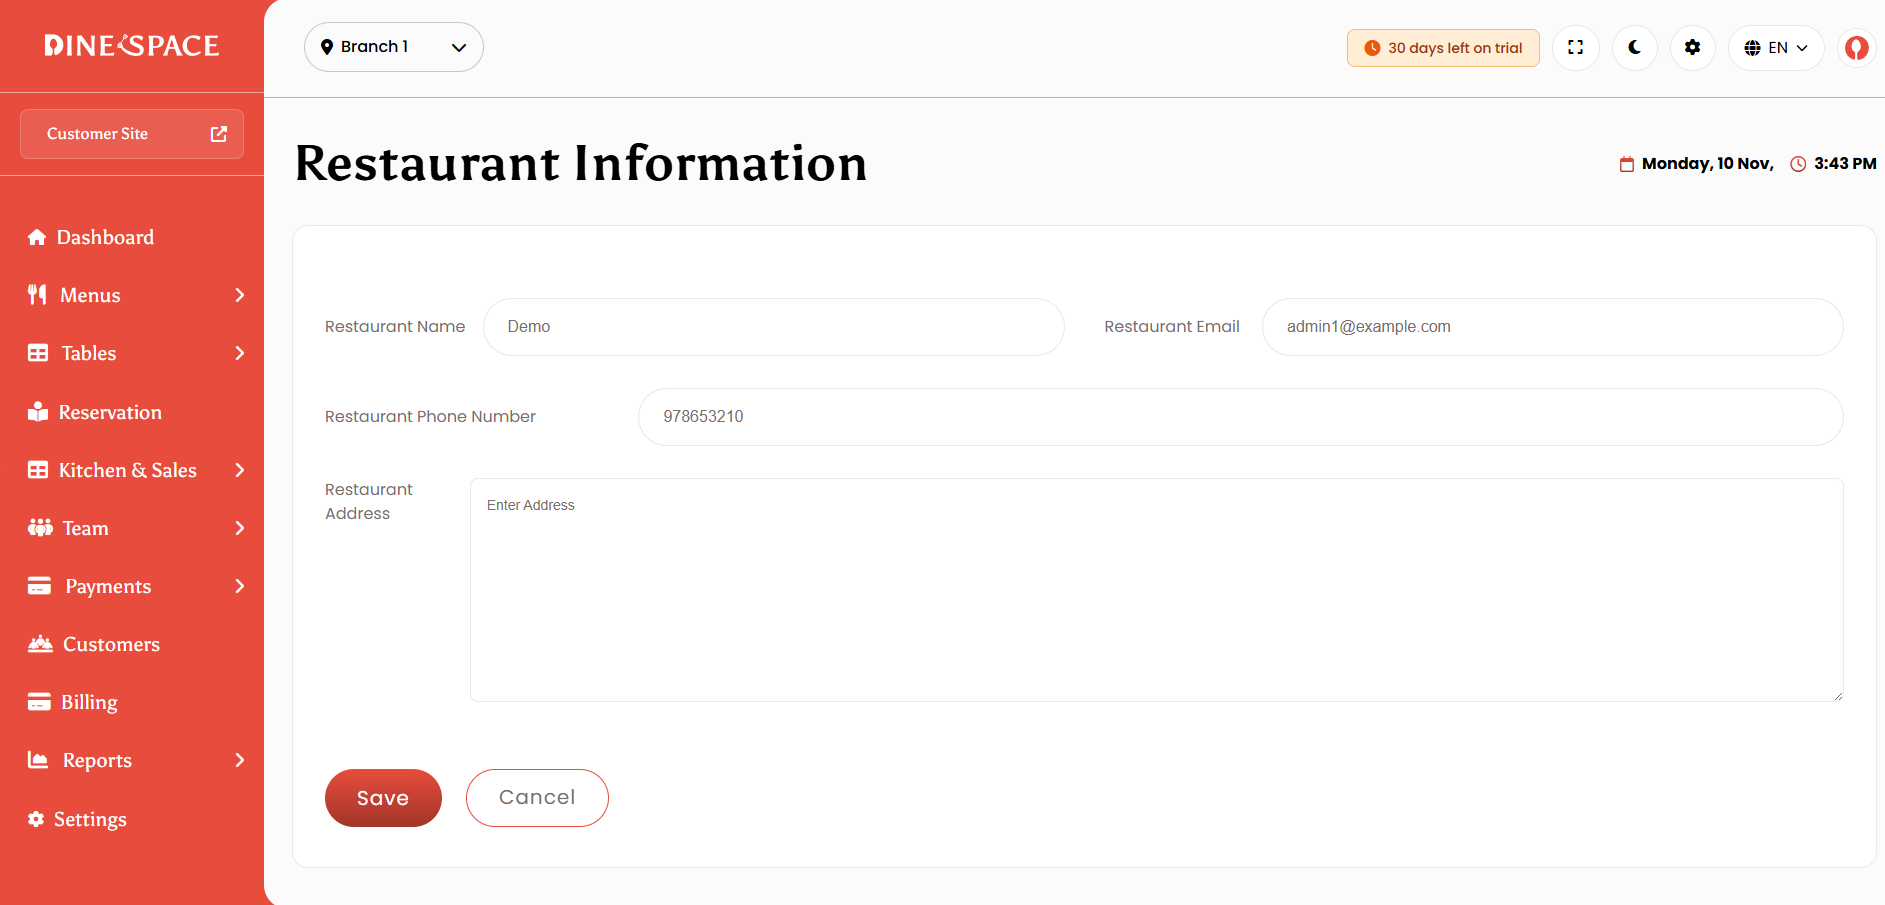
App Settings : Set default country, currency, and language.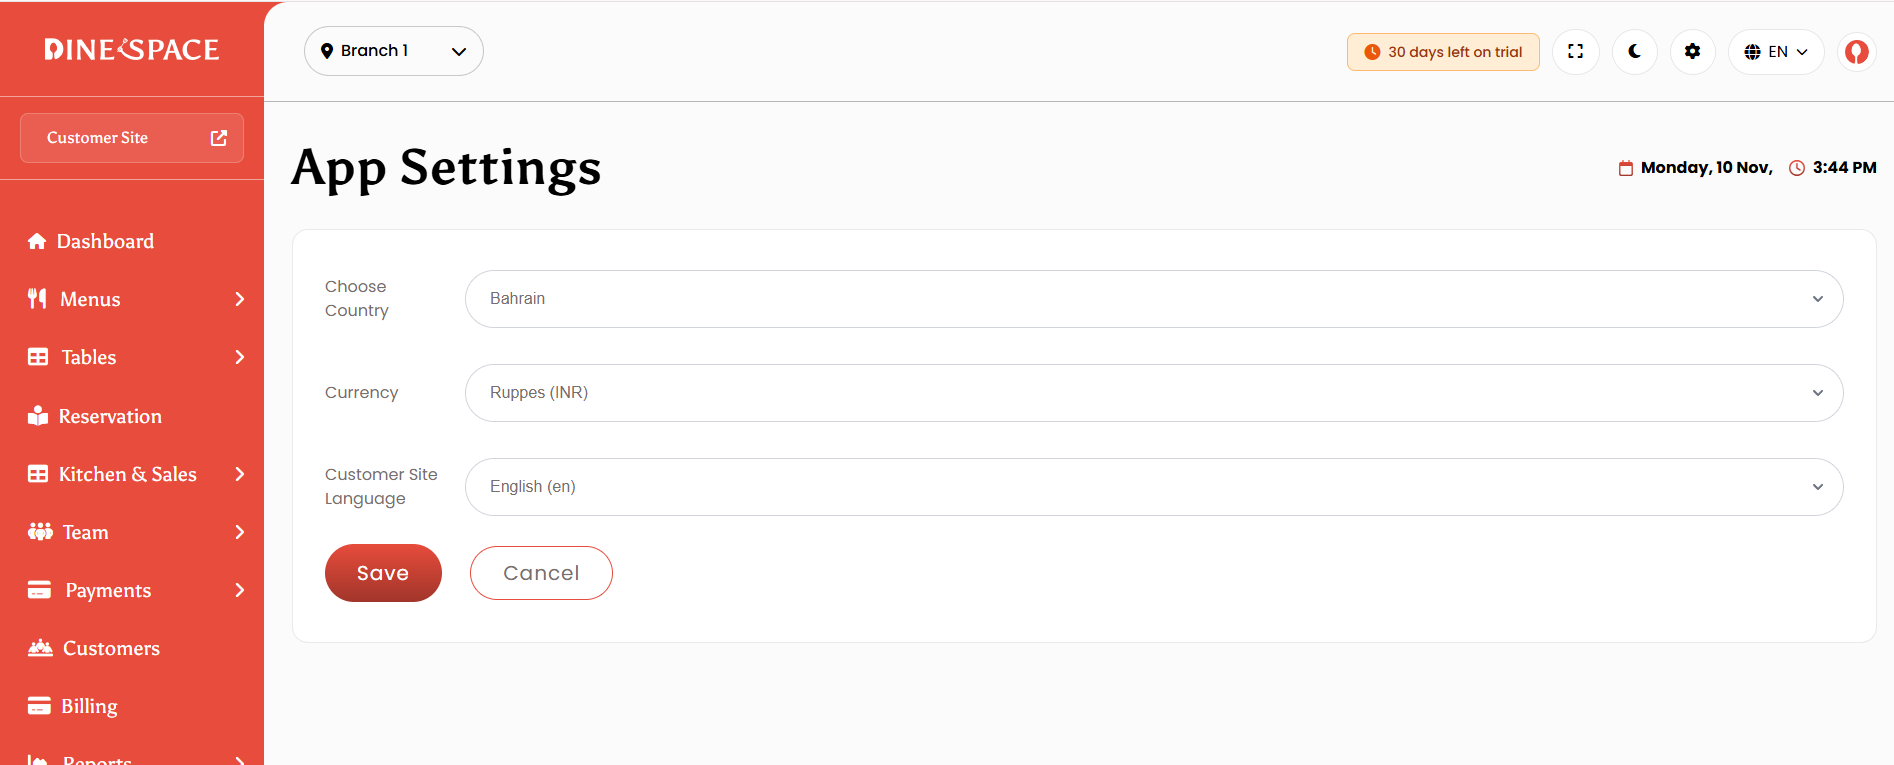
Branch Settings : Create, edit, activate/deactivate branches, and set a default branch.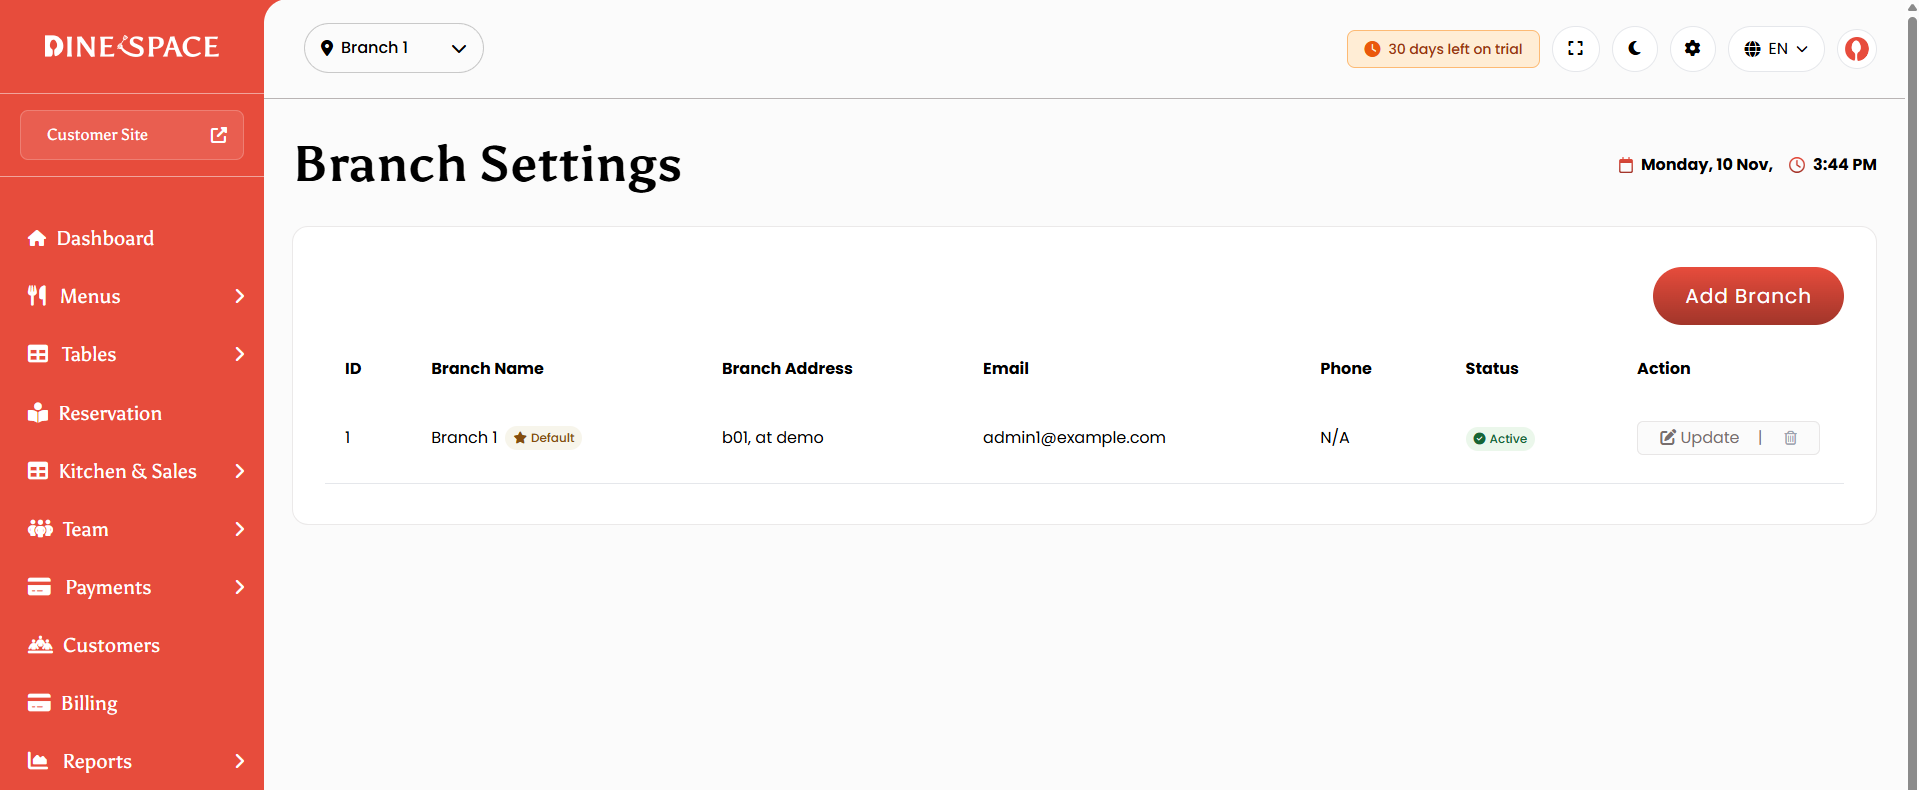
Theme Settings : Upload logo, favicon, and configure site brand color.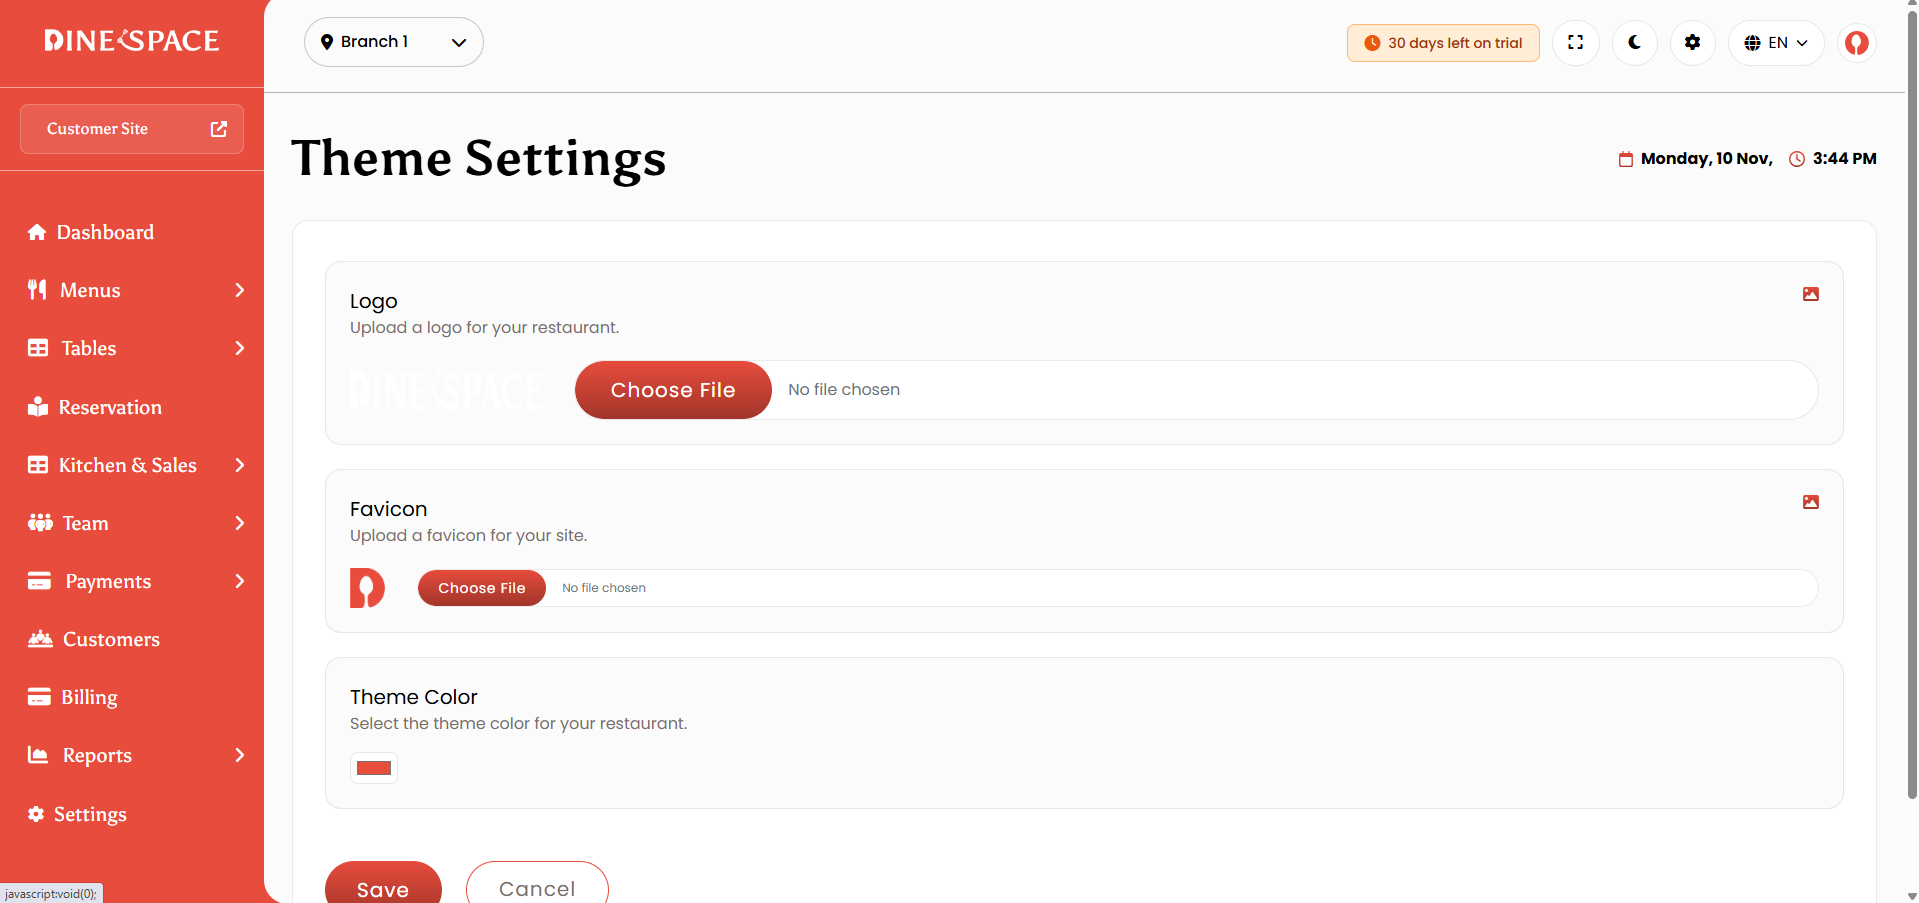
Reservation Settings : Configure table reservation slots, meal periods, and enable/disable admin or customer confirmations.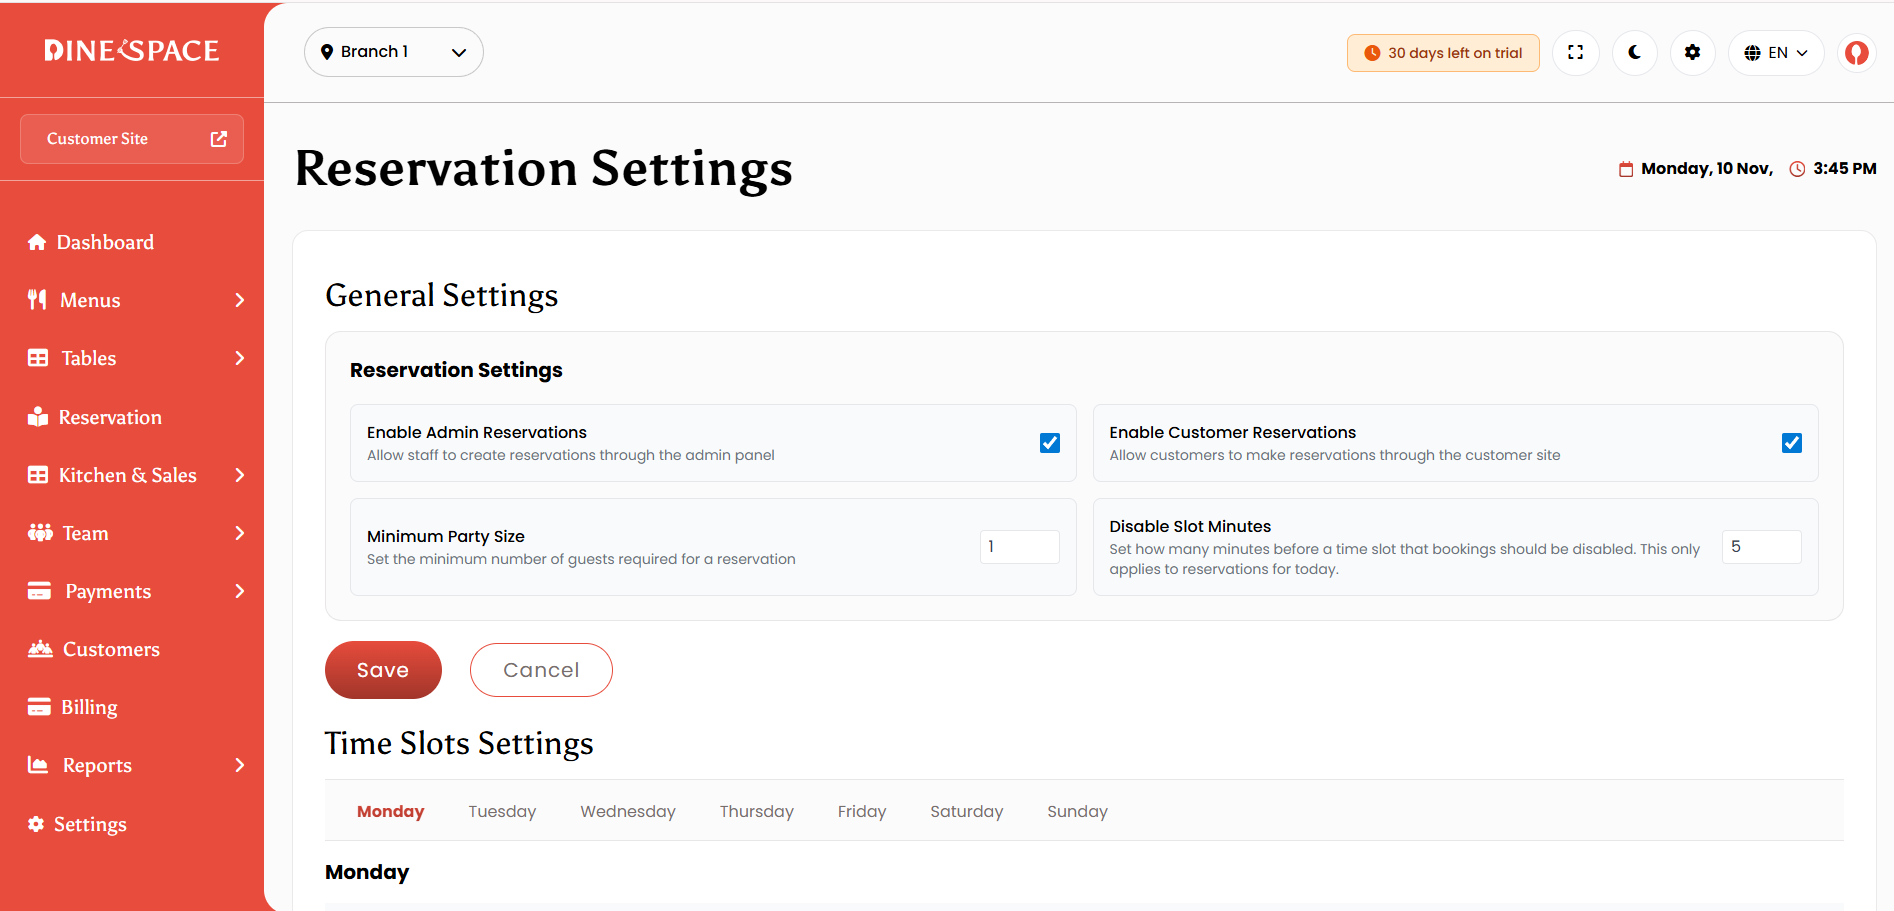
Email Settings : Manage notifications for orders, reservations, and staff communications.
Taxes : Add, edit, and apply taxes to orders and menu items.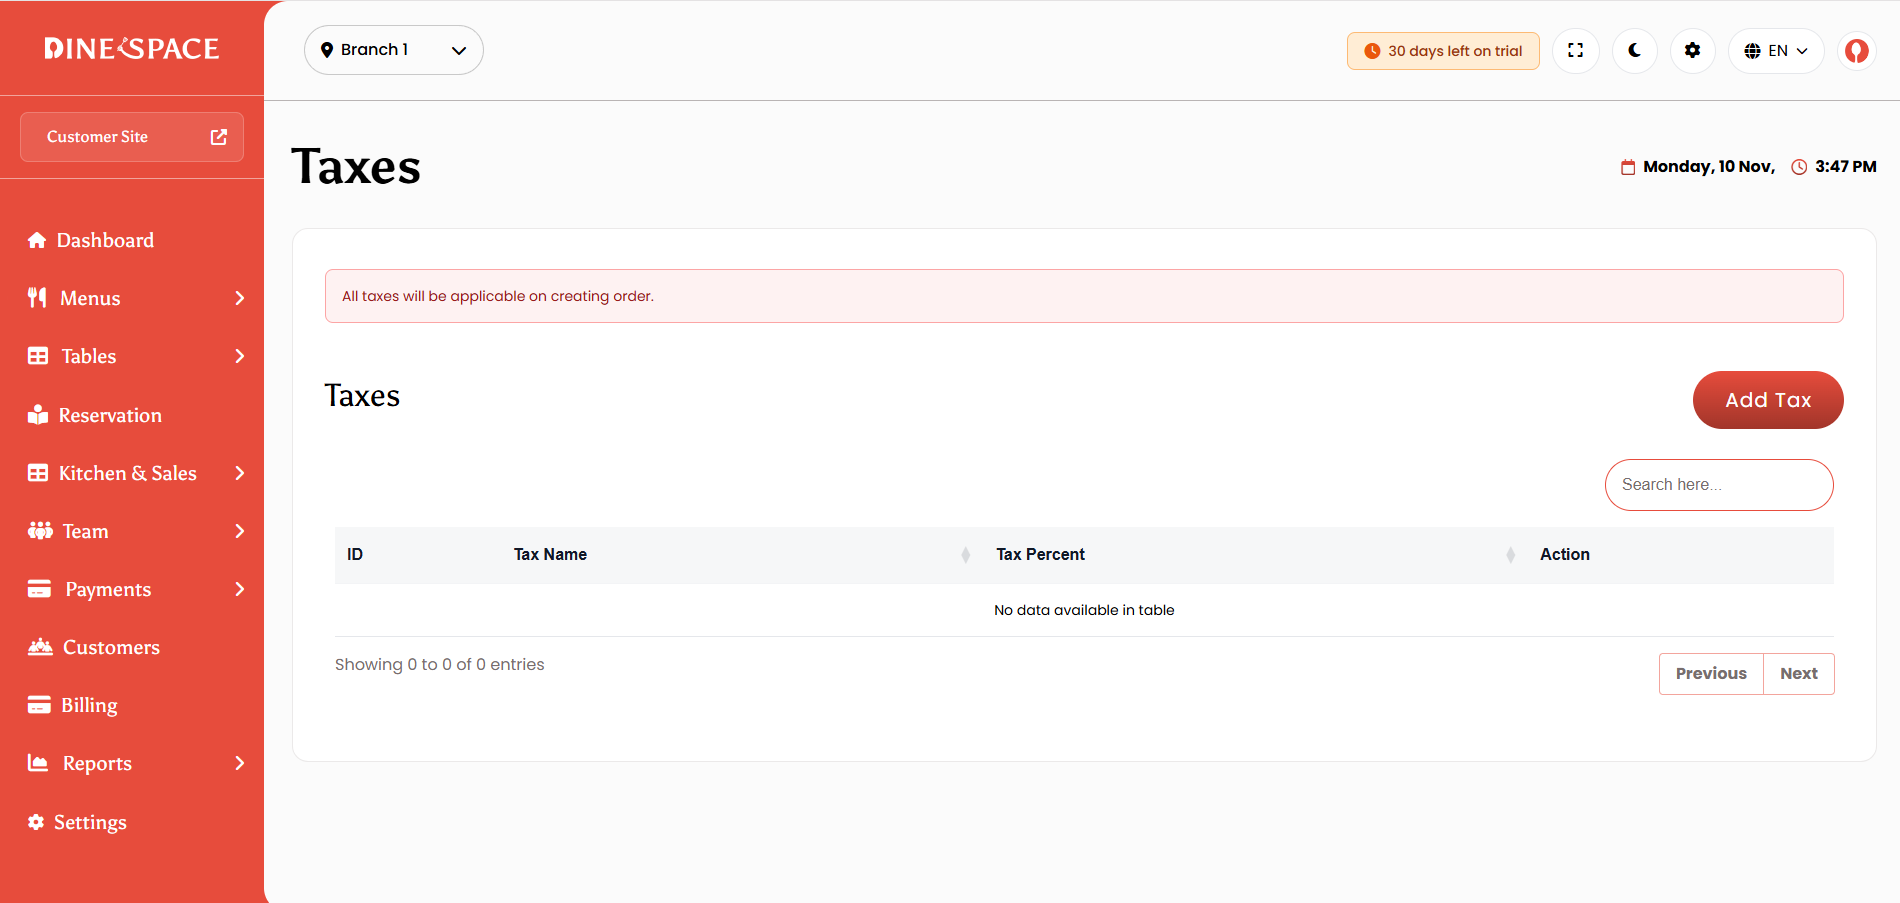
Payment Gateways : Configure Stripe, offline payments, cash, and QR code payments.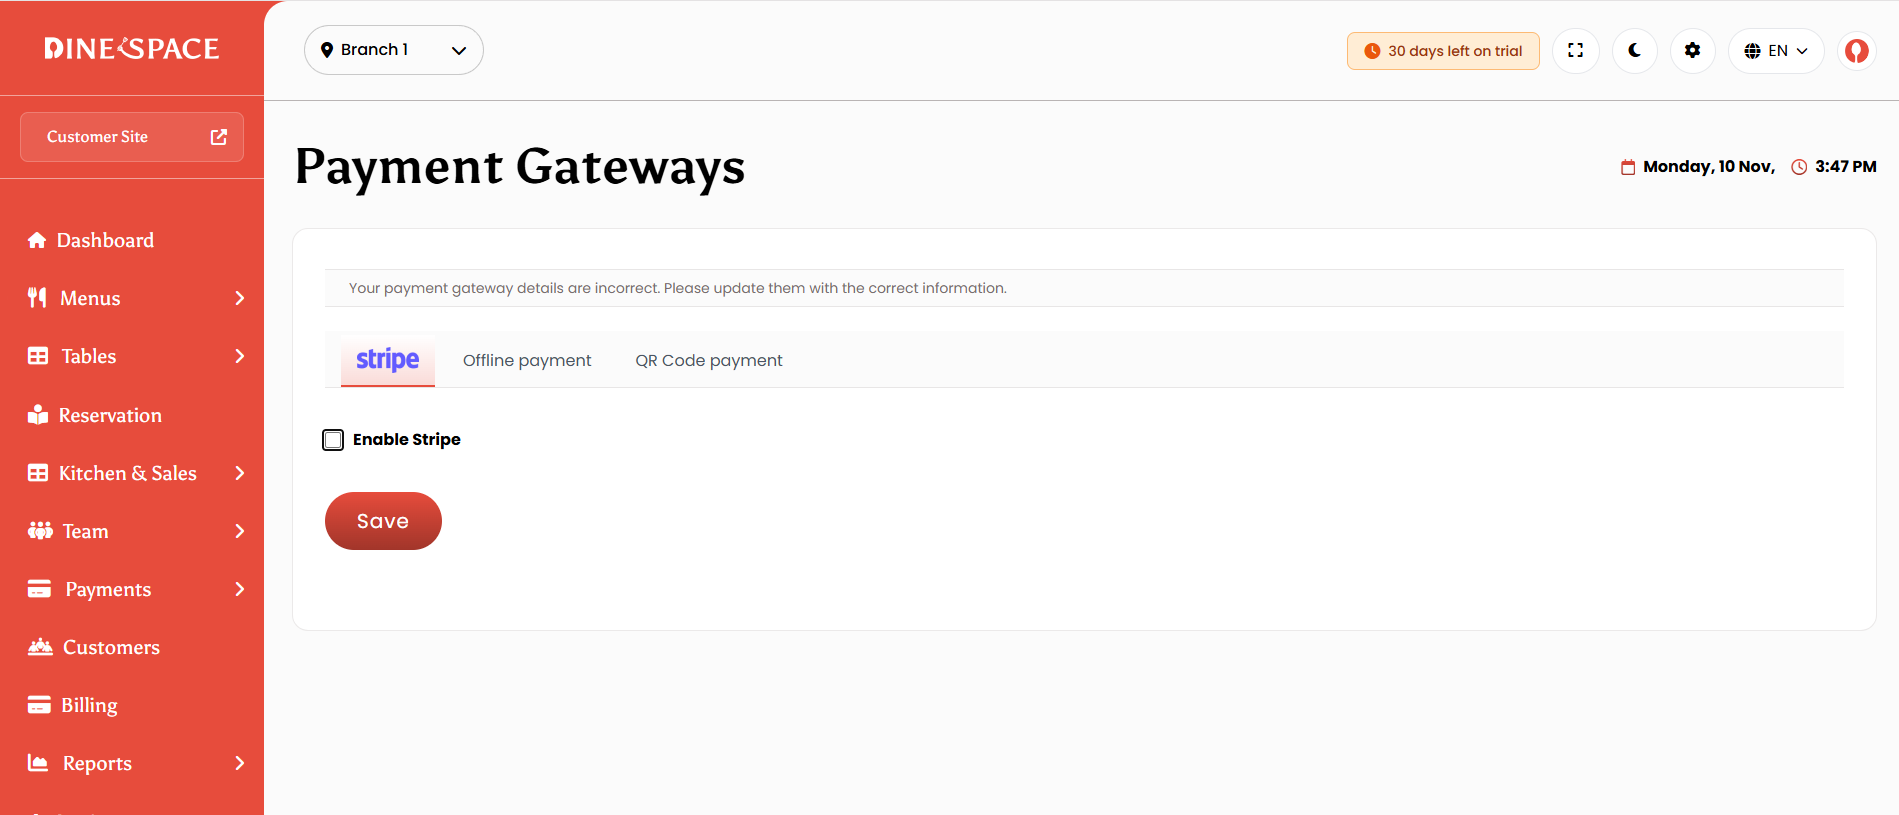
Customer Site Settings : Manage order options, pickup/delivery settings, table requirements, social media links, SEO, and header customization.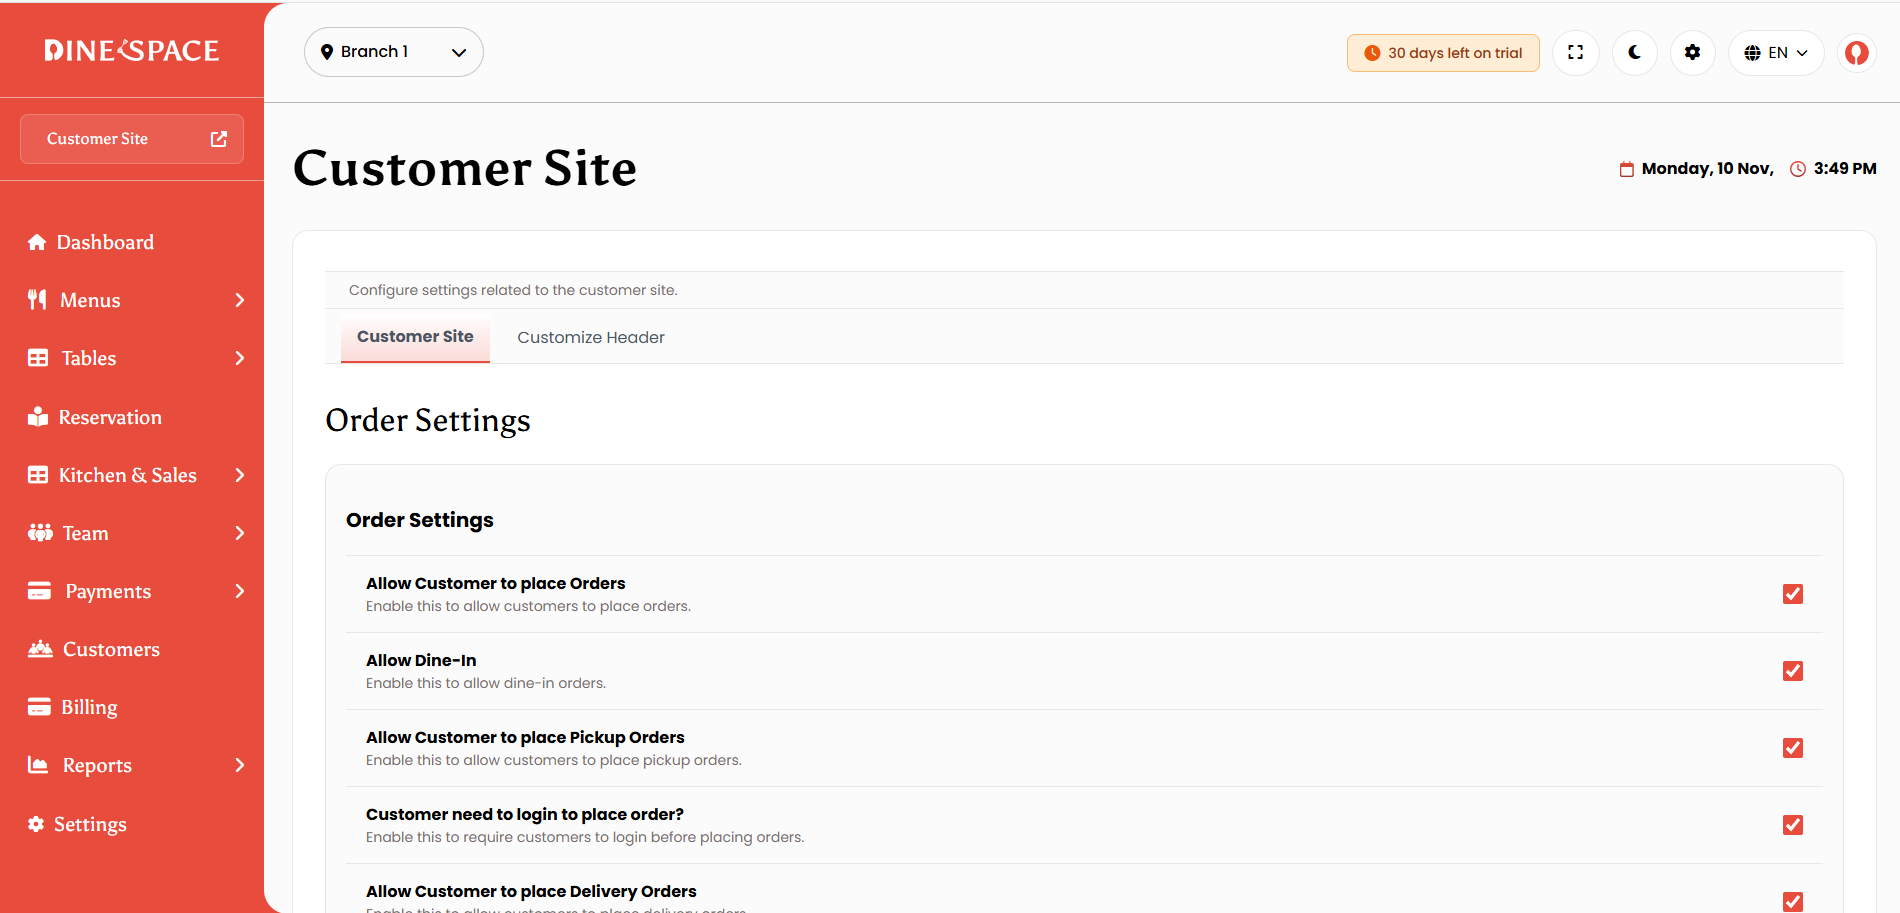
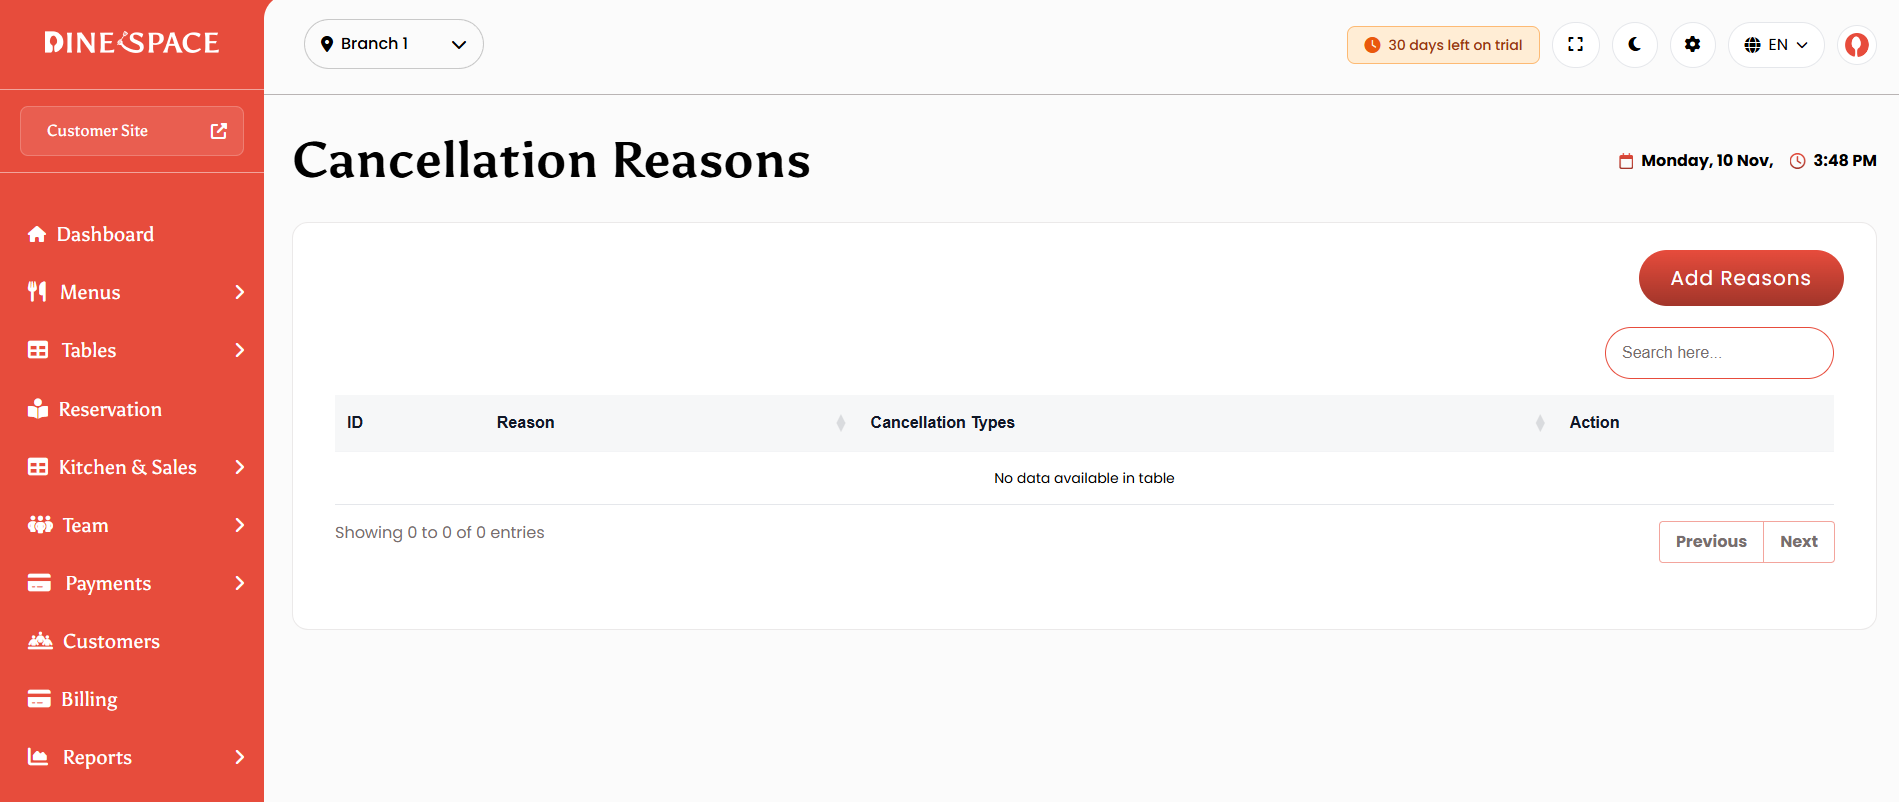
Cancellation Reasons : Create and manage reasons for order and reservation cancellations.
Currencies : Add, edit, delete, and set default currencies with symbols and formatting.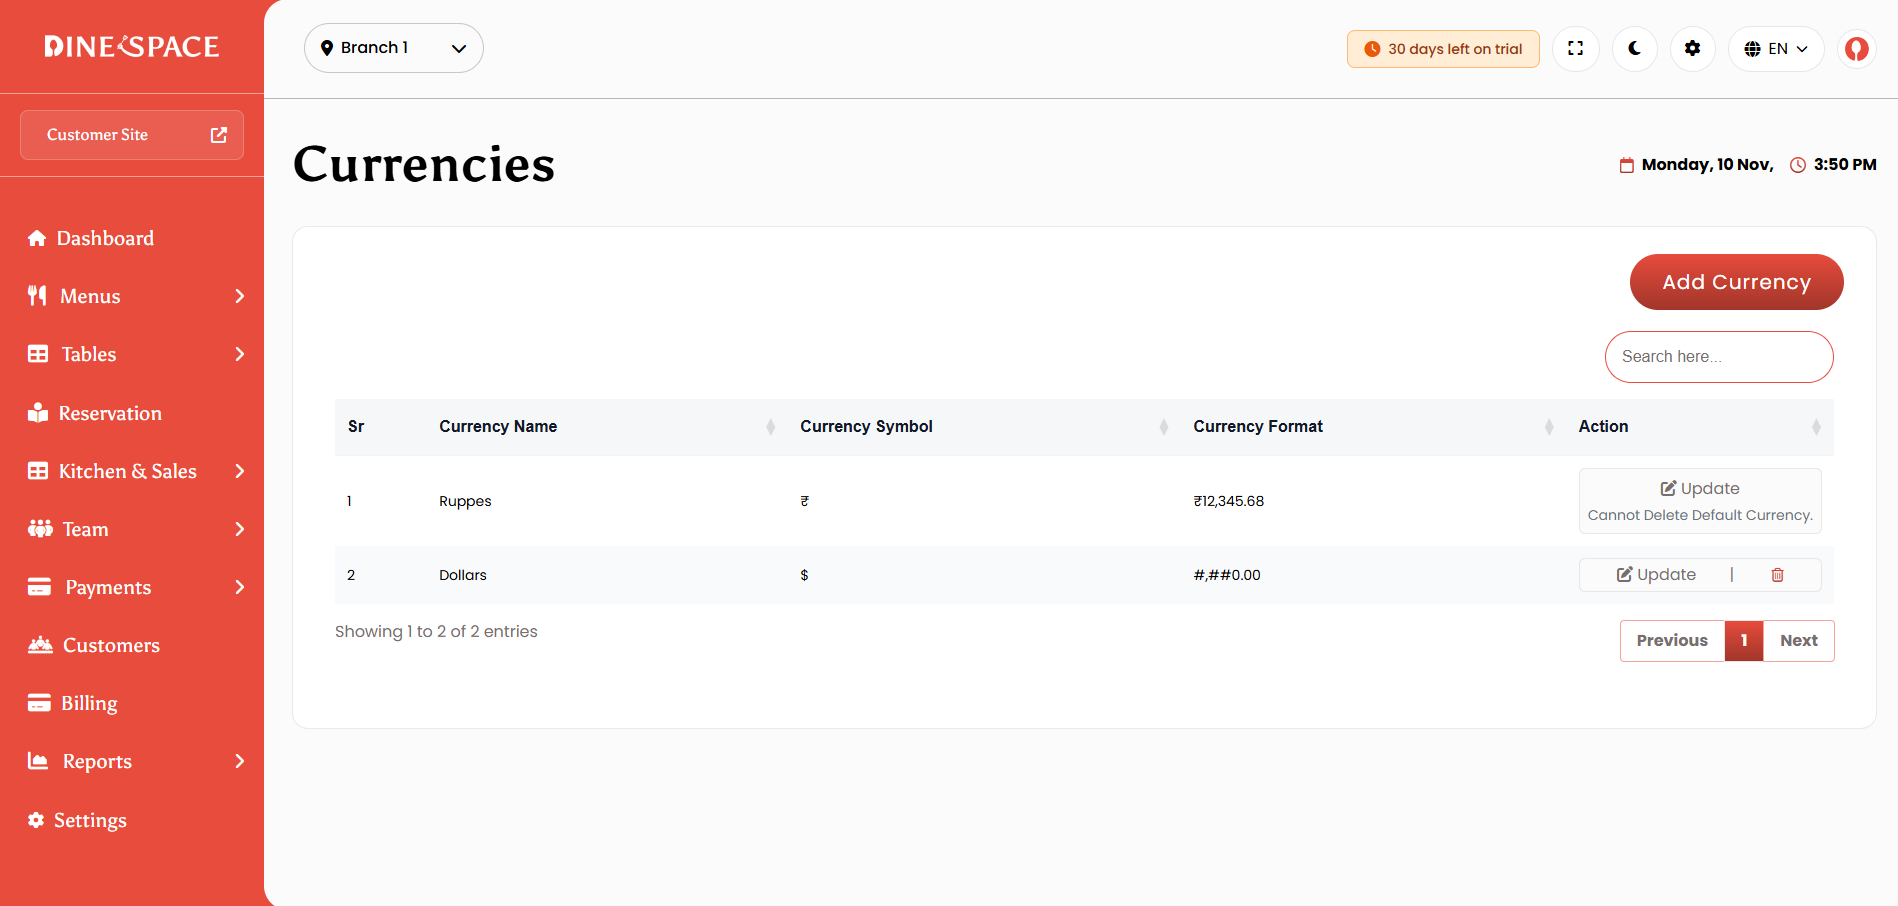
Staff Roles : Create roles, assign module permissions, and manage staff access.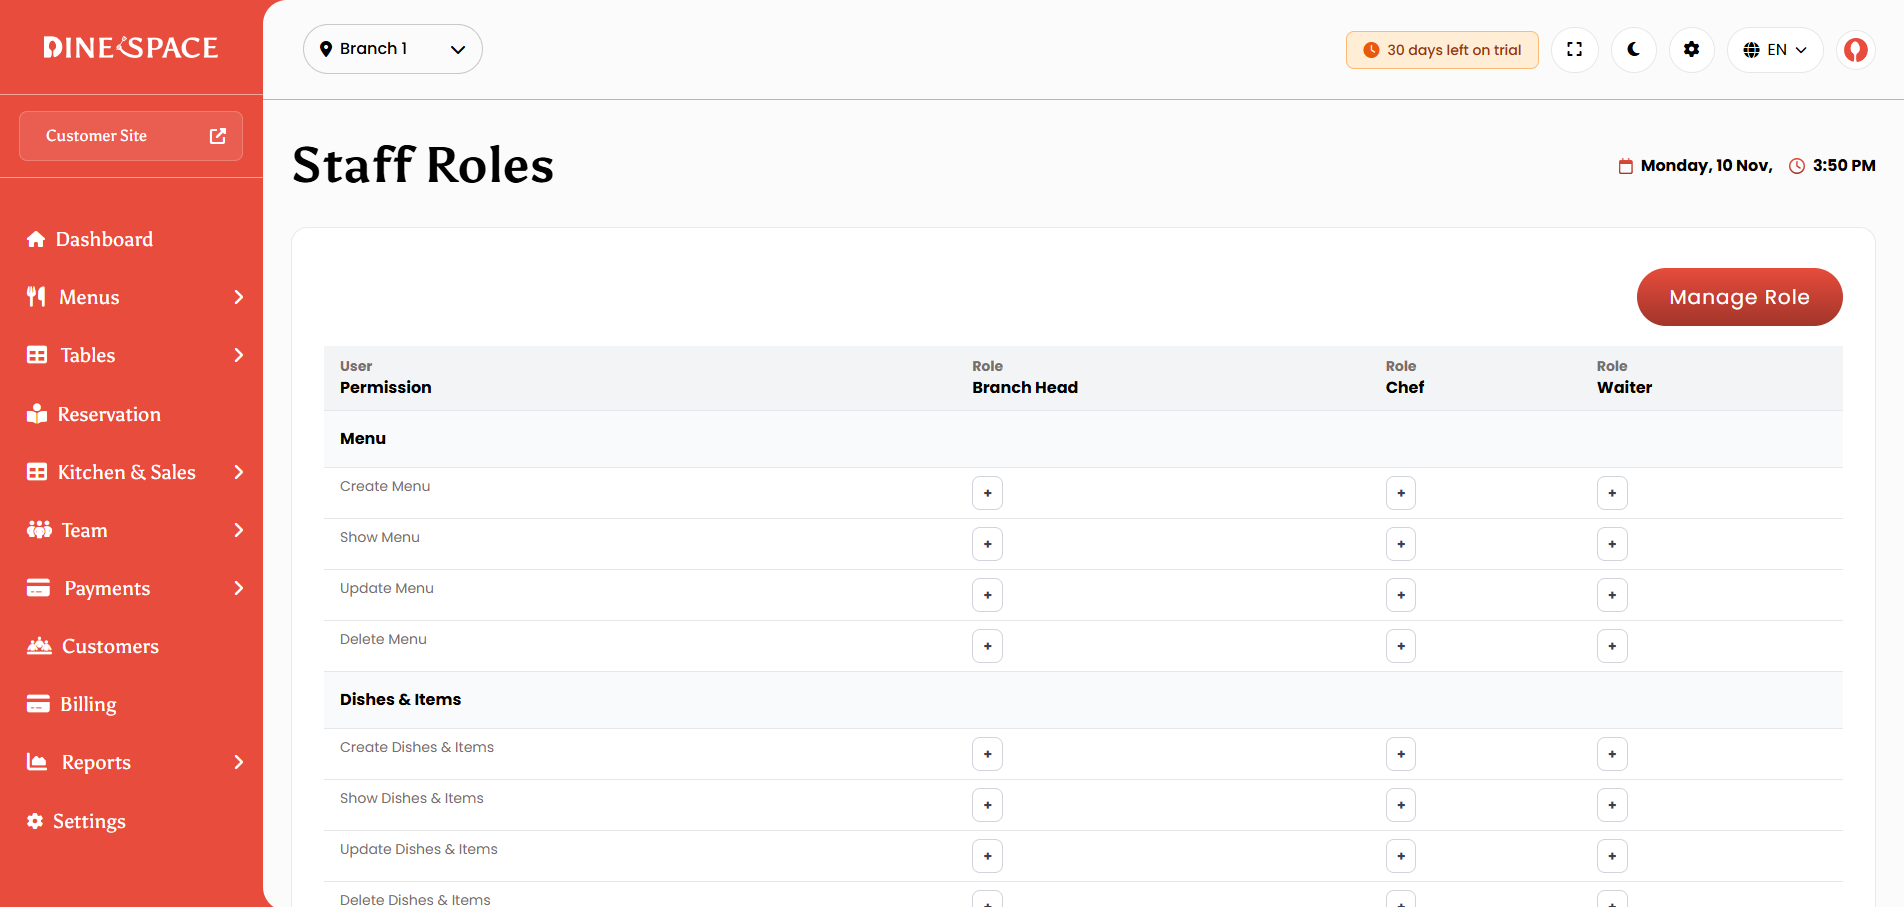
Kitchen Queue (KOT) Settings : Enable item-level status and set default KOT statuses.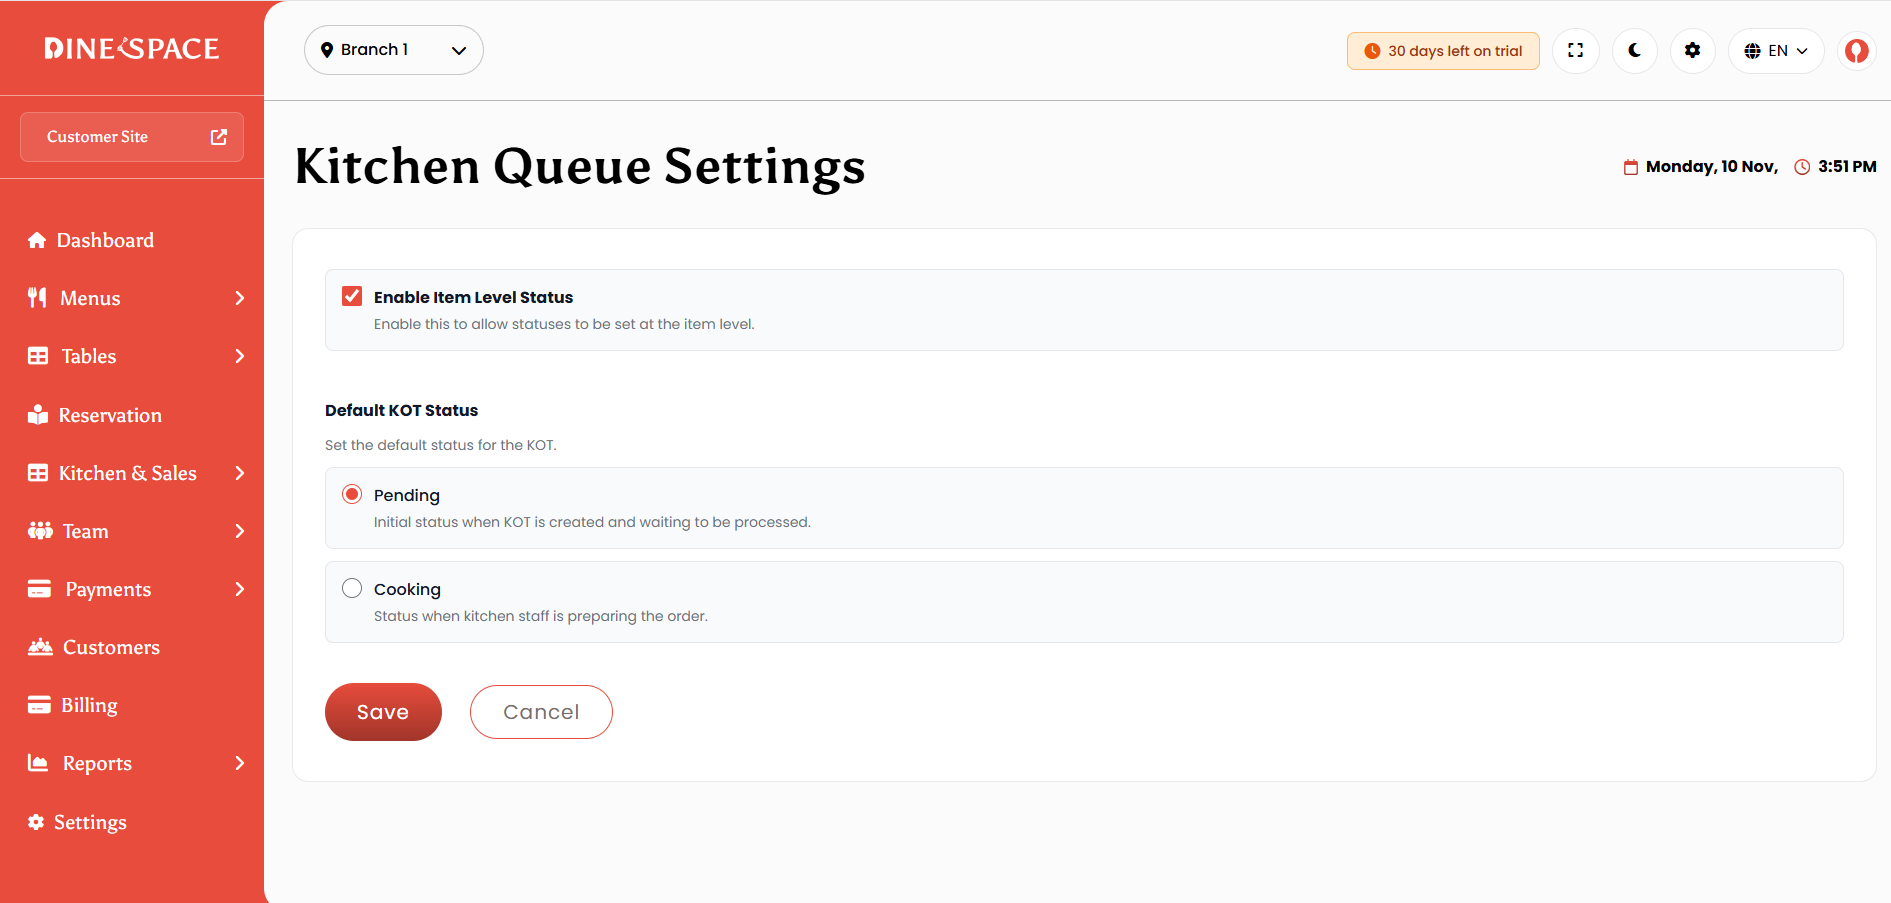
Order Settings : Configure order numbering, prefixes, separators, and length.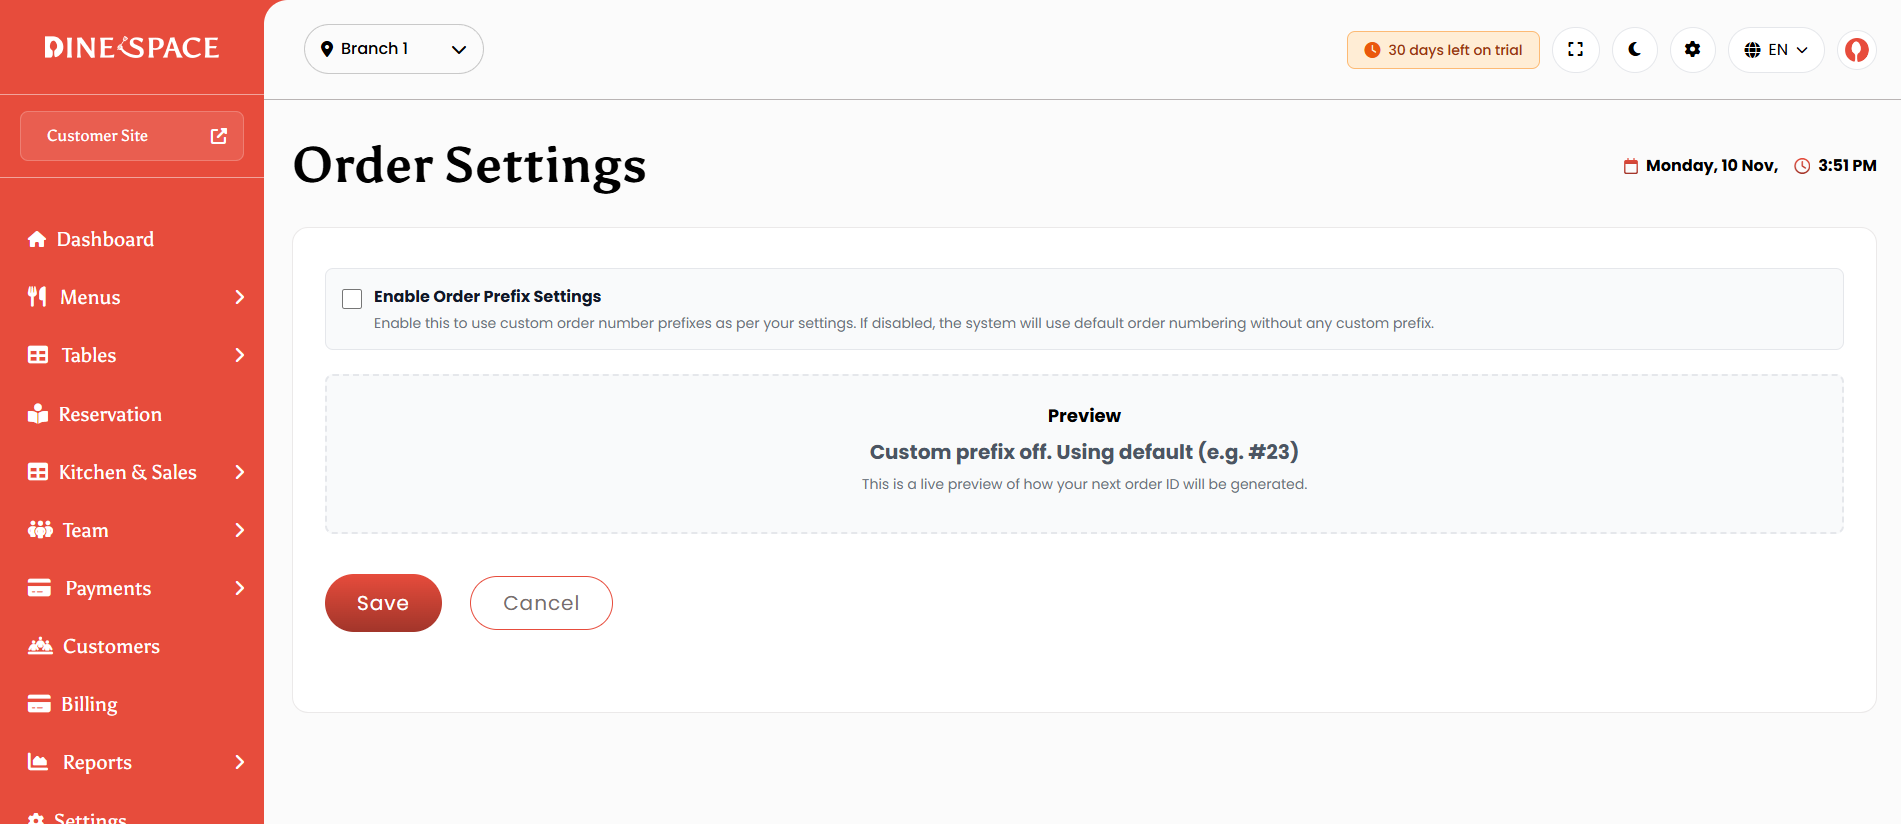
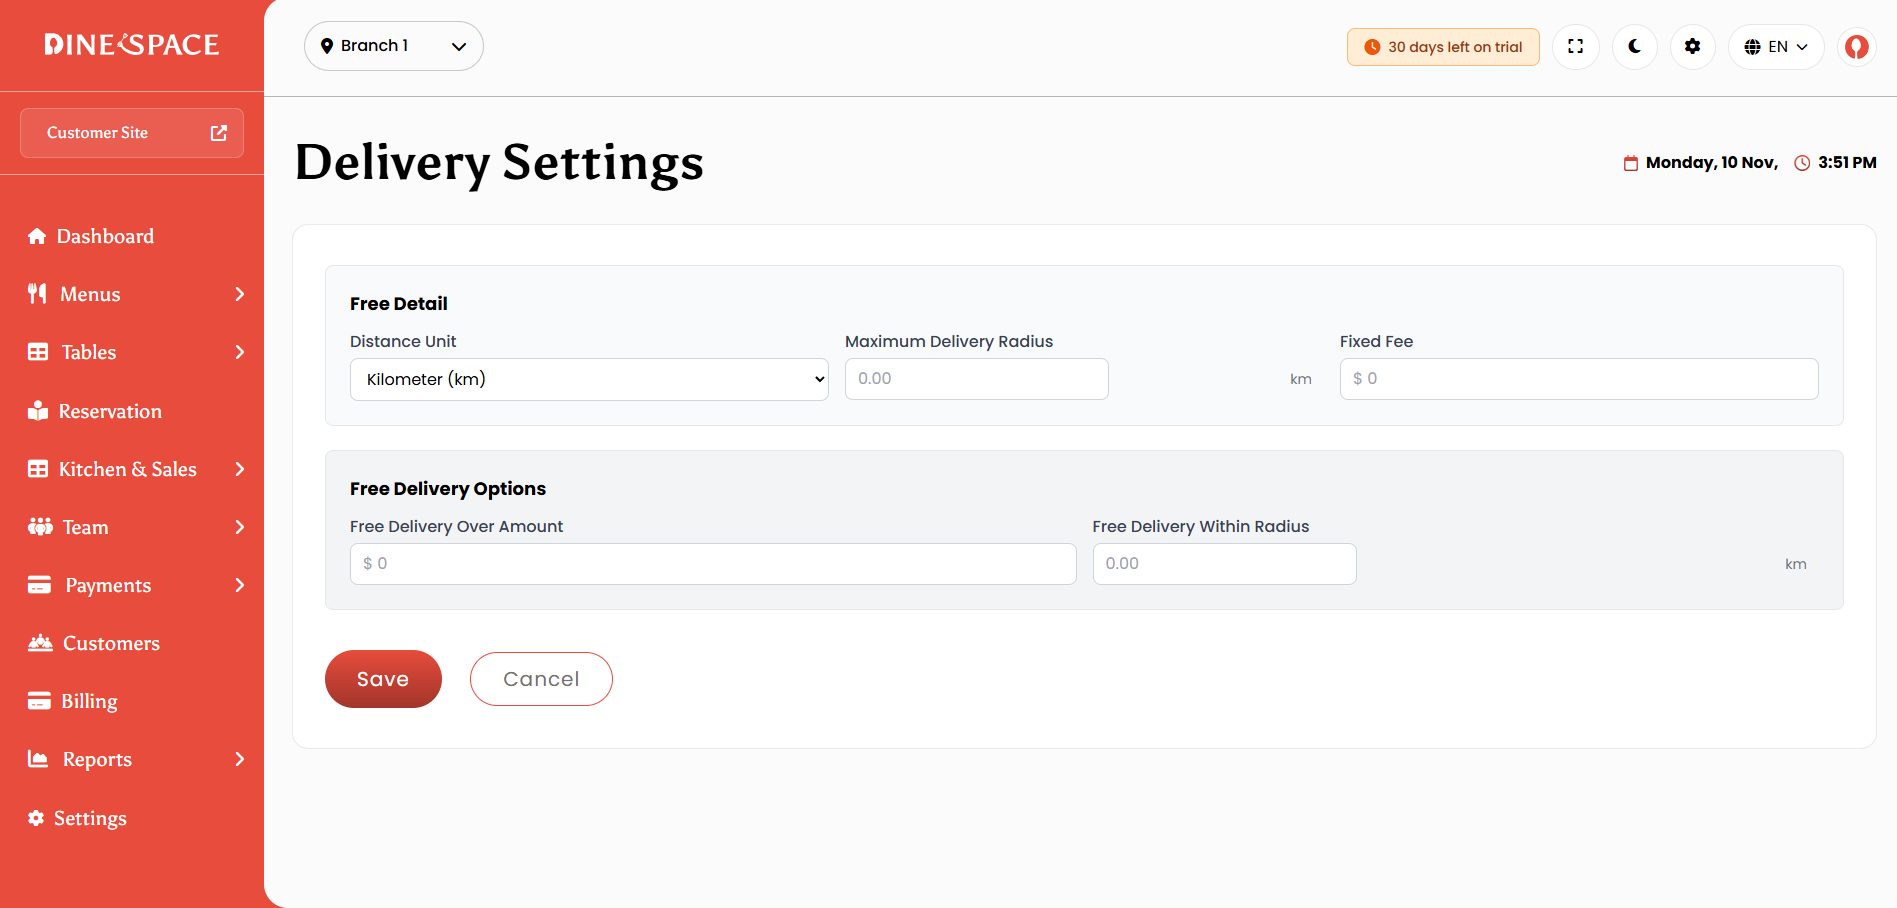
Delivery Settings : Set delivery unit, maximum radius, fees, and free delivery conditions.
Billing : View current package, subscription status, payment history, and offline payment requests.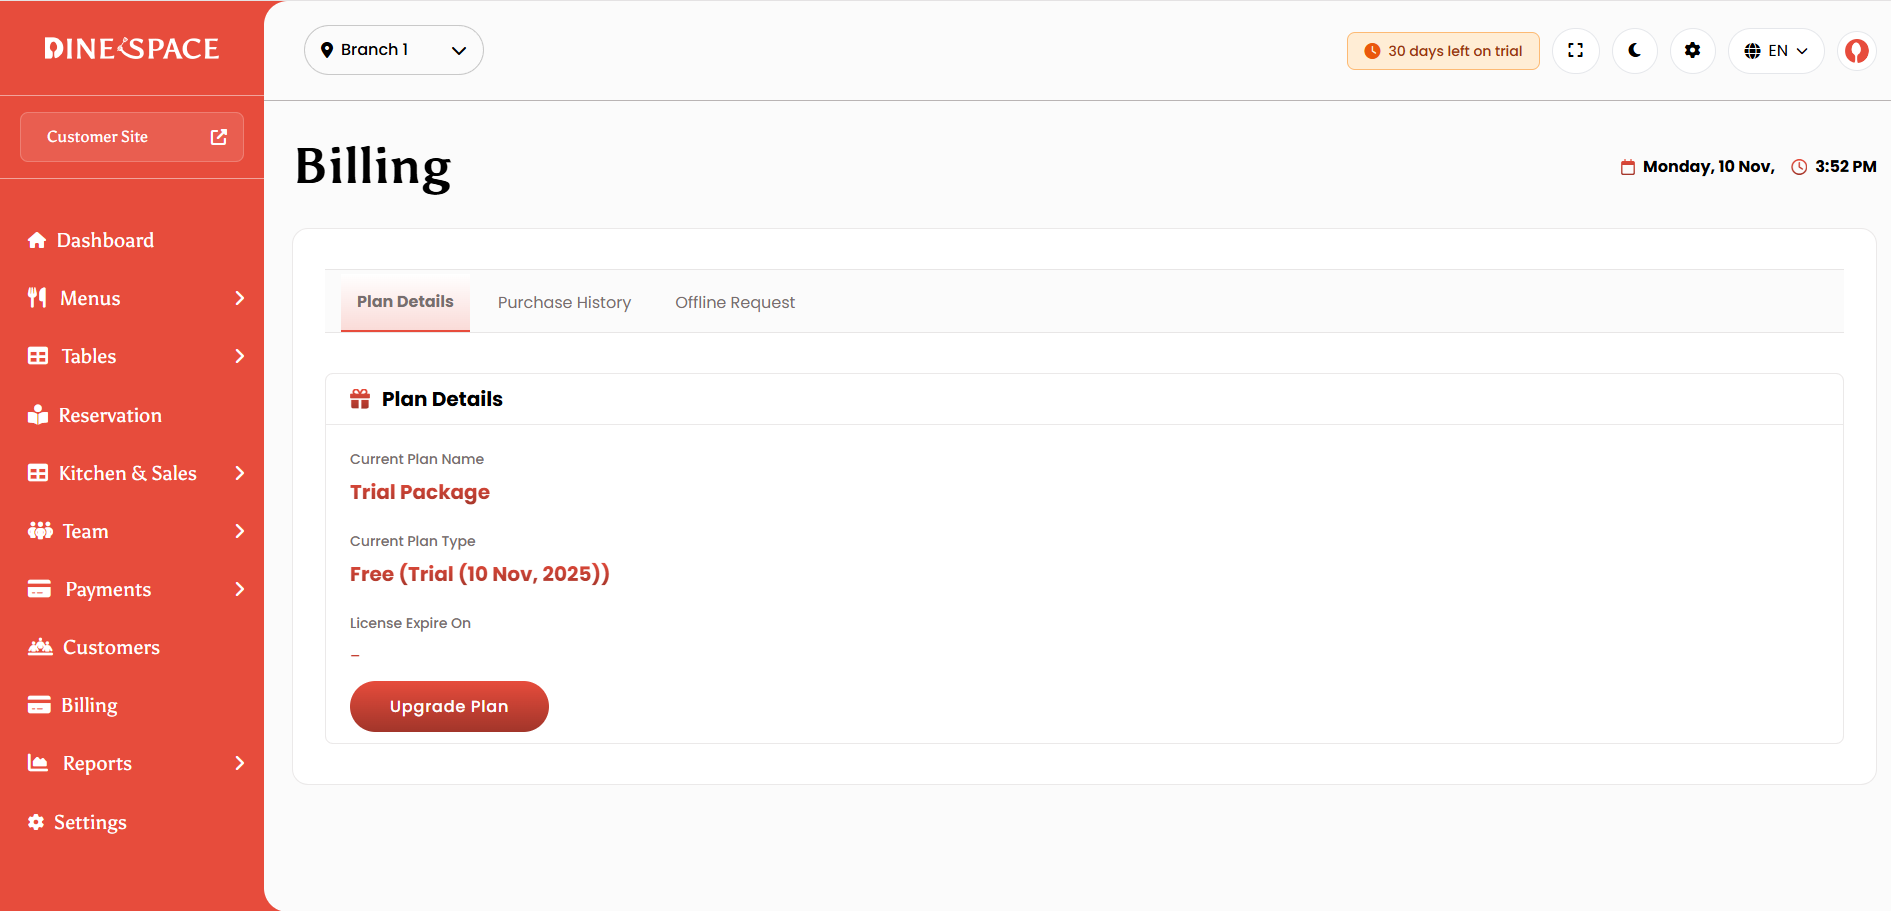
Customer Panel
The Customer Panel is designed to provide a seamless and user-friendly interface for your restaurant’s customers. It enables customers to browse menus, place orders, make reservations, and track their orders directly from their devices.
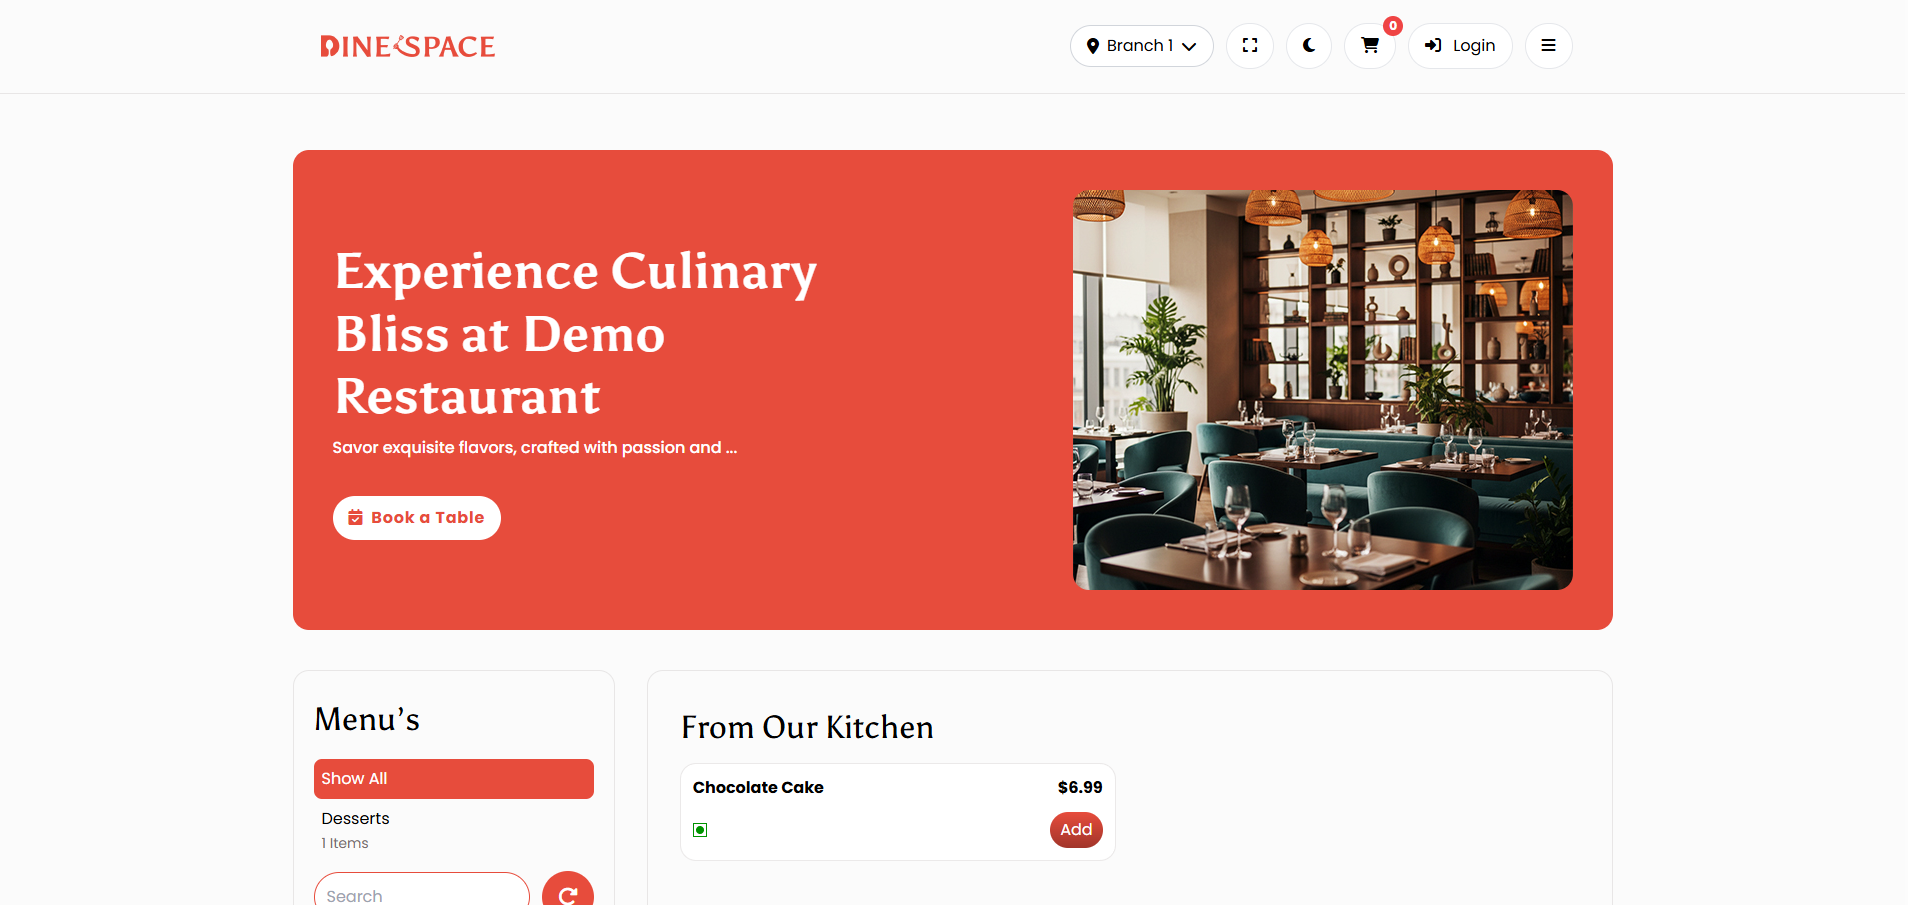
1. Customer-Facing Ordering Interface
- Customers can browse the restaurant menu in a clean and intuitive layout.
- Menu items are categorized and include images, descriptions, prices, and available add-ons.
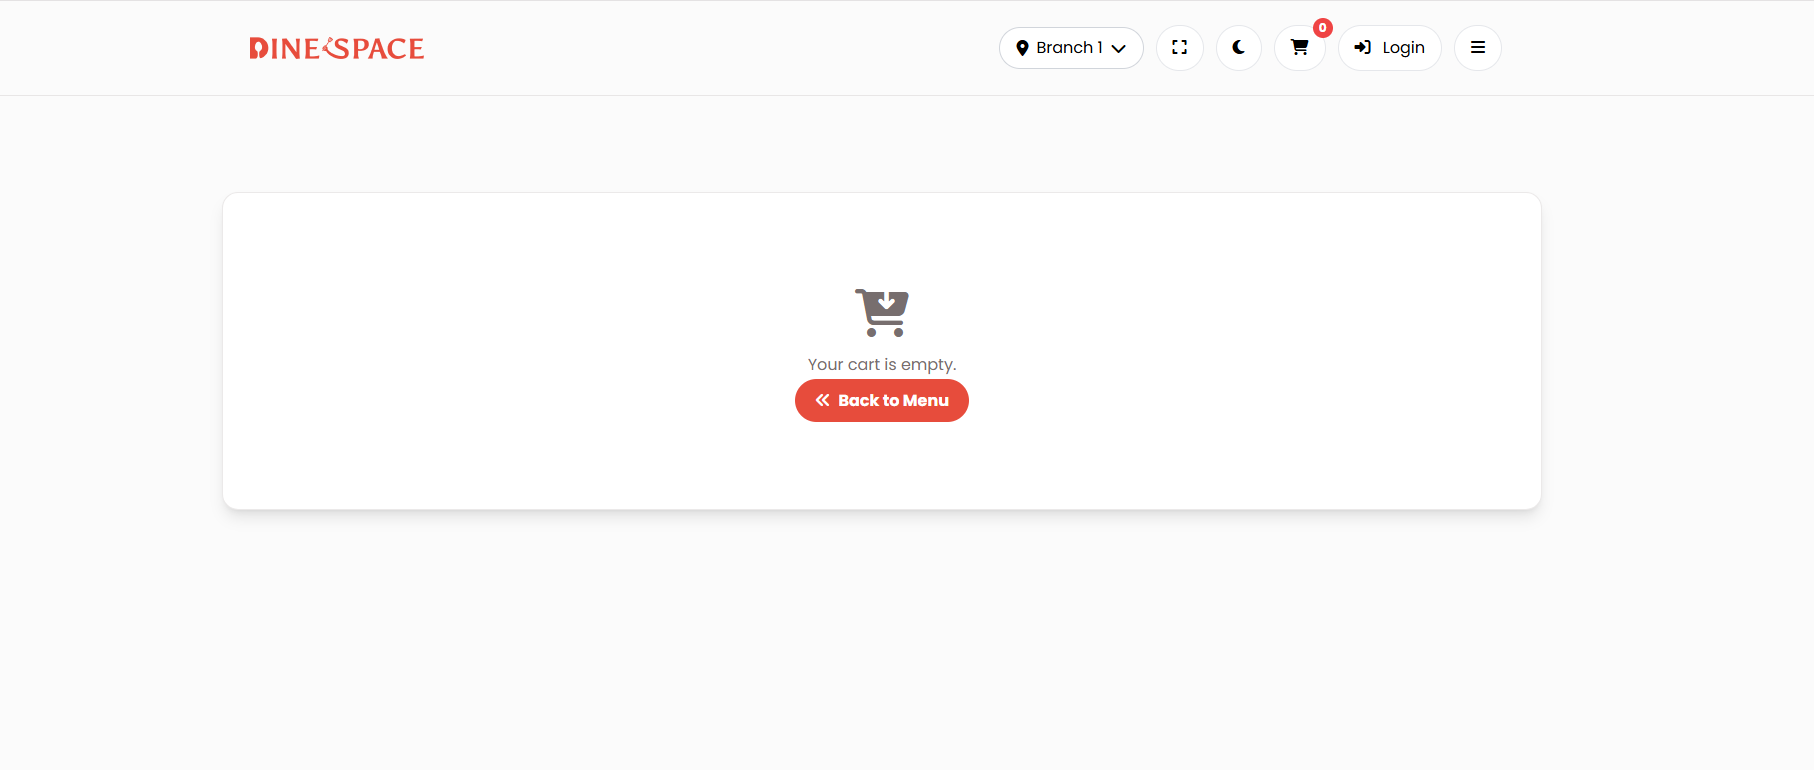
- Customers can select items, customize them with add-ons or special instructions, and add them to their cart
2. Online Ordering
- Customers can place orders for Dine in, Pickup or Delivery.
- The interface allows them to select delivery or pickup options, enter addresses, and choose preferred delivery times.
- Customers can track their orders in real time.
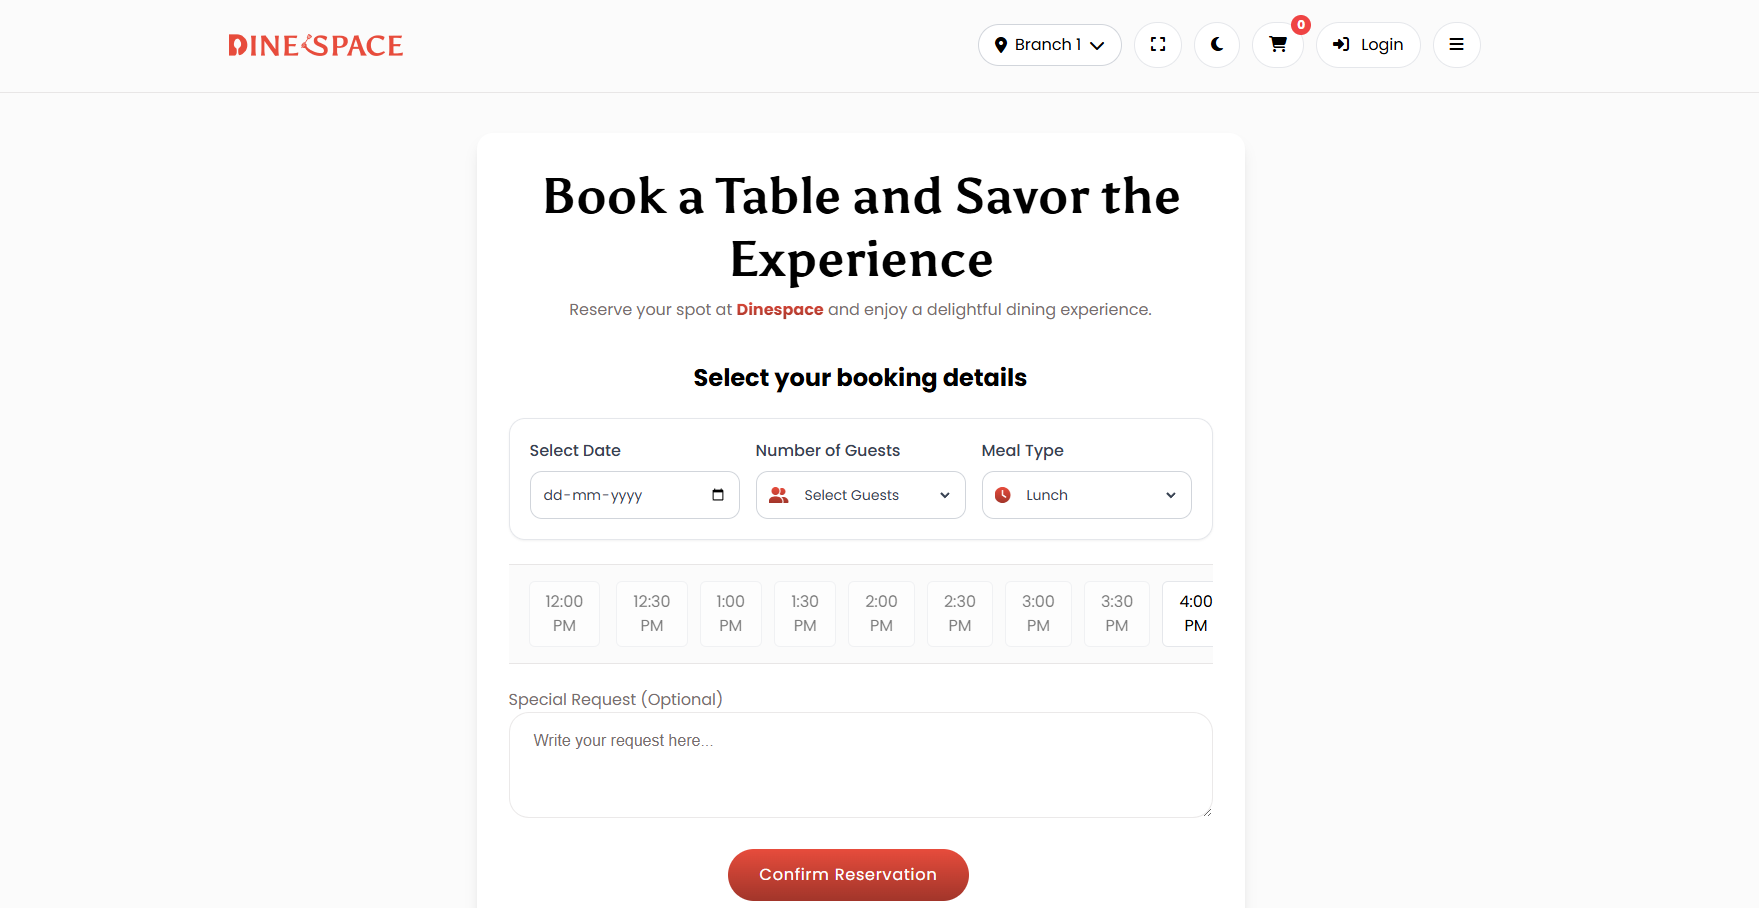
3. Reservation System
- Customers can book tables in advance by selecting the date, time, and number of guests.
- The system shows available slots and confirms reservations automatically.
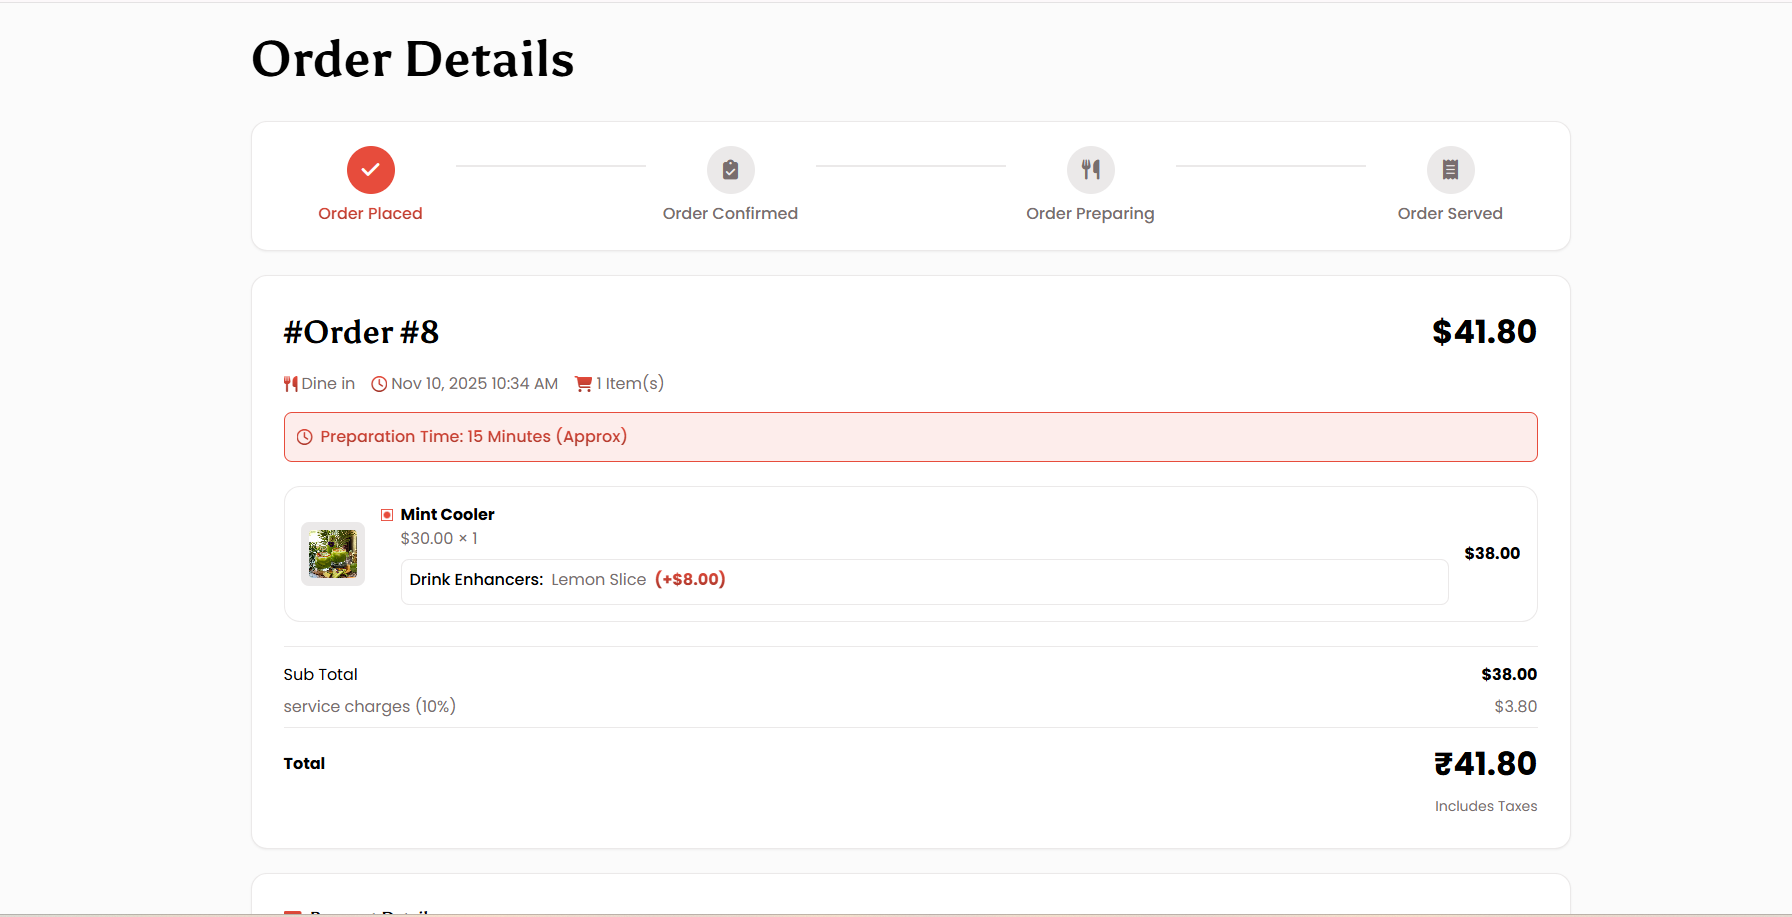
4. Order Tracking
- Customers can track the status of their orders in real time.
- Status updates such as “Order Received,” “Preparing,” “Out for Delivery,” and “Delivered” are displayed clearly.
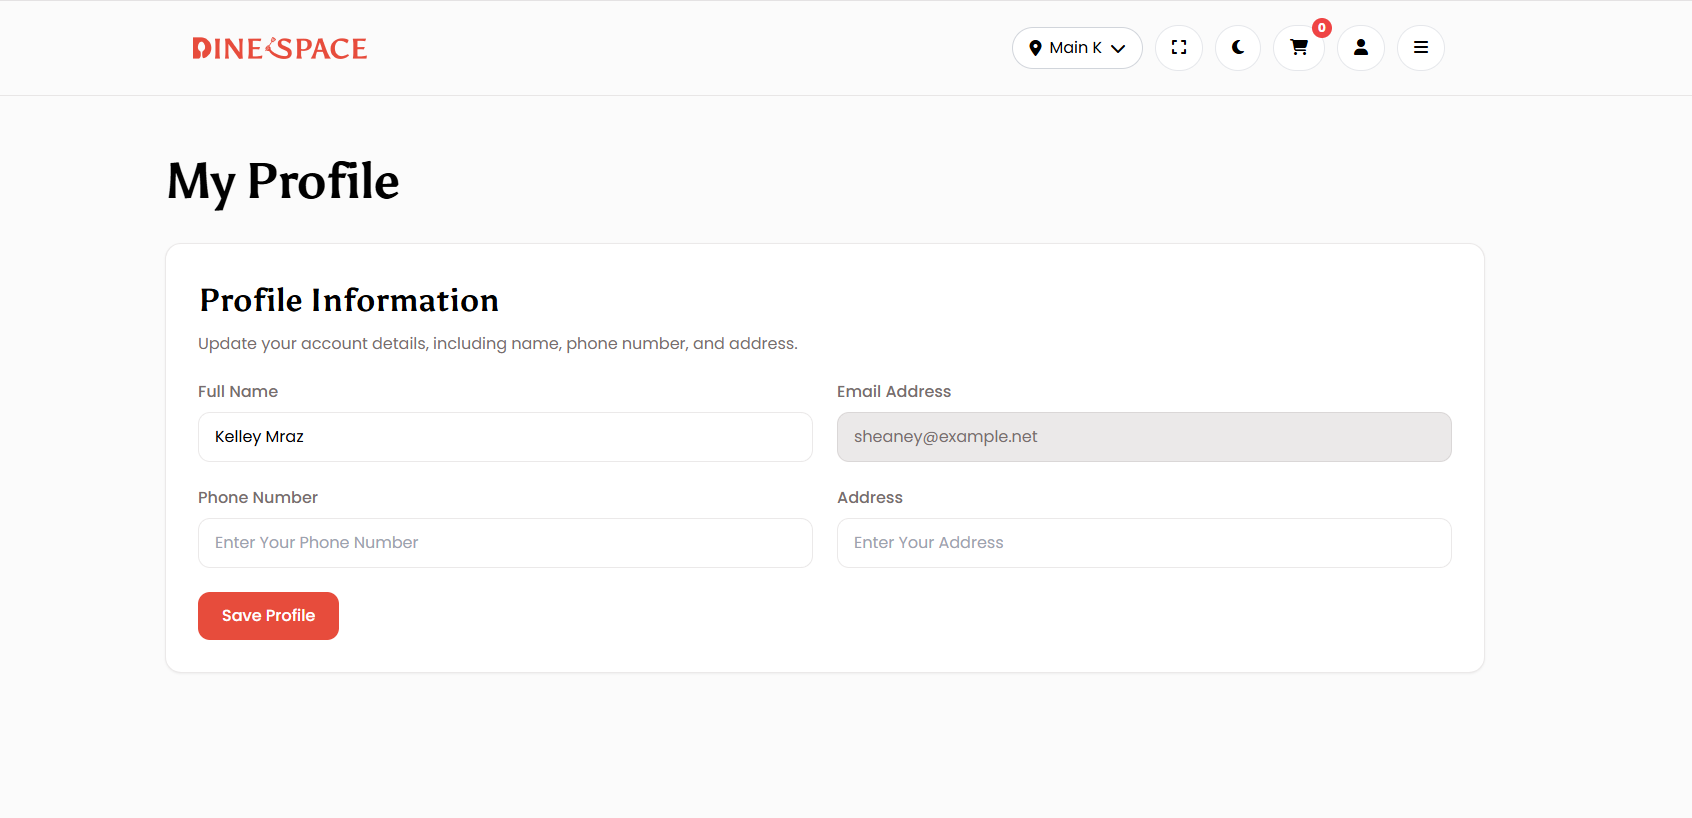
5. Account Management
- Customers can create and manage their accounts.
- Profile management allows them to update personal information, manage saved addresses, and view past orders.
Let's do great work together.
Request A Free Quotation!